
Biscayne Blouse Sew Along
Day 1: Cutting, Interfacing, & Marking
Day 2: Plackets
Day 3: Pockets
Day 4: Neckbands
Day 5: Arm Binding & Hemming
Welcome to the Biscayne Blouse Sew Along! Is everyone ready to make a shirt this week? I’m really excited about it, but this is also my first time hosting a sew along, so please bear with me! And feel free to ask as many questions as you need in the comments along the way.
Fit Testing
If you haven’t already, I recommend making a muslin to test fit. As the pattern suggests, pick your size based on your bust. If you are between bust sizes, size down (unless you want a very blousy look). For your muslin, simply cut a front and back and sew them together at the shoulders and side seams using a 5/8″ seam allowance. You can gather the neckline slightly where marked on the pattern, or just use your hands to pinch it in. What you’re really looking for here is that the shirt fits well at the bust, waist, and hips, that the length is appropriate for your height (remember to subtract 1/2″ for the hem allowance), and that the underarm isn’t too high or too low (remember to lower the underarm 3/8″ for the seam allowance). Testers were across the board with the underarm fit, so this is really a personal measurement that isn’t really affected by size. If you think the underarm is too low and will show your bra or gape open, simply raise the side seam equal amounts on the front and back. If you feel like the underarm is too restrictive, simply lower it by equal amounts on the front and back.
Interfacing
OK, let’s get started! Just for a visual, here’s the right and wrong sides of my fabric. I’m using a Robert Kaufmann dotted chambray that I bought from Finch Sewing Studio.
Cut interfacing as indicated in the directions for the right and left plackets, front and back neckbands, and either the welt or patch pocket. You can also opt to do no pocket, or put a pocket on both sides of the shirt.

Iron the interfacing to the wrong sides of each piece. If your print is directional, make sure you’re ironing the interfacing to the top of the pocket.
Marking
I’m just gonna tell you a little secret here that could probably get me fired from sewing. I use a regular old pen for marking this top. You’re marking on the interfacing on the wrong side of the fabric, so unless you’re using really sheer or light fabric it’s not going to show. For sheer fabrics I use water or air soluble fabric pencils and markers.
Mark the welt pocket rectangle on the wrong side of the welt pocket. I find the easiest way is to push pins through each corner and then mark where the pins hit the pocket.

Use a ruler to connect the dots and complete the rectangle.
Lay your right placket pattern piece next to your interfaced right placket. The placket should be wrong side up, with the top of the placket at the top if your fabric is directional.

Lay the pattern over the placket and mark lines 1-5. The easiest way for me to do this is to mark the top of the placket and then mark the bottom of the placket and connect the lines with a ruler. Line #1 is the stitch line and needs to be marked very precisely.


And here’s the MOST IMPORTANT PART. Flip the right placket over so the right side of the fabric is facing up. Make sure the top is still at the top. DO NOT FLIP THE PATTERN PIECE OVER. The pattern is designed so that it is always facing up for easier marking.


Lay the pattern on top of the right side of the placket and again use pins to mark the buttonholes.


Repeat the same steps to mark the left placket. Again, be sure that you do not flip the pattern piece over when you mark the button placement circles on the right side of the placket.


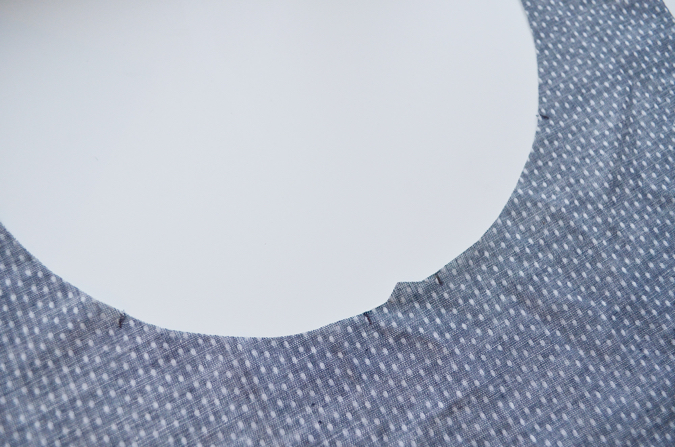
Mark the gathering stitch lines on both sides of the front and the center back. 
Use pins to mark the pocket placement on the left side of the shirt front (as worn). The red pins indicate where you’ll mark the patch pocket, the yellow pins indicate where you’ll mark the welt pocket.

For the pocket, I generally just mark two corners to help me align the pocket piece later.

Tomorrow: Plackets!
I love the comment about getting fired from sewing…haha! I also often use a regular ole’ pen when transferring markings. (I tear those tags off of pillows too – haven’t heard the sirens yet.) :)) I can only imagine how much work goes into putting together a tutorial, with all the pictures and writing out the steps, so thanks much! Your efforts are sincerely appreciated. Can’t wait to start mine.
Haha, the pillow tags! I’m guilty of so many things 🙂 Thanks for your kind words, I’m glad the sew along is helpful!
Great looking blouse. Lovely work