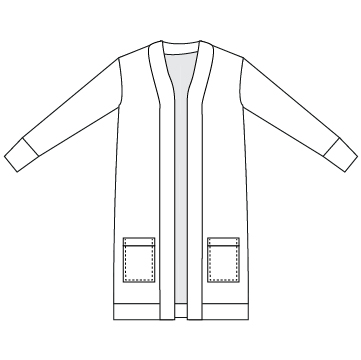
Happy Presidents Day guys! Today I’m sharing a tutorial to use your Tallinn Sweater pattern to make a long duster-style cardigan!
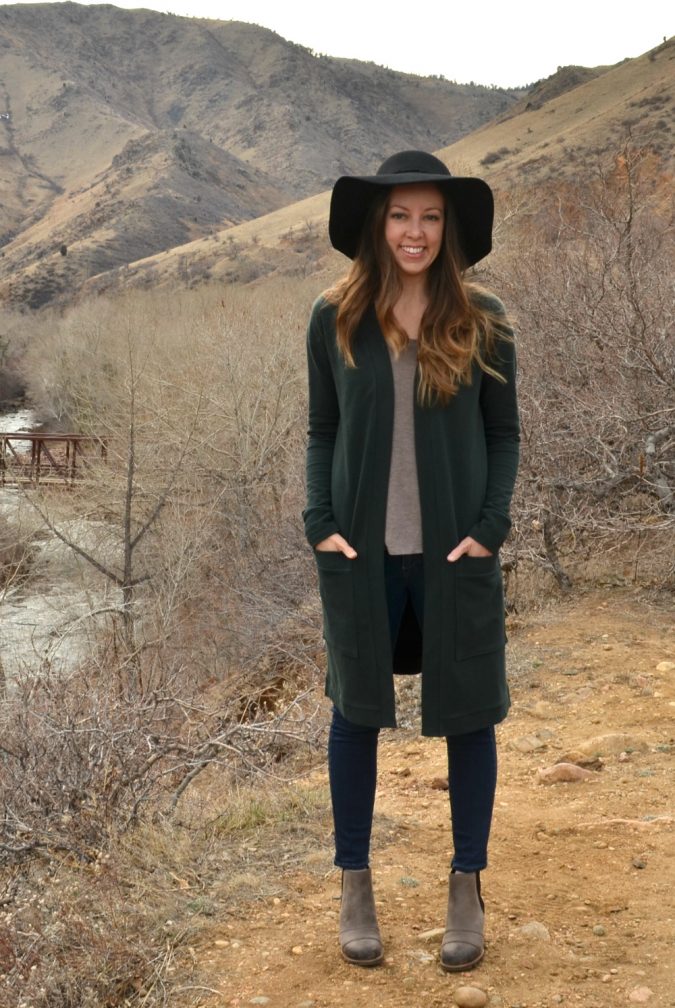
I’ve been living in this sweater since I made it a week ago – it’s the perfect “winter coat” for our mild front range winter days. This past week I actually ended up in shorts and a tank top, but this was still perfect for early morning school drop off!
I’ve been hoarding this super luxurious thick forest green french terry for awhile now. I actually bought it to make the Tallinn back when it was still in very early development stages, but I didn’t end up using it for the pattern, so it’s kind of fun that I’m using it for a Tallinn hack!
Are you ready for the tutorial? Full disclosure: you can literally use any sweater/raglan/t-shirt sewing pattern to make this. I used the Tallinn because I wanted the drop shoulder sleeve, but the Halifax, Lane, or Union would all work just as well! For fitted patterns, just be sure to grade out at the waist and hip so you have enough room since this will be layered over other clothing.
Ok, here we go. You’ll need at least 2 yards of 58″ or wider fabric (I used a full 2 yards for a knee-length size small. I would say that size L and up will need at least 2.5 yards), a ruler, rotary cutter or scissors, pins, sewing machine, and your math brain. Pay attention to each direction, because there will be a note at the end of the ones that require you to do something different in order to create the optional split in the side seam at the hem.
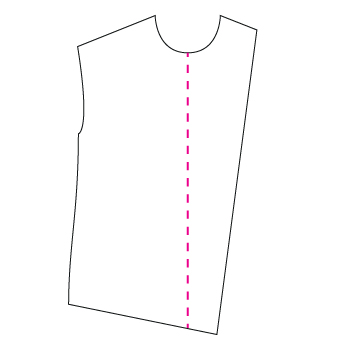
- First, find the center front line of the Tallinn Sweater pattern piece by folding it until the shoulder seams align. Cut down the center or just keep it folded. (For any other pattern, your front piece will probably already be symmetrical, so you can skip this step.
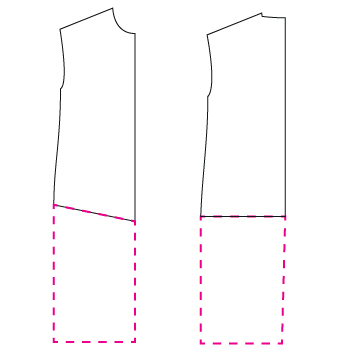
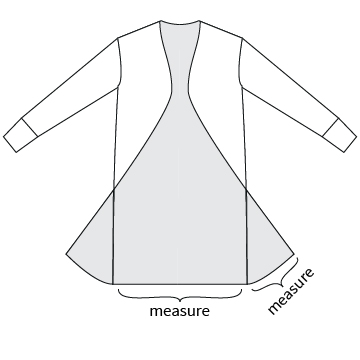
- Add to the bottom hem of the pattern piece your desired length. I added about 13″ from the side seam (I ignored the angle of the front center and just cut straight across at the hem.) Repeat to add the same amount to the back pattern piece.
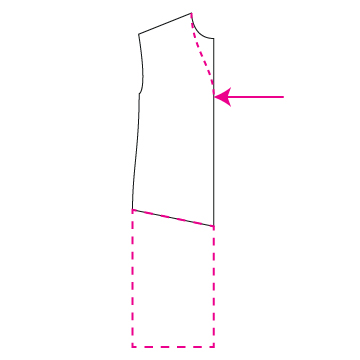
- Hold the pattern piece up to your body and mark the point that is directly on the bust line. From that point, angle the center front up to the shoulder point. You can also use a rtw cardigan as a guide to draw in this curve.
- Cut the pattern out of your fabric using the new pattern pieces. You will cut one back piece on the fold and two front pieces as a mirrored pair (cut on folded fabric or cut one, flip the pattern piece face down, and cut another). At this point also cut your sleeves and sleeve cuffs if applicable.
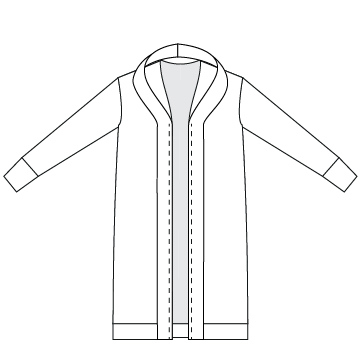
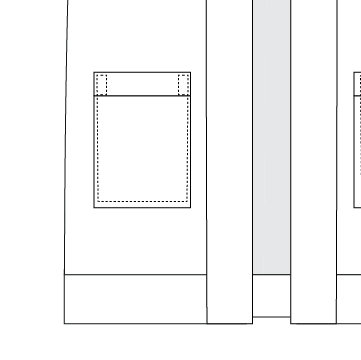
- Assemble the garment as indicated in the pattern instructions (first sew shoulder seams, then sew in sleeves, then sew the sleeves and side seams shut starting at the wrist and sewing down to the hem.) NOTE: I left the bottom 5″ of the side seam unsewn to create a split seam at the hemline. You can do this or sew all the way to the hem depending on the style you’re making.
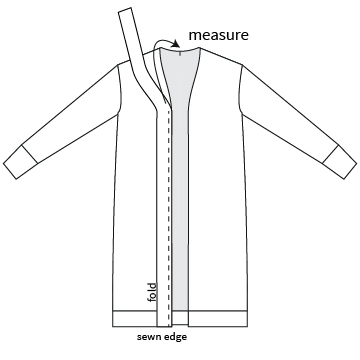
- Measure the hem of the front of the sweater and the back of the sweater.
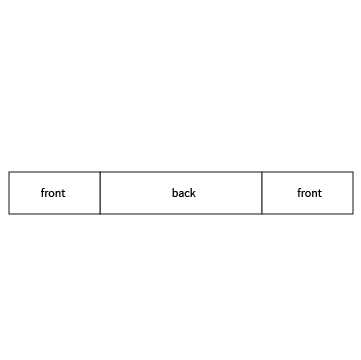
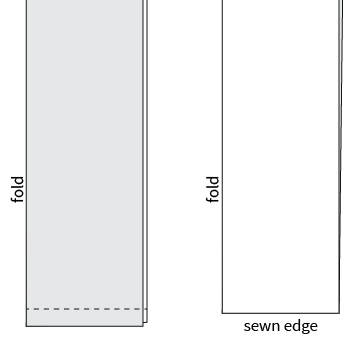
- Cut 2 bands that equal the front of the sweater in length, plus 3/8″ for a seam allowance and one band that equals the back of the sweater in length, plus 3/4″ for seam allowance. The height of the bands is up to you. Once you decide how tall you want the finished band to be, multiply it by 2 and add 3/4″ for seam allowances. I cut mine at 3 3/4″ so they would have a finished height of 1 1/2″. Sew the three bands right sides together into one long strip, with the two fronts on either side of the back piece. NOTE: if you are creating the split hem, do not sew the bands together.
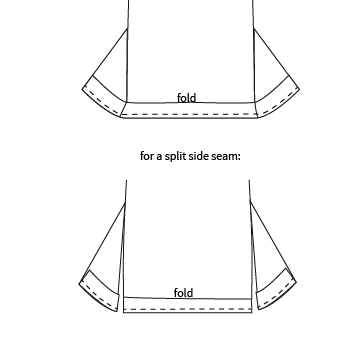
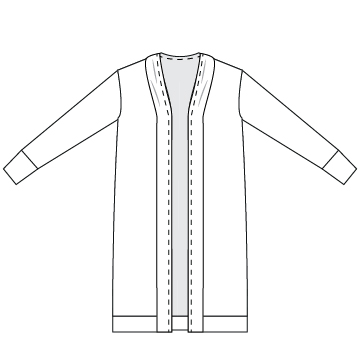
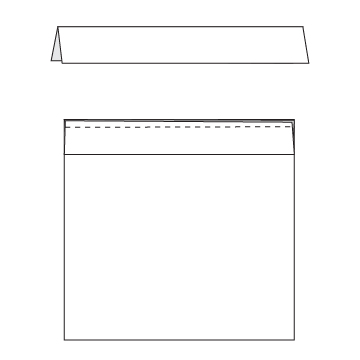
- Fold the band in half lengthwise, wrong sides together. Press. Matching the side seams, pin the band to the sweater hem, with all 3 raw edges aligned. Sew the band to the hem from center front, around the back, and back to center front. NOTE: If you’re creating the side split hem, sew each band to each corresponding sweater piece individually at the hem, as indicated in the second illustration.
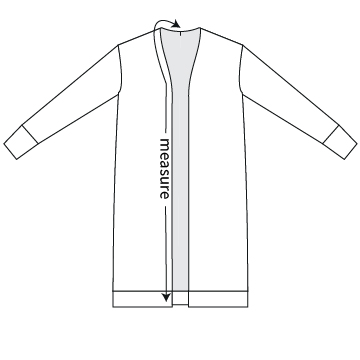
- Flip the band down and press well. For the side split hem, turn the seam allowances toward the inside on the band and sweater and press, then hem the split with a straight stitch. Take a couple stitches perpendicular to the side seam as you cross over it. Measure from the bottom of the hem band up to the center back of the sweater neckline. Cut two strips of fabric to that measured length. The width is also up to you. I made mine the same width as my hem bands (3 3/4″ for a finished width of 1 1/2″).
- Press one band in half right sides together just at the very bottom (what will become the center front hem). Sew across the bottom of the band with a 3/8″ seam allowance. Turn the band right side out and press well. Continue to press the entire band in half lengthwise. Repeat this step for the other band.
- Pin the finished sewn edge to the sweater hem, aligning all three raw edges. Without stretching the band or the sweater, continue pinning the band to the center front all the way up to the bust line where the sweater starts to curve inwards. Sew the band to the sweater up to that point. Repeat for the other side of the sweater. Measure the remaining distance from the bust point up to the center back neckline.
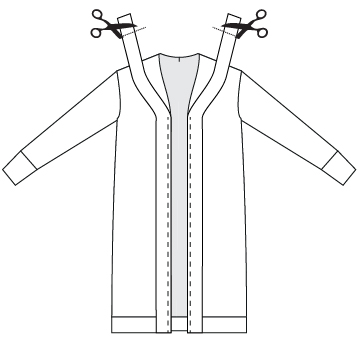
- Multiply that measurement by .85. For example, on my sweater the measurement from center front bust line to center back neckline was about 16 1/2″. After multiplying by .85, I got about 14″. Add 3/8″ to this length for seam allowance. So my final measurement was 14 3/8″ but it will be different for other sizes. Measure the remaining unsewn band from the point you stopped sewing and cut it to the new measurement you just calculated. You’ll only be cutting off a couple inches. (The reason you need the band to be shorter than the sweater at this point is because it needs to pull the sweater in around your neck just like a traditional t-shirt neckband. If you skip this step, the band will stand up around your neck and be wavy.)
- Unfold the bands to their full width and sew the cut ends right sides together with a 3/8″ seam allowance.
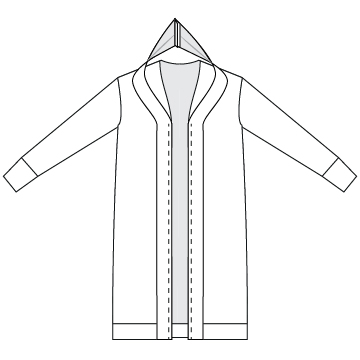
- Refold the band in half and pin the seam in the band to the center back neckline of the sweater. Stretch the band until it equals the length of the sweater, pinning at regular intervals.
- Sew the rest of the band to the sweater around the neckline and down to the bust line, stretching as you sew between pins. Be sure that the band is stretched equally on each side of the sweater so it doesn’t become bunched up in one area. Flip the band up and press well. Steam around the neckline to eliminate any gathering.
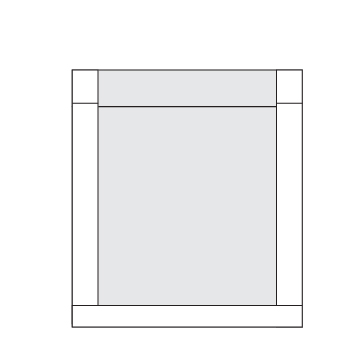
- I made a nice big pocket close to the hem on my sweater, but this is totally optional. You can make a patch pocket however you prefer, but this is how I made mine. First use a ruler to measure about how wide and tall you want your pocket to be. Mine is 8″ tall by 6″ wide. First make the top band of the pocket: Cut a strip of fabric to the desired width plus 1″. The height will depend on how high you want it to be. I kept the same 3 3/4″ as the rest of the bands on my sweater. Press the top band in half wrong sides together. Cut the main part of the pocket to the desired width plus 1″. The length will involve a bit of math because you need to decide how tall you want the finished pocket to be, then subtract the finished height of the band minus seam allowances, then add a seam allowance at the top and a hem allowance of 1/2″ at the bottom. I wanted my finished pocket to be 8″, so I first subtracted the 1.5″ of my finished band, which gave me 6 1/2″. Then I added 1/2″ for the hem and 3/8″ for the top seam, for a total height of 7 3/8″. So my final pocket pattern piece was 7 3/8″ tall and 7″ wide. Sew the band to the top of the pocket piece right sides together, aligning all three raw edges.
- Flip the band up and press well. Press the sides and bottom of the pocket toward the wrong side by 1/2″.
- Pin the pockets where desired on your sweater. Mine is about 1 1/2″ away from the center front band and about 6″ above the hem. Sew around the sides and bottom of the pockets to attach them to the sweater.
- If desired, secure the tops of the pockets by sewing reinforcement triangles or rectangles.
And that’s it! Your new duster cardigan is finished! I love how it looks layered over a casual tee, skinny jeans, and a great pair of boots, but it would also look fab over a button down and pencil skirt. Lots of ways to style this cozy wardrobe staple!
If you make your own, I’d love to see it! Share it on Instagram with #TallinnSweater or #HeyJunePatterns or, join my really fun and supportive FB group and share pics there!
Happy pattern hacking!







ahhh! this is so good. I want to make one right away – now to dig through and see if I have fabric for it already or if I need to go hunting. 🙂
Thanks for this excellent tutorial!
Super hack, love this idea. Thank you
This is my favorite hack thus far!!! <3
Amazing hack, very generous share of you. Thanks
Great tutorial! Thanks very much for sharing this. My brain is whirling with ideas now.
Love this! I need to start buying 3 yard pieces, haha!
What?!? No way! I was just thinking today I wish you had a pattern for something like this. Here I sit with 3 different patterns you made that I could hack. Yeeees!!!!
I just made one using the Union too! I’ll blog it soon 🙂
Love this and was just thinking I would like to try it with the Union Tee. How did it go for you using the Union?
Great! You can see it here: https://www.heyjunehandmade.com/hudsons-part-1/
Five minutes hack. Good job