
Sandbridge Sew Along Day 1: Fitting
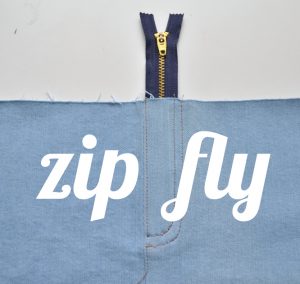
Sandbridge Sew Along Day 2: Zip Fly
Sandbridge Sew Along Day 3: Pockets
Are you guys ready to dive into your Sandbridge Skirt sewing? I promise this won’t be bad! Just take your time and don’t try to do it all in one sitting.
Things to note:
- This sew along is meant to be used in conjunction with the instructions. While it may be easier for some to follow with the pictures and conversational directions, the pattern itself has more technical information, so be sure to read through the pattern first.
- If this is your first time doing lots of topstitching I recommend using a colored or printed fabric so it isn’t very visible, or using a topstitch thread that matches your fabric. That will take SO much pressure off.
- In this sew along I used denim I had on hand because I loved the bleached out color. However, this denim was really best suited to jeggings or possibly a denim bikini. It is SO ridiculously stretchy. You’ll be able to see through this sew along how that stretchiness negatively affected my results. My first two skirts were on regular stretch denim, like 98% cotton, 2% spandex and they worked out so much better. In terms of construction and top stitching, zero stretch will yield the best results. Just another thing to keep in mind if this is your first time. No matter what, yours will look better than mine because of this crazy stretchy fabric, so you can already be happy about that!
- Consider the fabric that you chose and if you want your topstitching to stand out as a design feature or not. Depending on those factors, decide up front how you’ll use bartacks and topstitching around the fly, front pockets, and back pockets to either blend in or stand out. Check out all the rtw denim pieces you have to get ideas!
- I will be using a serger to finish all seams in this sew along and I recommend you use one too. If you don’t have one, a faux overlock stitch will also work. Whenever you finish a seam in this pattern do not trim any excess off with the serger knife.
Today we’re primarily going to work on the zip fly, but before we can do that we need to do a little prep work. First, cut out all the pieces according to pattern directions and transfer all markings and cut all notches where indicated. Remember to add an inch to the length if you plan to sew a double turned-up hem instead of leaving it raw.
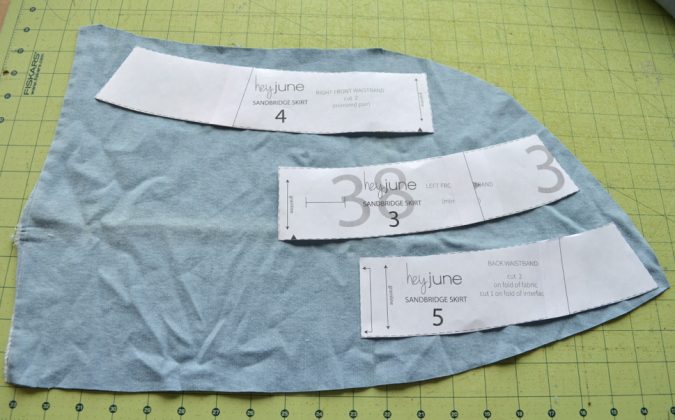
For the waistband, I’m going to show you an easy way to cut the pieces with the interfacing to save a step and ensure accuracy.
First, lay your waistband pieces on top of your fabric, both of them right sides up. Make sure you have enough fabric to cut all three pieces (remember the back is on the fold!) and then cut just enough fabric to accommodate the three pieces.
Lay the fabric right side up on the fusible interfacing with the sticky (fusible) side of the interfacing facing up. Fuse the entire piece of fabric to the interfacing and cut around the piece to remove the excess interfacing.
Lay your pattern pieces back on top of the fabric with the pattern pieces facing right side up and cut out each piece. Again, remember to cut the back on the fold! Now your waistband pieces are perfectly interfaced! The other set of waistband pieces will be the waistband facing. You may also choose to cut those out of a different fabric since it will be hidden inside the skirt. REMEMBER to cut the waistband facing with the pattern pieces facing down so they will be mirror images of the waistband. This only applies to the two front pieces since the back is on the fold.
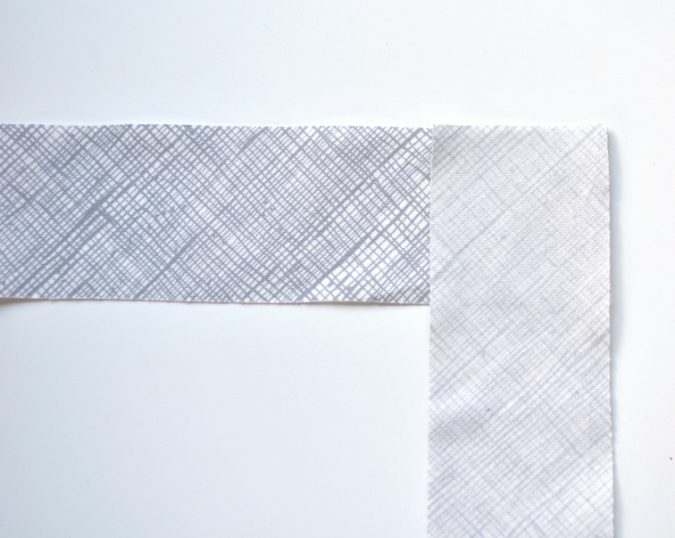
The next bit of prep work is to make the bias tape if you’re not using store-bought tape. If you don’t want to cut one long continuous piece, follow the pattern directions to divide your low waist measurement in half and cut two bias pieces. To sew them together, place them right sides together at a 90 degree angle just like the picture below.
Sew them together starting at the top left corner and sewing down to the bottom right corner of the square where they overlap. Sometimes it is helpful to draw this diagonal line using a pencil and ruler to ensure accuracy.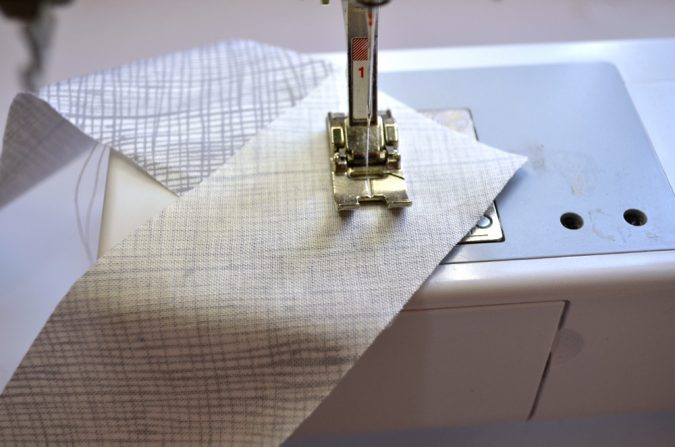
Trim the seam allowances to 1/4″ and press them open. Set your bias tape aside for now.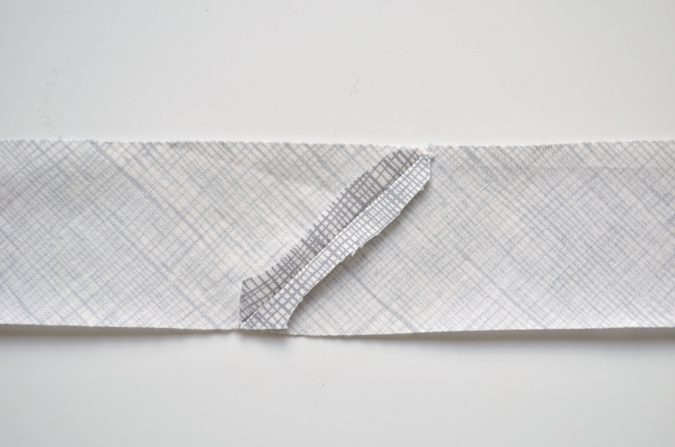
The next step is to choose your top stitching thread. Remember that this color will show, and depending on how fancy you decide to go with your top stitching and if you use double stitches, it’ll be quite prevalent. I get these amazing large spools of top stitching jeans thread from Wawak, and they’re very cheap. I can’t imagine running out of any color in my lifetime. These colors are black, dark navy, and garbardine. Garbardine is my favorite to get that classic contrast jean stitching without it appearing to be super gold or yellow.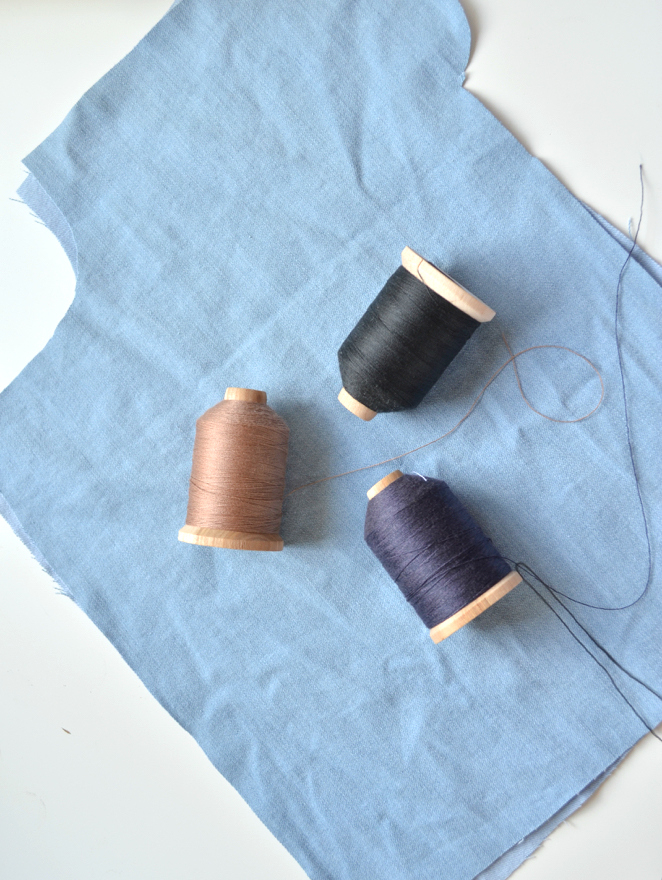
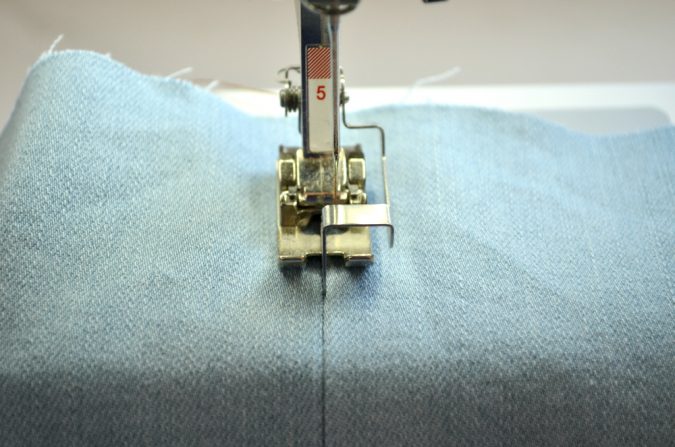
A great idea to both choose a color and test out your settings is to run a few line of stitches on scrap fabric. Make sure to sew on the cross grain to give the thread the best visibility. I increase my stitch length from 2.4 to 2.8 when I top stitch for this pattern, but use this opportunity to find what works best for you and your machine. Just remember to be consistent in lengthening your stitches when you switch to topstitch thread and returning them to normal when you use regular thread for the construction seams.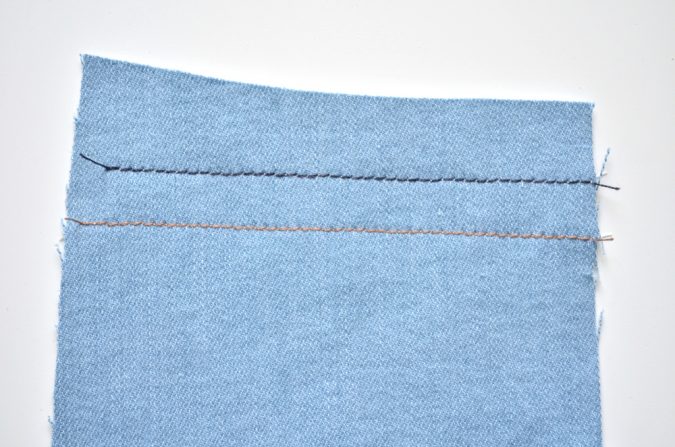
I recommend using a topstitch needle with this type of thread. If you want to continually change out your needle throughout this project, you can use a jeans needle for all construction seams and a topstitch needle for all top stitching. I’ve made three skirts now with only a topstitch needle and haven’t had any issues whatsoever. You’ll be changing out your thread often enough, save yourself some work. 
Once you’ve picked your top stitch color, pick another all-purpose thread that closely matches your skirt and use that to load your bobbin. You will use all-purpose thread in the bobbin for the entire project.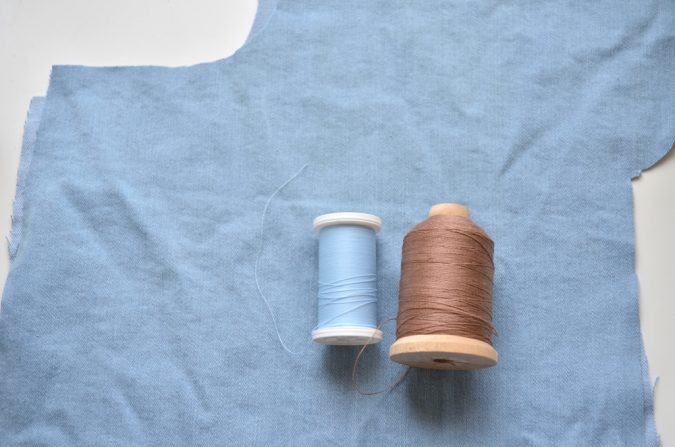
Ok, let’s sew!!
Align the two front pieces right sides together along the fly extension. If you haven’t already, mark the basting stitch line. You can use a regular pencil for this, it won’t show.
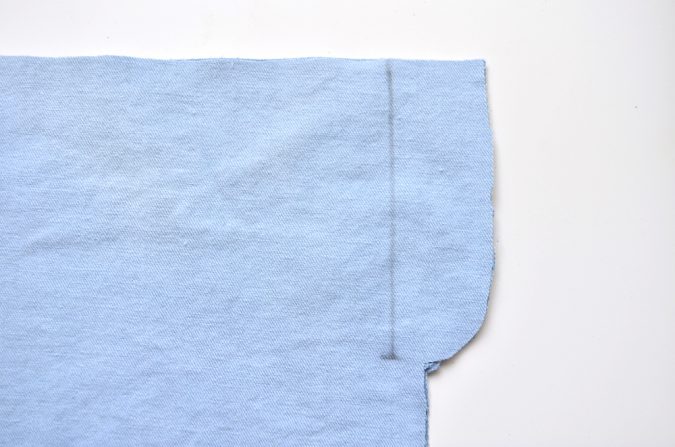
Sew down the basting stitch line using a (duh) basting stitch. This is the longest stitch length your machine offers with no locking of stitches at the beginning of the seam. When you reach the end of the basting stitch line, switch your stitch length back to normal and then start sewing a regular seam all the way down to the hem. Backstitch as you begin and end this seam. For reference, at this point you should be using a 1/2″ seam allowance.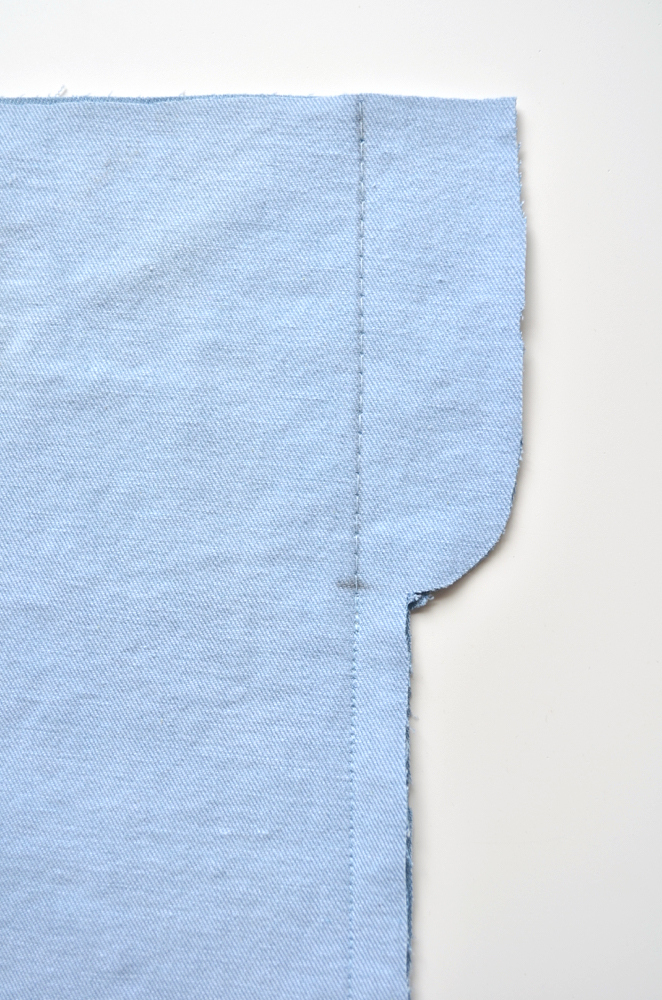
Press the fly open. Clip the seam allowance just under the fly to release them and press those seam allowances down toward the left.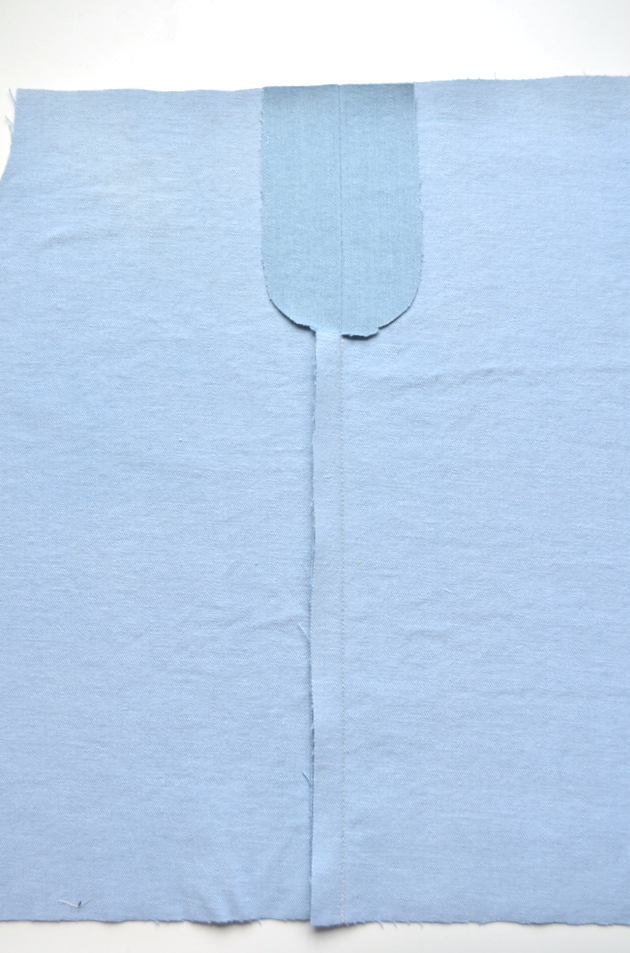
Finish the left fly and both seam allowances below with a serger or faux overlock stitch. If serging, leave long serger tails on both ends of each seam. (I’ll stop saying it after this, but it is crucial that you do not trim off any of the seam allowance with your serger.)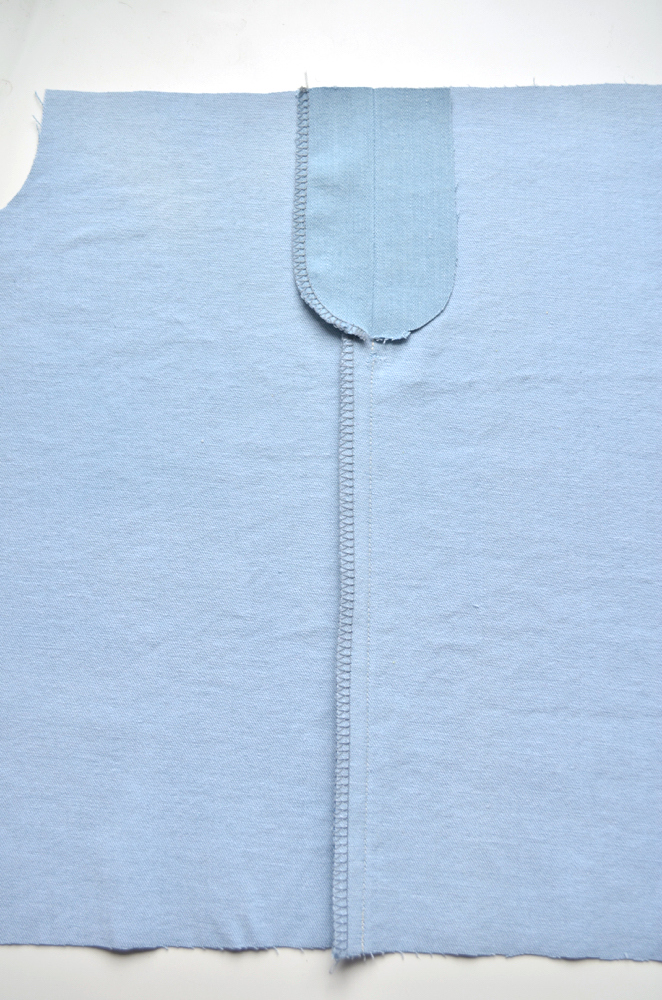
There are several places in this pattern where a serged seam will not be later enclosed. In each of these instances, use a wide-eye hand sewing needle to thread the serger tails…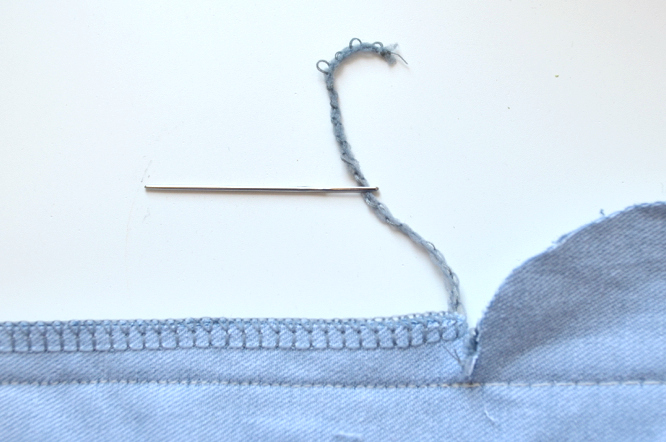
…and bring them through the serging stitches to secure them in place.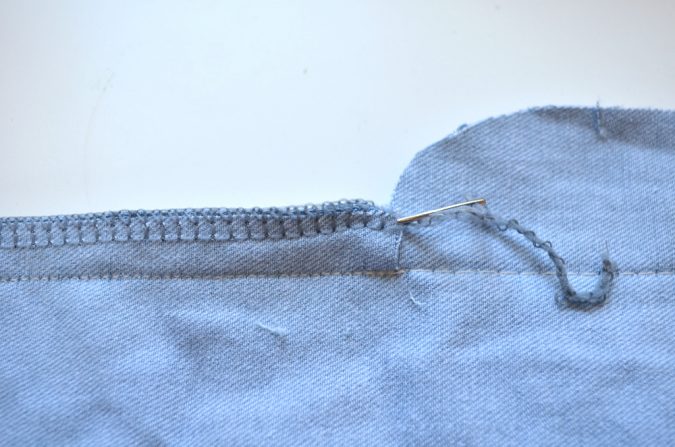
When you run out of serger thread tail, bring the needle back up through the seam. This technique is very important around the hem of the skirt if you intend to leave the hem raw and fraying.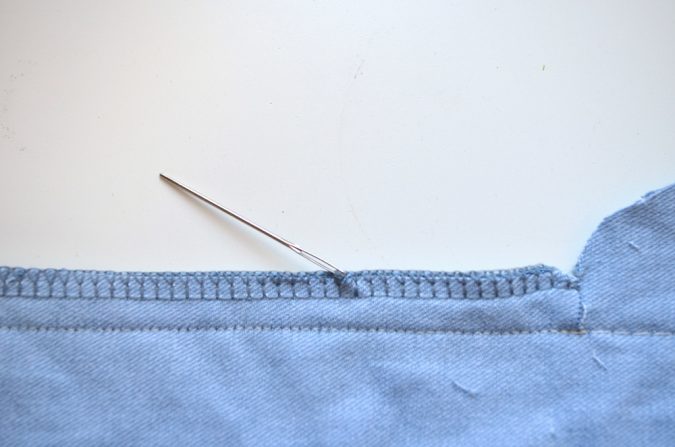
Use a ruler to draw a line 3/4″ from the center seam on the right fly.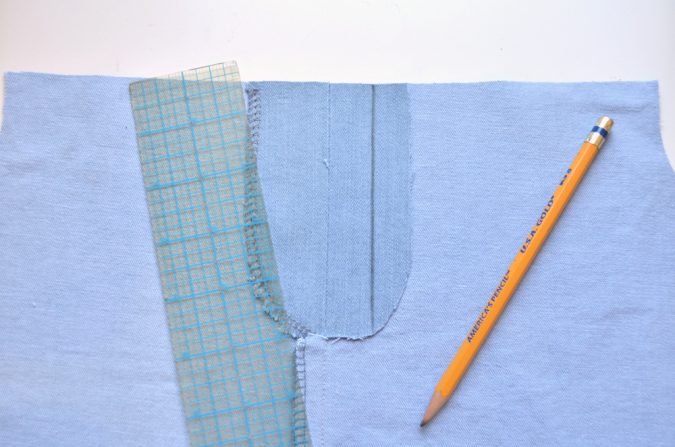
Cut along the marked line. If desired, serge this edge as well to keep it from fraying. It will be sandwiched between two other pieces, but the raw edge will still be able to fray.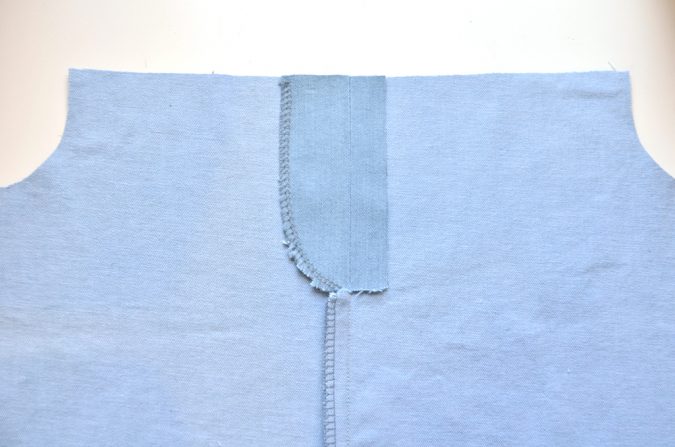
Flip the skirt over to the right side and switch to your topstitch thread. You will be sewing a decorative edgestitch to the right of the center seam (on the left side of the skirt as worn) starting at the waist and sewing down to the end of the fly. As you can see, my favorite way to do all precision top stitching is to use my #5 Topstitch foot from Bernina. The metal arm in front of the foot fits into the groove of the seam that you’re following and then you can adjust the seam allowance by moving the needle to the left or right. I shift my needle 4 spaces to the right for this type of stitch. This will ensure a perfectly even topstitch every time!
Leave a tail of thread hanging loose from this seam and do not back stitch.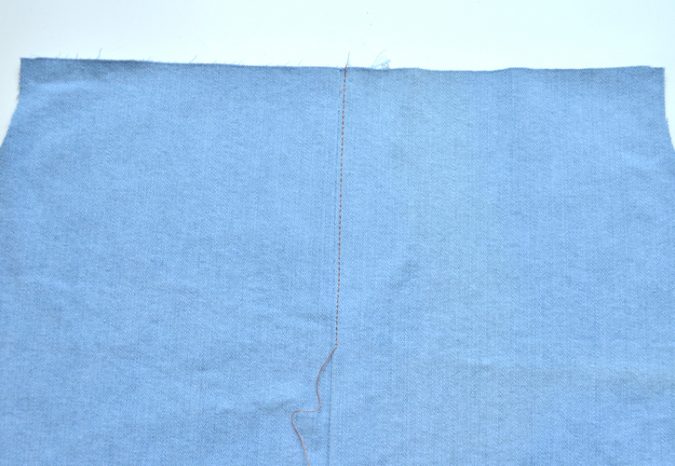
Fold the skirt in half, right sides together. Bring the trimmed fly out so it is lying to the right of the skirt with nothing underneath of it.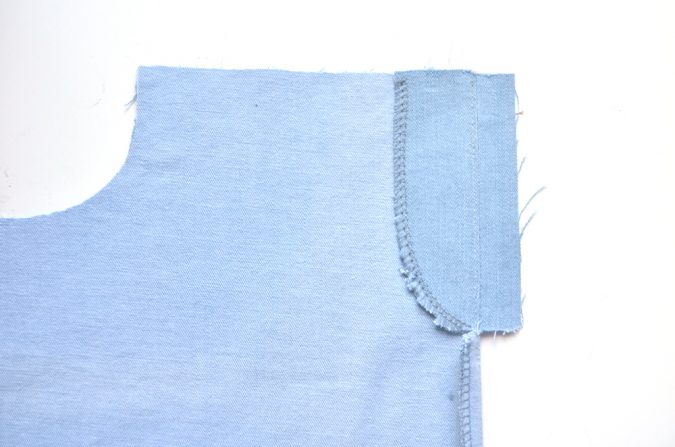
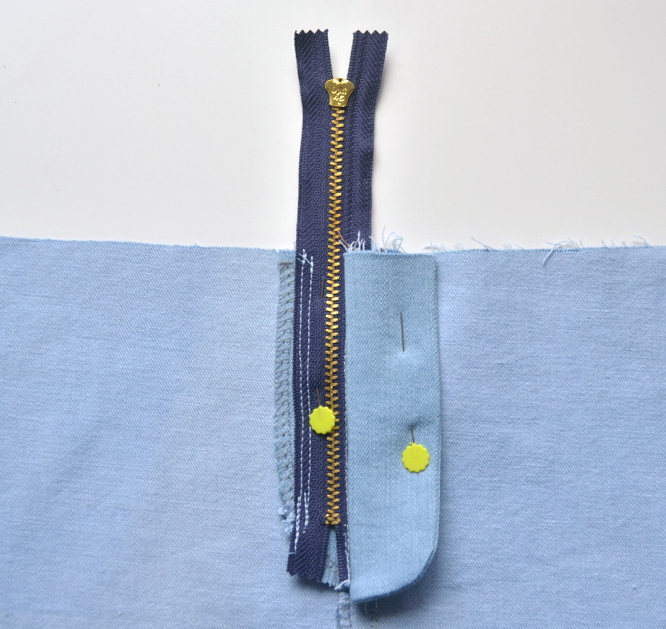
Lay your zipper face down on top of the trimmed fly. The edge of the zipper should align with the trimmed edge of the fly and the bottom of the zipper tape should align with the bottom of the fly, as pictured.
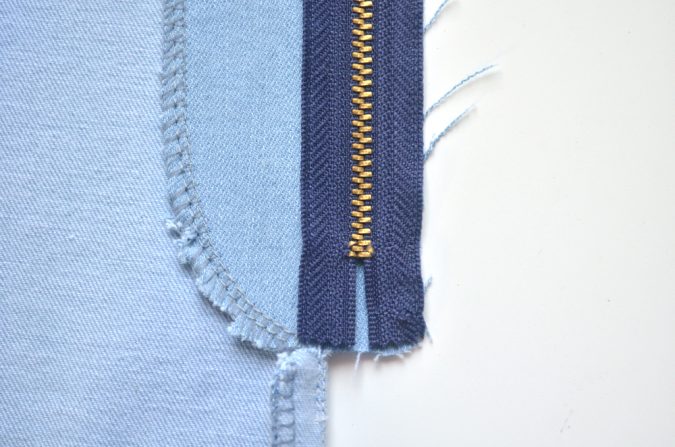
Pin the zipper in place so it doesn’t shift while sewing. Precision in the next few steps will help make your zip fly as perfect as possible.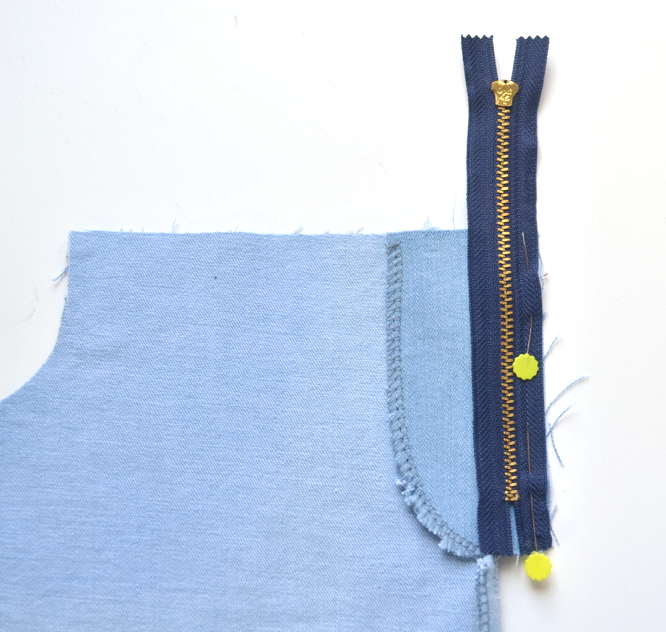
Switch to regular thread and a zipper foot and sew along the right side of the zipper close to the zipper teeth, securing the zipper to the trimmed fly beneath.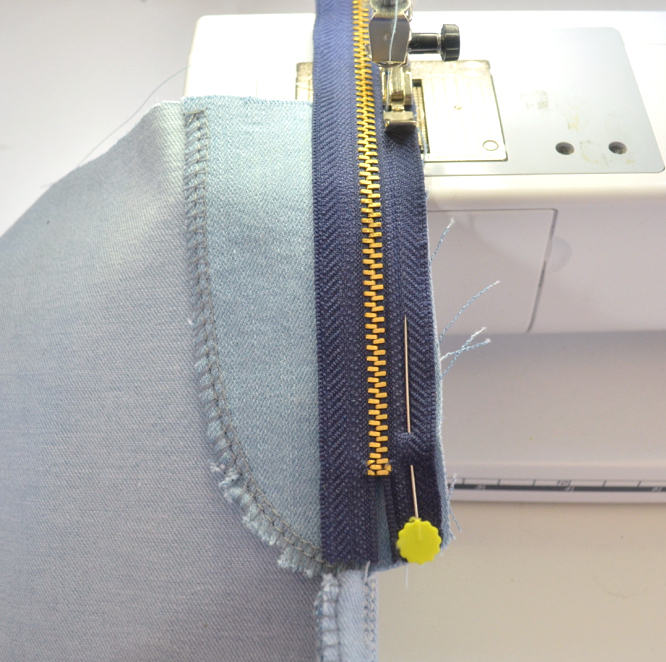
Backstitch this seam to lock it in place.
Set the skirt aside and grab the fly shield piece. Fold it right sides together along the fold line. Sew around the curve using a 1/2″ seam allowance.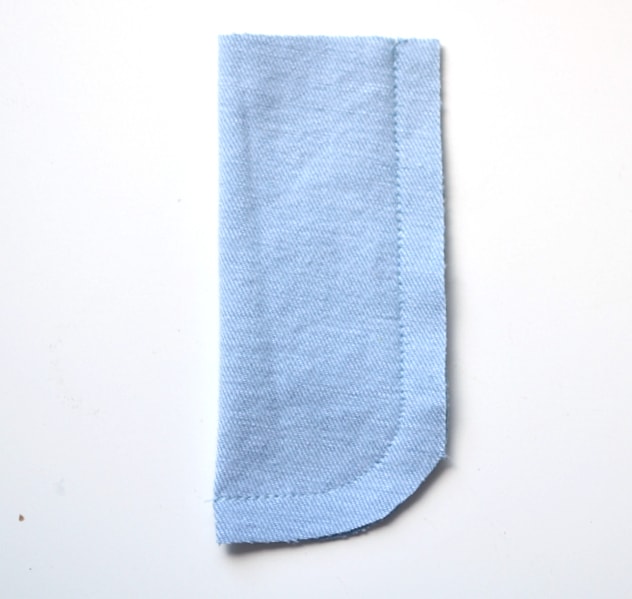
Trim the seam allowances for easy turning and smooth curves.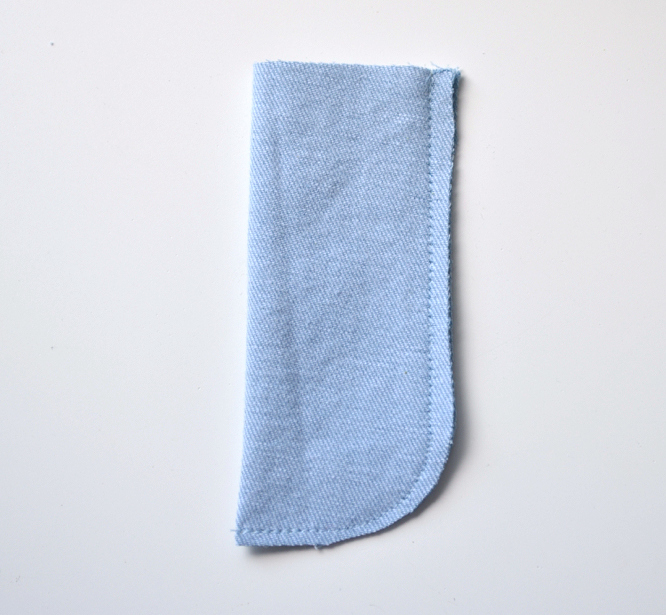
Turn the fly shield right side out and push out the corner and curves. Press well.
Lay the skirt right sides together again, this time with the zipper flipped so it is facing up. Press the seam where the zipper is attached to the trimmed fly well, but be careful to avoid the metal zipper teeth with your iron. 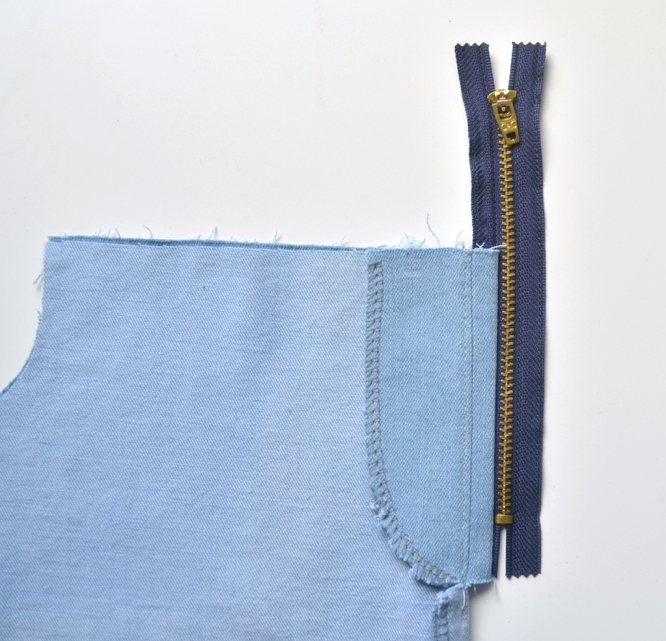
Lay the fly shield next to the zipper as shown, with the curve facing right.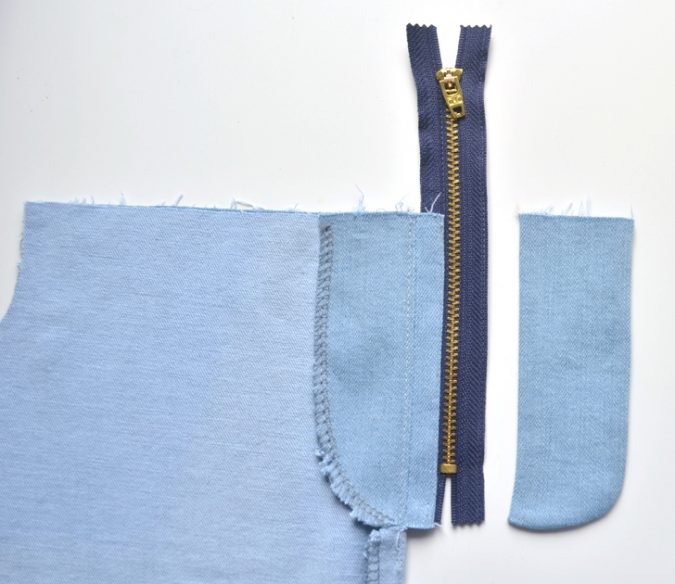
Slide the fly shield underneath the zipper and trimmed fly until the edge of the shield is abutted up against the center seam, but not crossing it.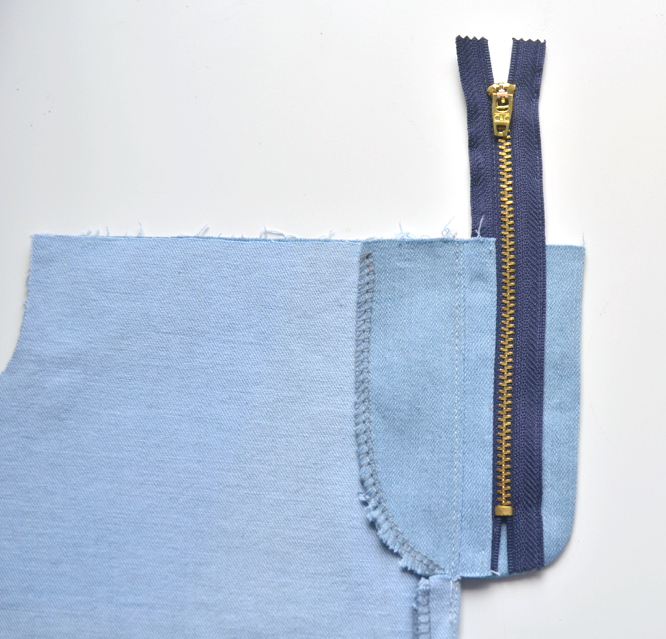
Pin it in place. This is how it will look on the back side – it is almost touching the center seam but not crossing it.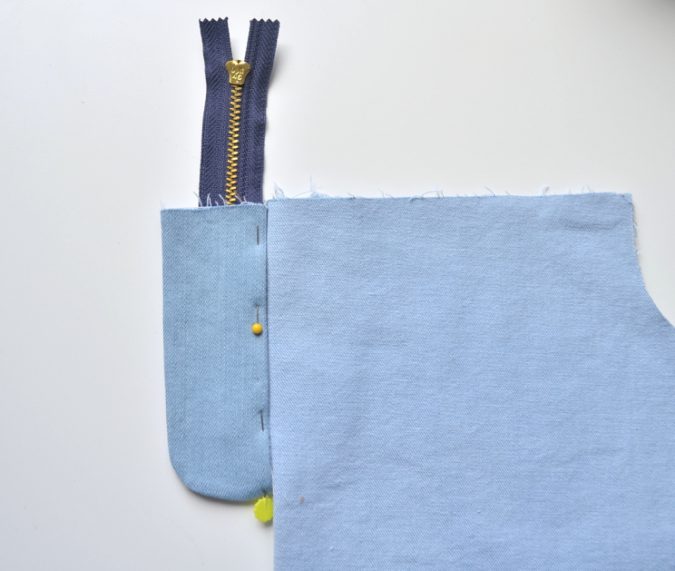
Top stitch on the trimmed fly close to the zipper teeth, once again using a zipper foot, but switching to topstitch thread. This seam will catch the trimmed fly, left side of the zipper, and fly shield. After sewing, open up the skirt as shown below and press everything well.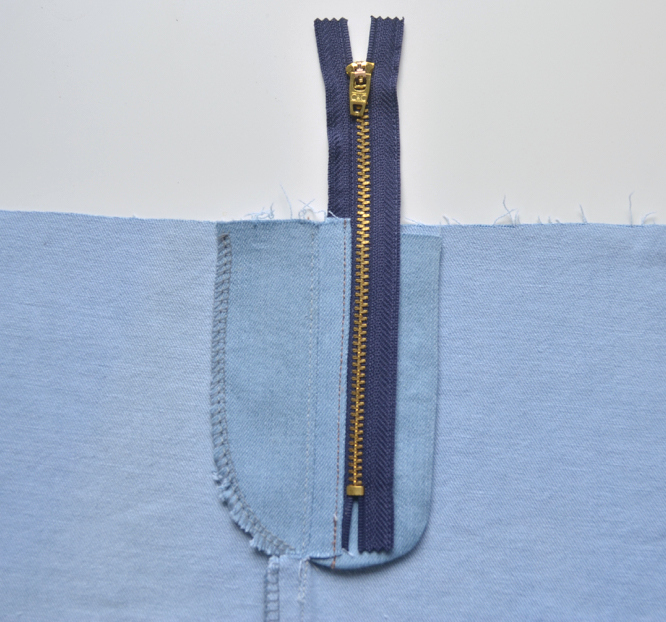
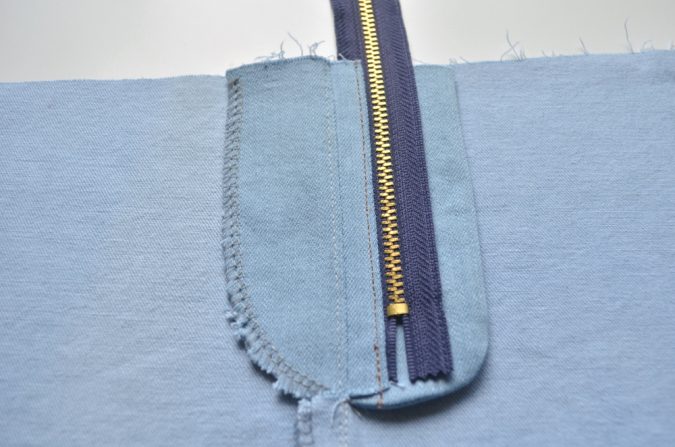
Flip the entire fly shield over to the left as if you were turning the page of a book. Press.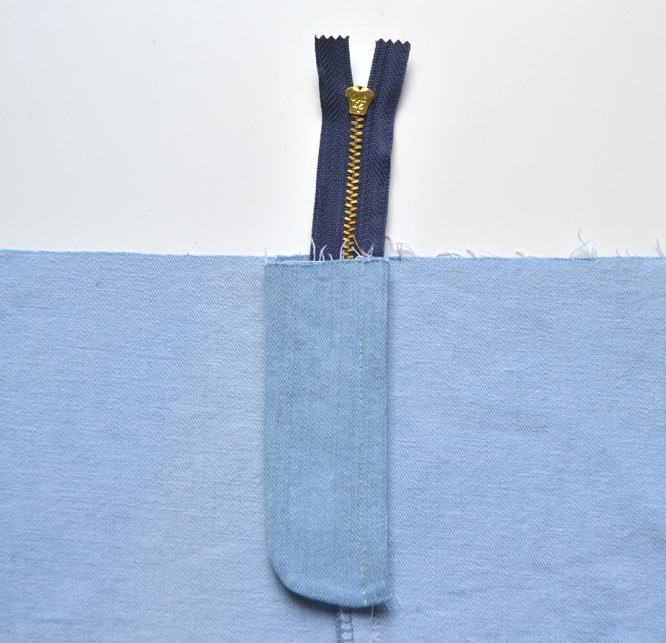
Open up the shield so it is laying on the right side of the skirt but not bending the zipper tape at all.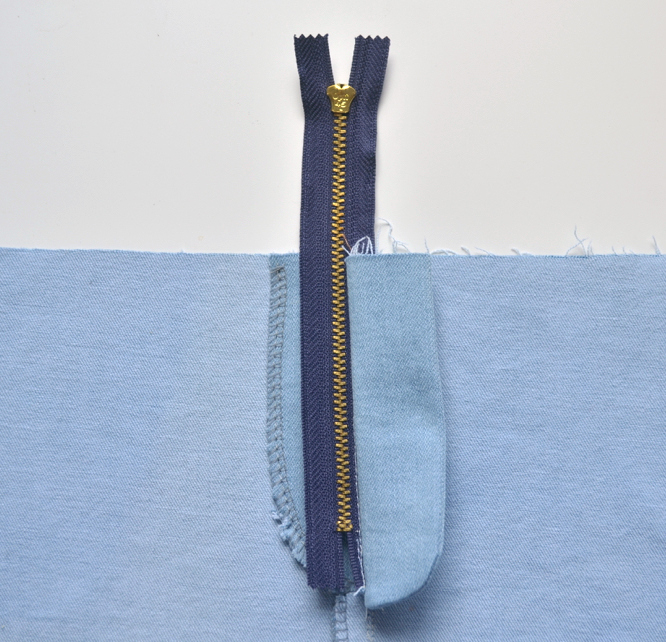
Pin the fly shield to the right side of the skirt to keep it out of the way for the next few steps.
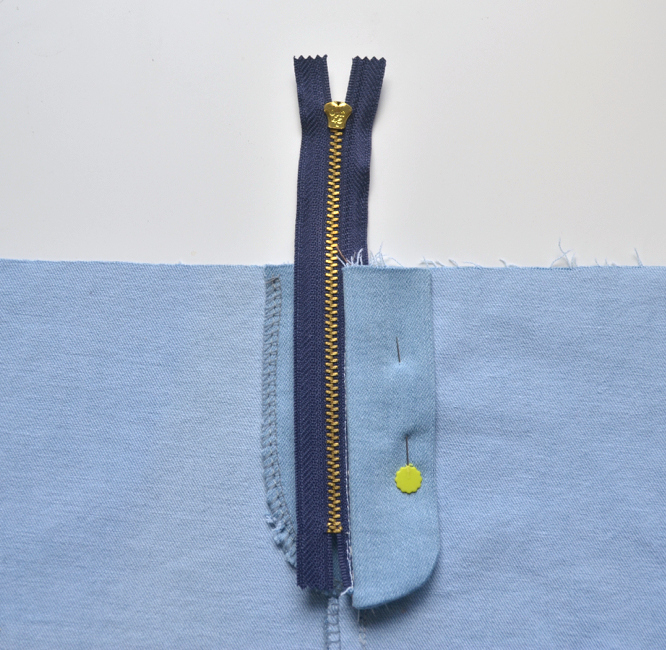
Fold the skirt in half right sides together again, this time with the left fly extended out with nothing underneath it. Sew the zipper to the left fly using regular thread. You don’t need to use a zipper foot or come very close to the zipper teeth on this side. Because this seam will basically hold the top of the skirt together while wearing, I like to sew an additional line of stitching. As you can see from my inexplicably messy stitches, I secured these stitches very well on both ends.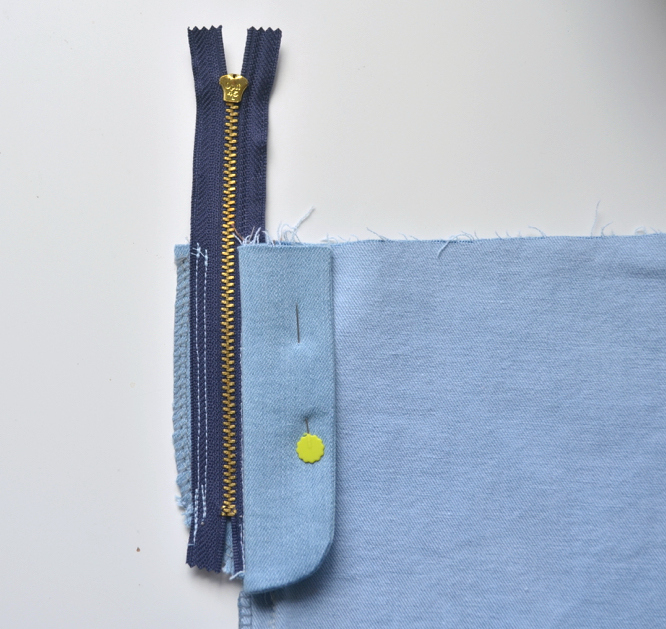
STOP. COLLABORATE and LISTEN!
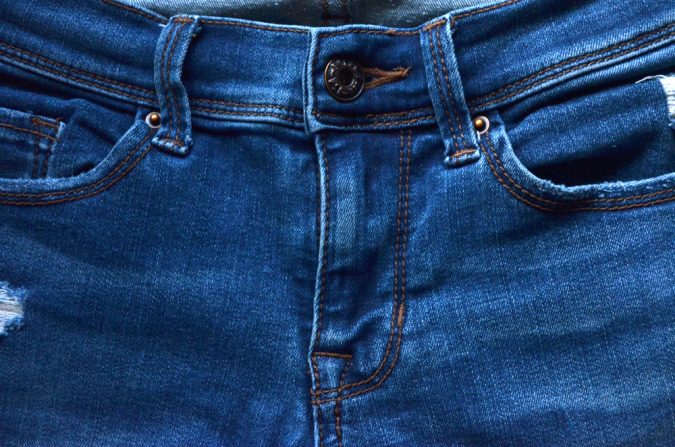
This is the point when you really want to make some decisions re: the design style that you’re going for on your skirt. If you’re using a colored or printed fabric I wouldn’t worry too much about making your topstitching stand out as a feature. However, for a solid denim, I really recommend going through any rtw denim you have and checking out all the different ways a fly can be top stitched. Just keep in mind that beyond the single curved line around the fly, everything is decorative. Here are a couple non-traditional examples from things I own: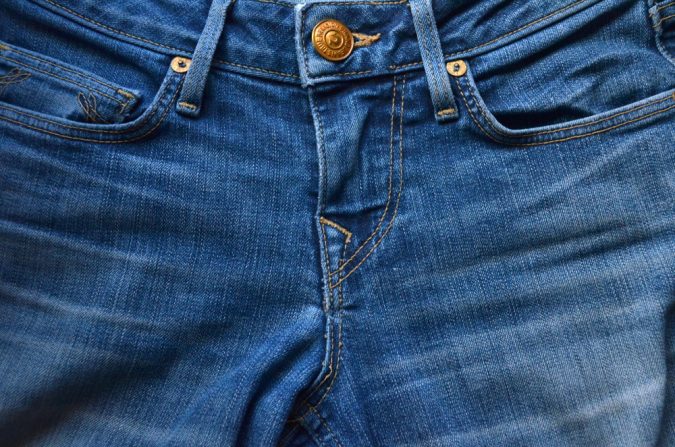
Once you’ve figured out exactly how you want your topstitching and bartacks to appear on your given skirt, you may proceed.
Open up the skirt and pin the left fly to the left front of the skirt with everything laying nice and flat. Using regular thread, sew a basting stitch around the curve of the left fly, stopping right at the center seam. These basting stitches will act as the fly topstitching guide. If you prefer to draw on the front of the skirt you may do that as well, using the front skirt piece with the fly extension as a guide. Just remember to draw the seam line slightly inside the fly extension so it will catch the fly on the inside of the skirt.
Flip the skirt to the right side and your basting stitches should look like this: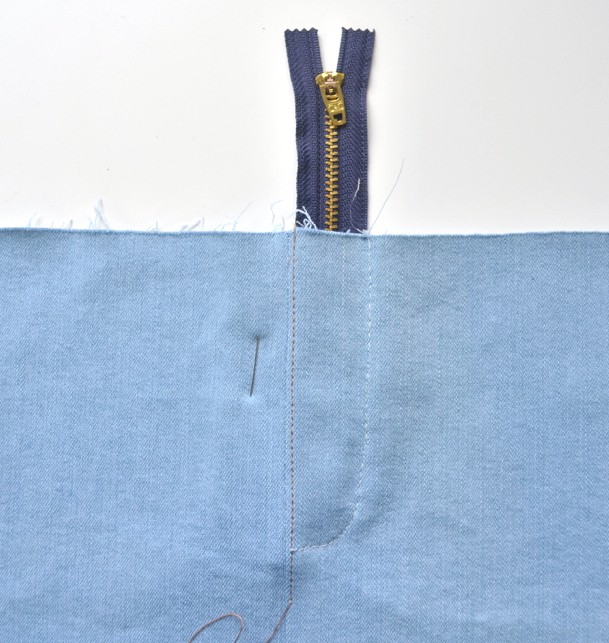
Switch to topstitch thread and sew a line of stitching directly on top of the basting stitches, using them as a guide to get a nice curve. If desired, sew a second row outside of the first stitch line, paralleling the first. This is where your topstitching may veer off course from the tutorial if you’ve decided to do something different. No matter what you do, stop sewing any curved seams when you reach the topstitching along the center front. Leave a long thread tail and use a needle to bring the tail to the inside of the skirt and tie it off for a clean finish. 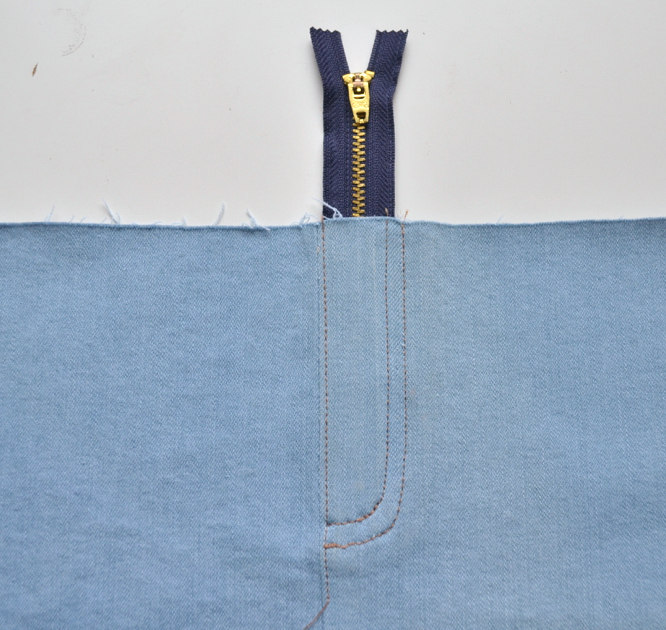
I’m going to address this a little later in the tutorial because of the way I positioned my bartacks, but if you want, you can go ahead and sew a bartack now. Make sure to unpin the fly shield and flip it to the left so it is laying underneath the left fly and will be caught in the bartack.
Check out where bartacks are located on rtw for best placement. They should start just at the top of the curve in the fly stitching and continue a short ways up the straight line. Bartacks should be about 3/8″ to 1/2″ long. The best way I’ve found to sew bartacks on my machine since I don’t have a dedicated bartack stitch is to use my automatic buttonholer with a buttonhole stitch. I simply stop sewing the buttonhole when I reach my desired length and bring the thread tails to the back to tie off. Bartacks should always be sewn with topstitch thread. For reference, this bartack is used to both secure the fly shield to the left fly and to prevent the fly from opening all the way up below the zipper stop.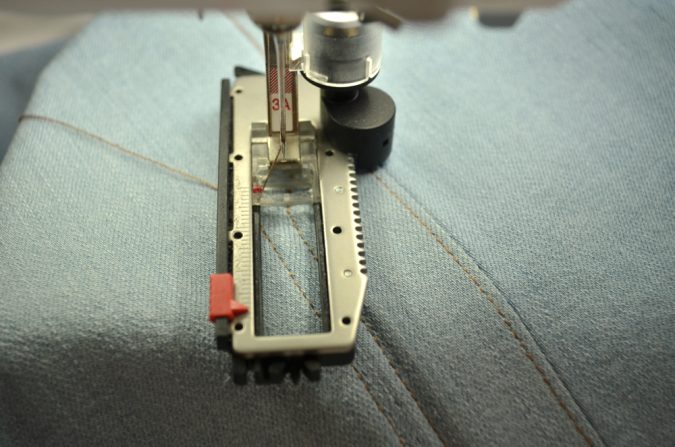
And that’s it! See, that really wasn’t painful at all. There are a bunch of ways to construct a fly, this is just my personal favorite because I think it’s easiest and at least to me, it comes together logically so I don’t have to refer back to directions all the time. If you prefer a different way, by all means, use it! That’s what sewing is all about! Just remember to alter the pattern before you start to suit your preferences, if necessary.
Come back tomorrow and we’ll start on the pockets! And don’t forget to enter the giveaway below for a chance to win one free pattern! You’ll have a chance to win every day during the sew along!
Thank you so much for all the work you did on this sew along. It really is helpful!