Sandbridge Sew Along Day 1: Fitting
Sandbridge Sew Along Day 2: Zip Fly
Sandbridge Sew Along Day 3: Pockets
Hello Sandbridge sewists! Welcome to the sew along! I hope this week of sewing this skirt step by step will help answer any questions you may have or give you an extra visual if you need one. If you have further questions, just leave a comment or join the Hey June Facebook group, where we have nearly 10k helpful HJ pattern sewists who can answer questions too. We’d also love to see your finished garments over there!
Before we even start sewing the pattern, let’s talk about picking the best size and making any necessary alterations.
Fit:
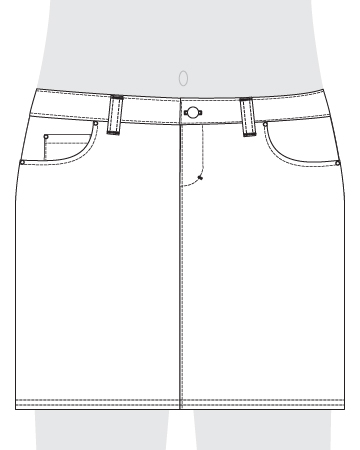
The Sandbridge is a casual skirt with jeans styling and is meant to sit lower on the waist than a traditional woman’s skirt. This diagram shows the garment sitting on the low waist. Depending on physiology, that’ll be about 1-2″ below the belly button (apple-shaped plus sizes may find that it fits over the belly button, especially for petites.) The length is drafted for women of average height – 5’5″ – 5’6″. View A is meant to hit mid-thigh and view B should hit just above the knee.
Where to Measure:
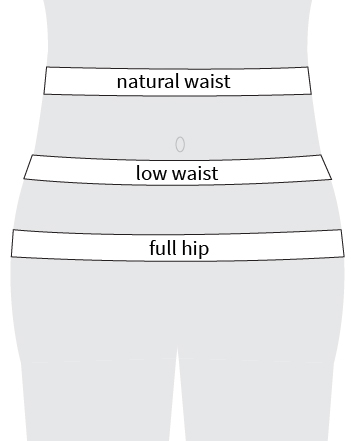
The Sandbridge is drafted for a 9-10″ difference between natural waist and full hip measurements, which is average for women. You can also see this difference in the body measurements on page 2 of the pattern. Because the skirt sits well below the natural waist, the full hip is the most important measurement to consider when choosing a size. This should be measured around the fullest part of the lower body, usually right around the butt. For reference, you may also want to measure your low waist and compare it to the finished garment measurements. The finished low waist measurement requires no ease or even a small amount of negative ease, so if your low waist measurement matches it or is slightly greater, that’s perfect.
If you are between sizes on the full hip, consider how you want your final skirt to fit and what type of fabric you’ll be using. Sizing down with a stretch denim will produce a fitted skirt, whereas sizing up will give a more casual fit that might have a bit more ease in the waistband.
Unless your measurements are spot on with the size chart, I highly recommend making a muslin before cutting into your fashion fabric. Even if your measurements are the same, a muslin is very helpful for determining minor fit adjustments. For this pattern, you only need the front, front pocket facing, back, yoke, and one set of waistband pieces to make a muslin. Page 3 in the pattern will show you how to tape the pocket facing to the front piece to cut them as one. Leave the basted fly area open and pin them together so you can try the muslin on.
The goal of the muslin is twofold: 1. Get your best fit through the hip, and 2: discover what kind of alterations need to be made to the waist, if any.
Hip Adjustments:
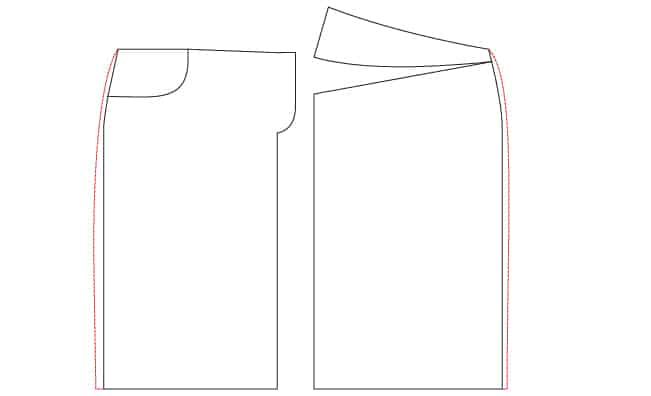
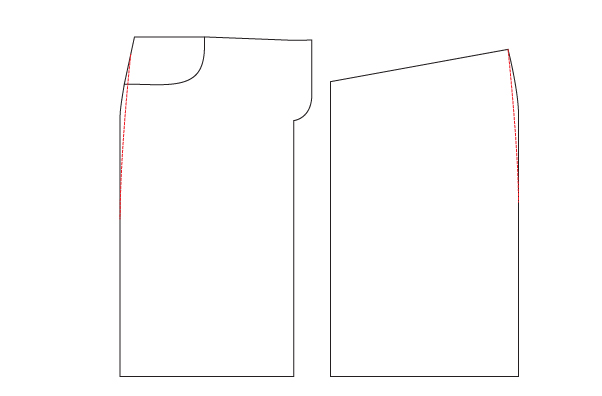
If your hip is fitting slightly too tight but everything else seems to fit well, you can simply add a small amount to the side seams on the front and back. Remember you’ll also have to add to the side of the back yoke and the pocket bag and pocket facing if you use this technique. Since the waistband fits well, angle your additional width up to zero as you approach the top of the skirt pieces. No more than 1/2″ at the widest part is recommended if you add width using this method. You can angle this width back to zero at the hem or just make the entire skirt wider, as shown.
Alternately, if your hip is too wide and you have excess fabric on the sides, you can shave a bit of width off on the side seams, once again removing the same amount from the pocket bag and pocket facing. Start at a point below the back yoke if that area doesn’t need to be taken in.
Flat Butt Adjustment:
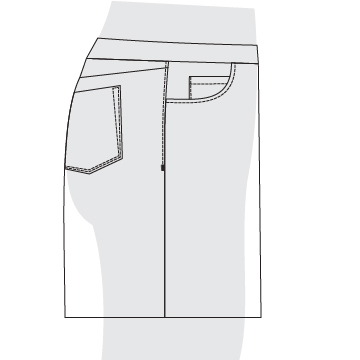
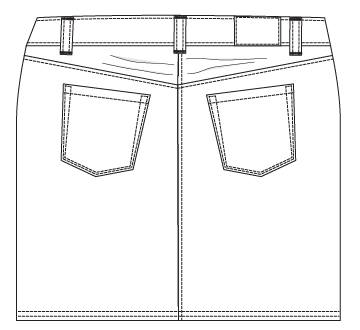
Just because your hip measurement matches the pattern does not necessarily mean your shape will. A woman’s hip measurement is made up of several different parts of the body, so if you carry most of your width around the rear end but have narrow hips you can have the same hip measurement as someone with a flat rear end but wide hips. If your muslin has excess fabric between the yoke and skirt that is bunching up, you may need a flat butt adjustment. Here is an illustration of the skirt as it is drafted to fit:
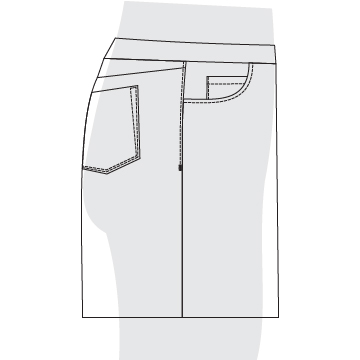
And here you can see how the skirt may fit on a flatter or lower rear end. As you can see, there is now a portion of the upper butt/lower back that doesn’t fill out the skirt, creating excess fabric in the back of the skirt.
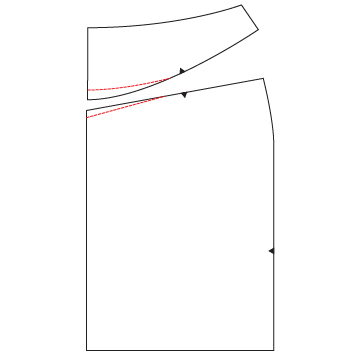
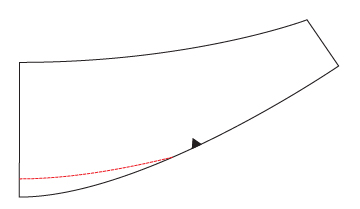
To adjust for this issue, simple shave off some height from the lower back yoke pattern and the upper back skirt pattern. The amount you remove depends on how much excess fabric you can pinch out in the muslin, but you shouldn’t need to remove more than 1/2″ from each piece. Remember to leave a little bit of fabric ease in this area for sitting down and bending over.
Petite Adjustment (or Swayback Adjustment):
If your muslin is bunching up through the back yoke with extra fabric, you can perform a petite adjustment to remove the excess height. Because the skirt is straight through the front you probably won’t need to adjust anything on the front pieces. The hip curve on the side seams may need to be raised to meet your widest point though. This adjustment also helps alleviate a swayback issue.
To remove the excess fabric, pinch it out and measure how much you need to remove and then shave that off the bottom of the back yoke.
Waist Adjustments:
Once the hip and yoke area are fitting your body well, you may find that the coordinating waistband is either too tight or gaping. I’ve made a couple of quick videos to help you work through both of those issues.
Note: do not remove or add more than 2″ using this method. If you need to remove or add more, you will need to use the same methods in the video and apply them to the front pieces of the pattern to evenly distribute the alterations. Alternately, you could perform the alterations up to 2″ as outlined in the videos and remove or add the remaining amount at the side seams. Remember that depending on how you alter the pattern, you may also need to perform alterations to the back yoke, pocket bag, and pocket facing so they fit the new waistband.
Waistband is gaping:
If you are more of an hourglass than the pattern is drafted for (more than 10″ difference between waist and hip), this video will show you how to reduce the waistband width:
Waistband is too tight:
If you are less of an hourglass than the pattern is drafted for (less than 10″ difference between waist and hip), this video will show you how to expand the waistband width:
Length Adjustments:
Because the sides of the skirt are straight, you can shorten or lengthen the pattern at the hem as desired. View A is still quite modest in length, so for a true mini skirt you may want to reduce the length. View B is meant to hit just above the knee as drafted for average height. If it will be longer than knee length, you may want to reduce length to maintain mobility while walking.
Hopefully this post has answered any fit questions or issues you may have experienced with your muslin. Please feel free to comment, email, or join the FB group for further questions!
Be sure to enter the giveaway below for a chance to win a free pattern! You’ll have a chance to enter and win every day during the sew along!

What a GREAT post!! 🙂
Thank you so much for the perfect explanations and amazing video! 🙂
I have loose pants that bind at the knee when I lift my leg. The tightness is from the back waist under the butt and over the knee cap. I have had this problem with closer fitting pants too. My body has a low rise in the front.
Do you have any tips please about reducing the waistband on the front pieces? I have a total of 4inch to remove, so was going to do 2 at back (as in your video) and 2 at front. But the front waistbands dont tape together nicely with the front piece unless I’m not doing it right!
Thank you!
Just curious about why I wouldn’t distribute the length to be removed from the whole waistband. Why just remove at the back?
There are a couple reasons for this, but you should always do what works best for your body. In general, the fit from CF to the side seam is not where excess ease is found on a gaping waistband. You can check by pinching the CB until it fits closely to your body and checking the side seam location. If it’s centered, that tells you all the adjustments need to be done to the back. Also, the front generally doesn’t have darts, so it’s harder to remove excess width from that area. The side seam can only be curved in at the waist by a small amount before it starts getting distorted. When drafting, you always want to create contours with seams and darts instead of curving the sides on a woven pattern.