Hello lovely sewists! I’m here to show you how to do a full bust adjustment on the Phoenix Blouse. The Phoenix has a hidden princess seam dart between the shirt and the yoke, so this will be very similar to a regular princess seam FBA with a couple added steps for adjusting the yoke. If your measurements indicate you’ll need a FBA, a muslin is highly recommended. This will help you find your exact bust point on the pattern and also determine how much you need to lengthen the yoke and/or the shirt hem.
Before we begin, find the difference between your high bust and full bust (the illustration below shows where to properly measure yourself). Hey June patterns are drafted for a B sewing cup, or a 2″ difference between high bust and full bust. PLEASE NOTE: sewing cup size is not the same as bra cup size. You may wear a D cup bra and not need a FBA. Bra cups are based on the difference between your under bust and full bust. Also note that some Hey June patterns have enough style ease that you may be tempted to skip a FBA based on the finished garment measurements. While this will technically work in terms of fitting around your bust, it can also lead to drag lines and pooling above the bust because your bust no longer has the ease designed and drafted into the garment. In essence, you’ve changed the fit and proportions of the pattern in one place and left the rest the same, so proceed with caution. On the Phoenix in particular, this can lead to the yoke riding up on the bust and the armscyes or sleeves pulling.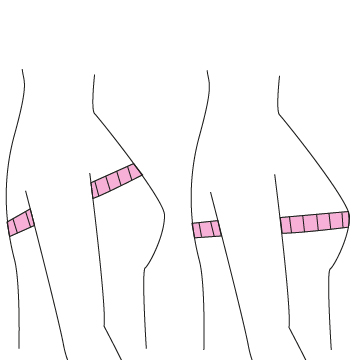
Before you begin the FBA, you will need to find your own bust differential. If the difference between your high bust and full bust is 0-2 inches, you do not need to do a FBA. If it is 3+ inches you should use this tutorial. On a piece of paper, write your bust differential. Subtract 2″ because that is already included in the pattern. The number you are left with is your full differential. Because we are working with half of a pattern piece, we will only need to add half of that number. So divide your full differential by two and write that number down. You will need to use it in step 6.
As an example: 3″ difference between high bust and full bust minus 2″ equals 1″. 1″ divided by 2 equals 1/2″. So the number you would write down is 1/2″.
Ok, now you can get started with the FBA!
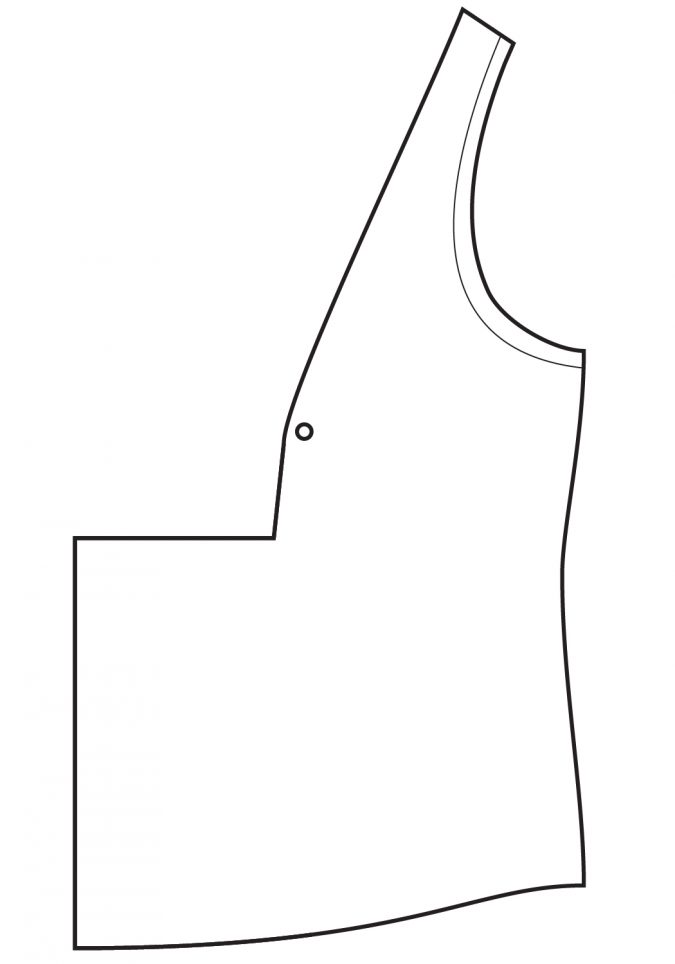
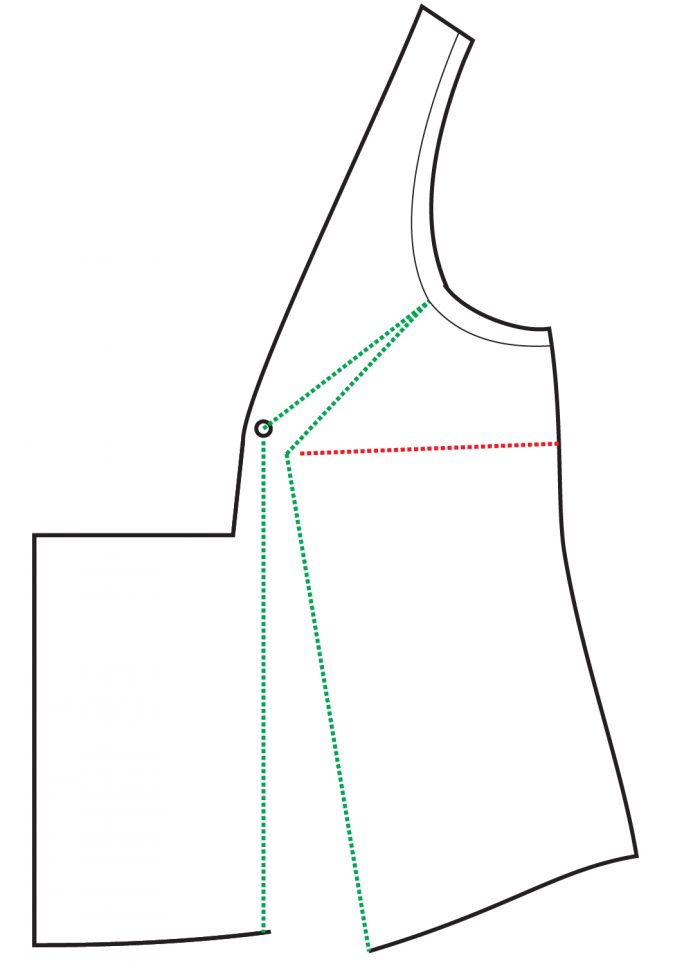
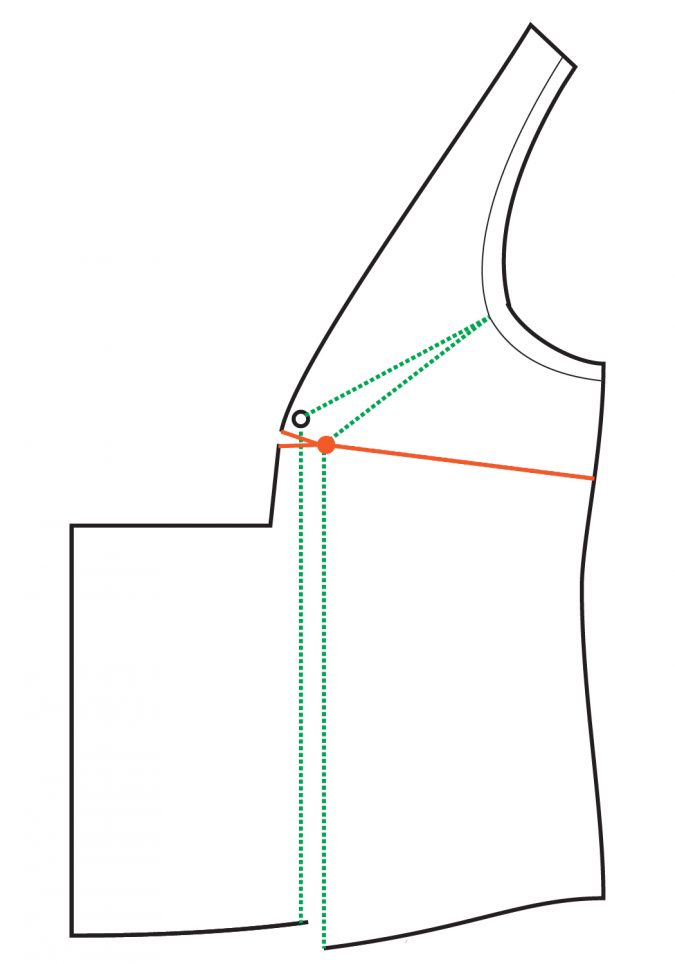
- First, lay the pattern piece over a large sheet of paper, or several printer papers taped together. Draw in the 1/2″ seam allowance around the armscye on the Phoenix Blouse front (piece 1 or 5 depending on what view you’re making). Hold the pattern to your body to mark your closest approximate bust apex (shown by the circle in the illustration).
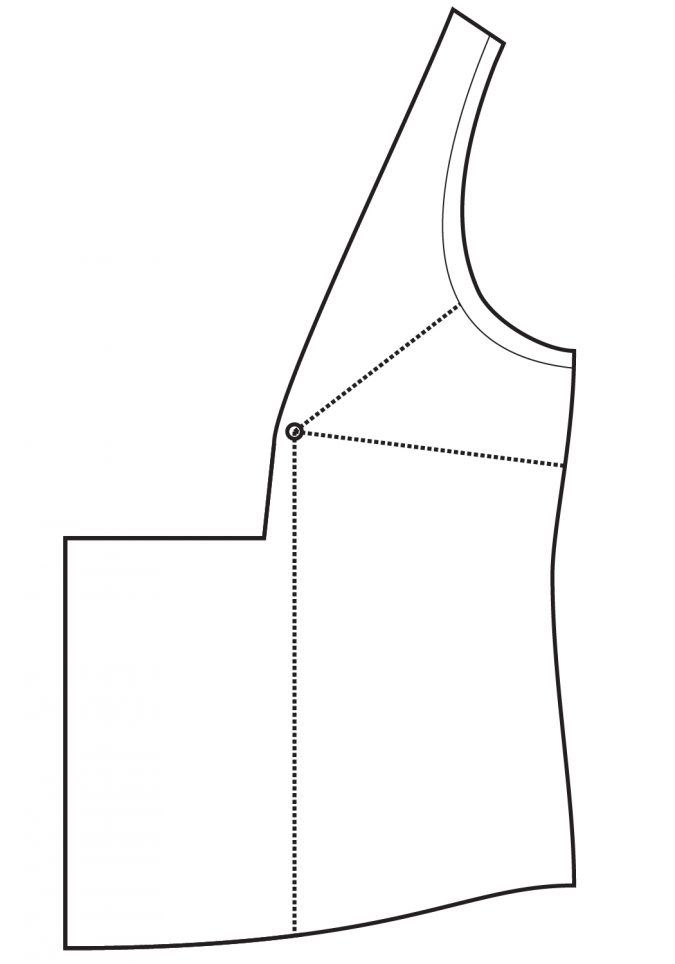
2. Draw a vertical line from the hem straight up to the bust point. From there, draw a diagonal line to a point about 1/3 of the way up the armscye (on view A, you can use the notch). Draw another line from the bust point to the side seam at a slight downward angle.
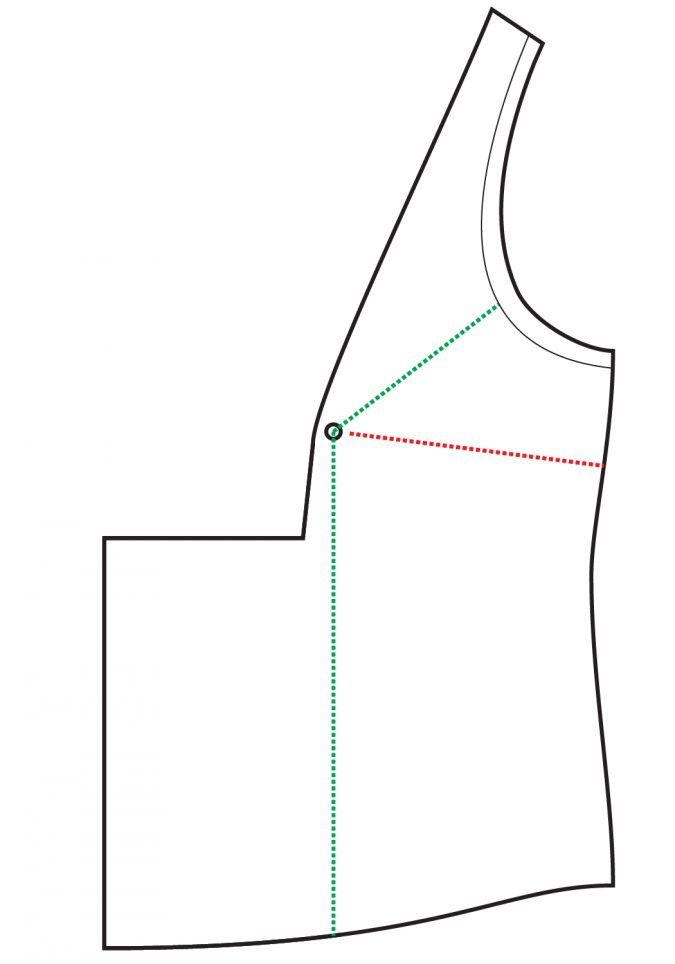
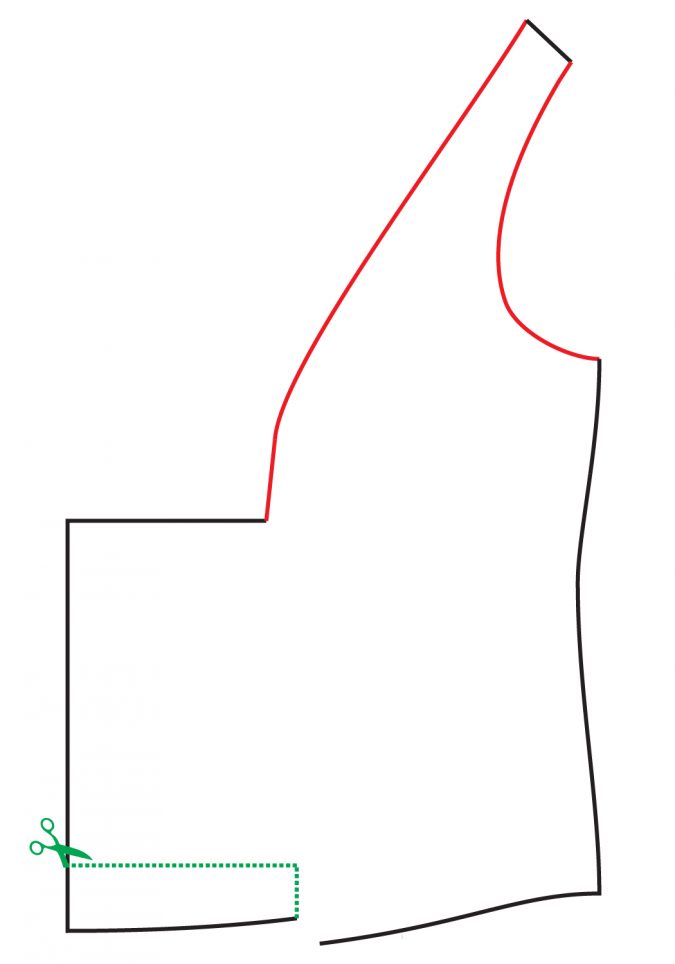
3. Now you will cut along the lines you drew as follows: starting at the hem, cut on the green dotted line up through the bust point and all the way to the marked seam allowance line. Do not cut all the way to the edge of the armscye. Starting at the side seam, cut on the red dotted line toward the bust point, leaving a small amount of paper at the bust point to act as a hinge.
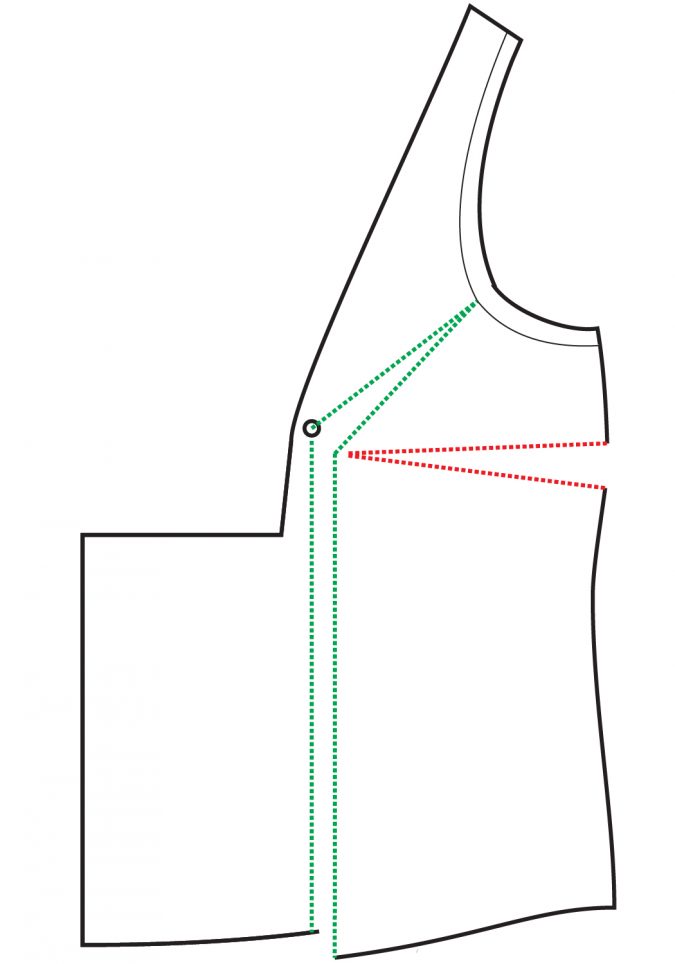
4. Now you will be able to manipulate the pattern. First, open up the pattern along the green dotted cut line.
5. Now let the pattern naturally drop open at the red dotted cut line so that the two vertical green dotted lines remain perfectly parallel to one another.
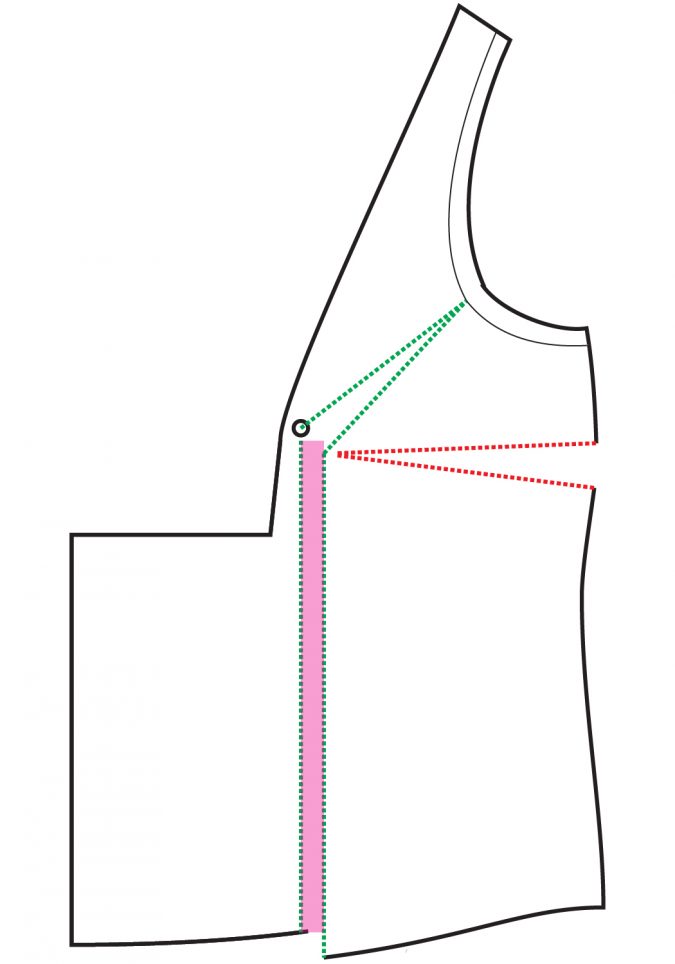
6. Adjust the pattern until the space between the green dotted cut lines (shown shaded in pink) equals the number you recorded before beginning the FBA. In our example, it was 1/2″. Tape the pattern down to the paper below it to maintain that distance.
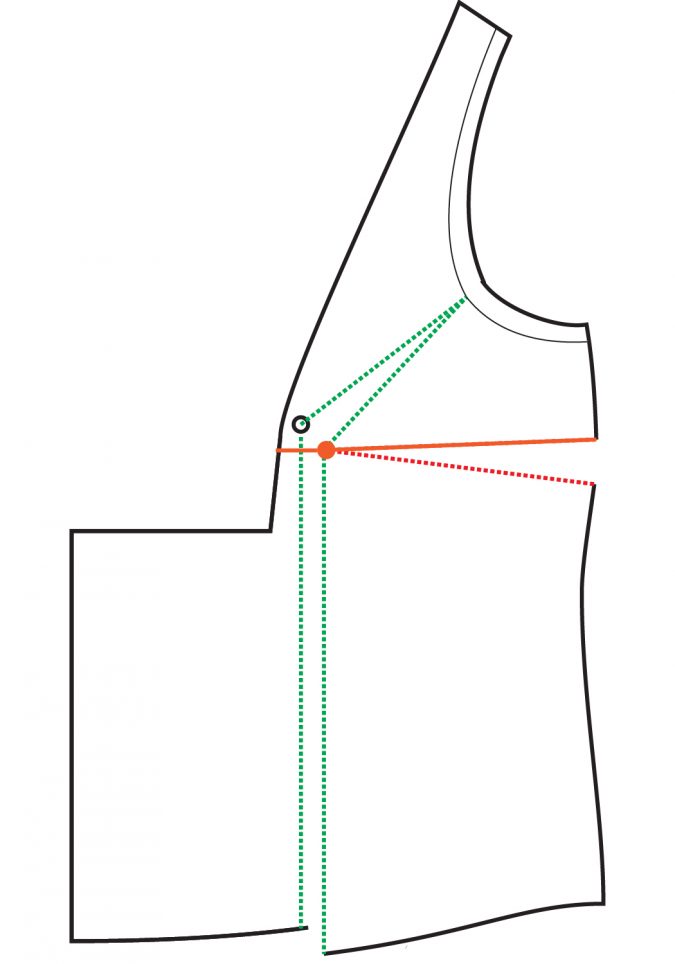
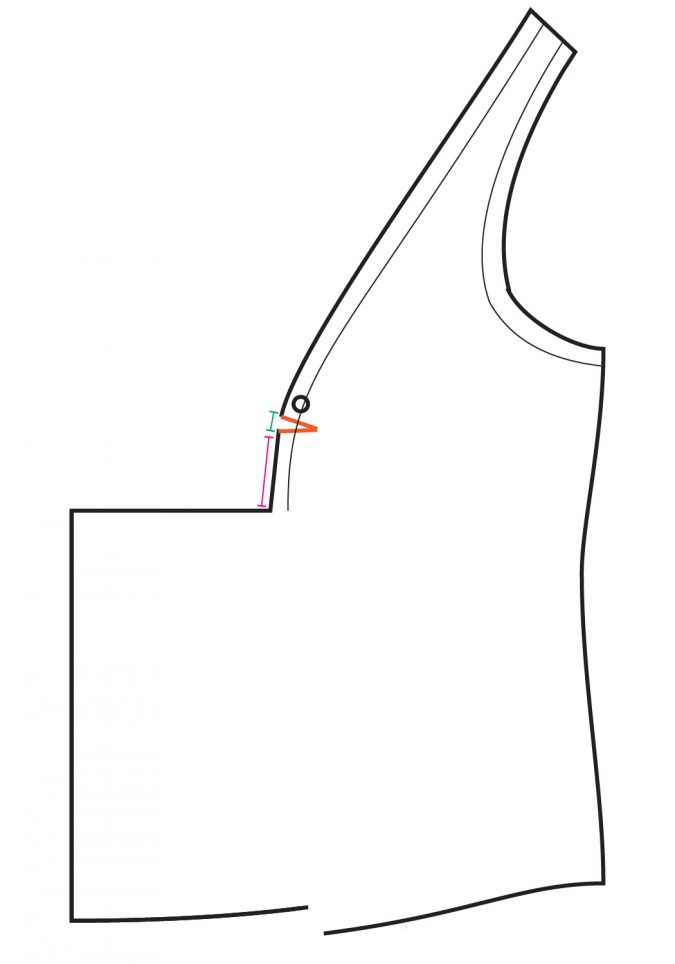
7. Now draw a line starting at the upper leg of the new bust dart through the bust point to the inner edge of the pattern (shown in orange). Cut along the line starting at the princess seam and stop just short of the bust point (marked on the illustration with the orange dot). The bust point will act as a hinge.
8. Close the bust dart by moving the top leg down to align with the bottom leg. The pattern will be hinged at the orange dot. and a new dart will open on the princess seam. Tape the side seam dart closed.
9. Draw in the 1/2″ seam allowance along the princess seam. Measure the new dart opening (measurement shown in green) on the seam allowance line, not on the edge of the pattern (they are shown on the edge in the illustration for clarity). Also measure the distance from the bottom of the yoke opening up to the bottom of the dart (measurement shown in pink).
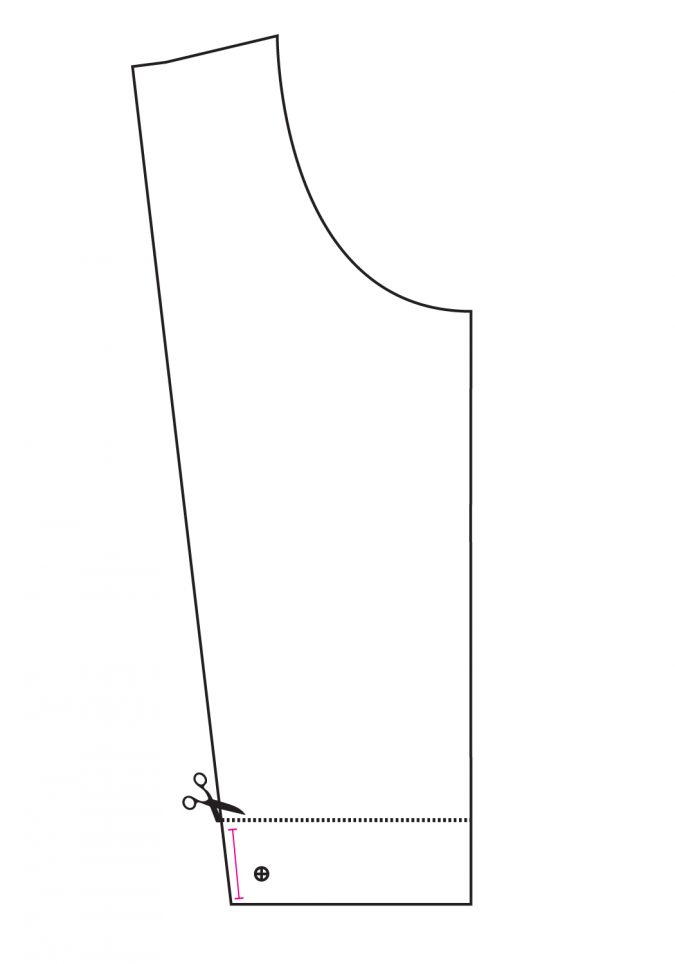
10. Use the pink measurement from above to measure up from the bottom of the yoke piece and cut straight across the pattern at that point.
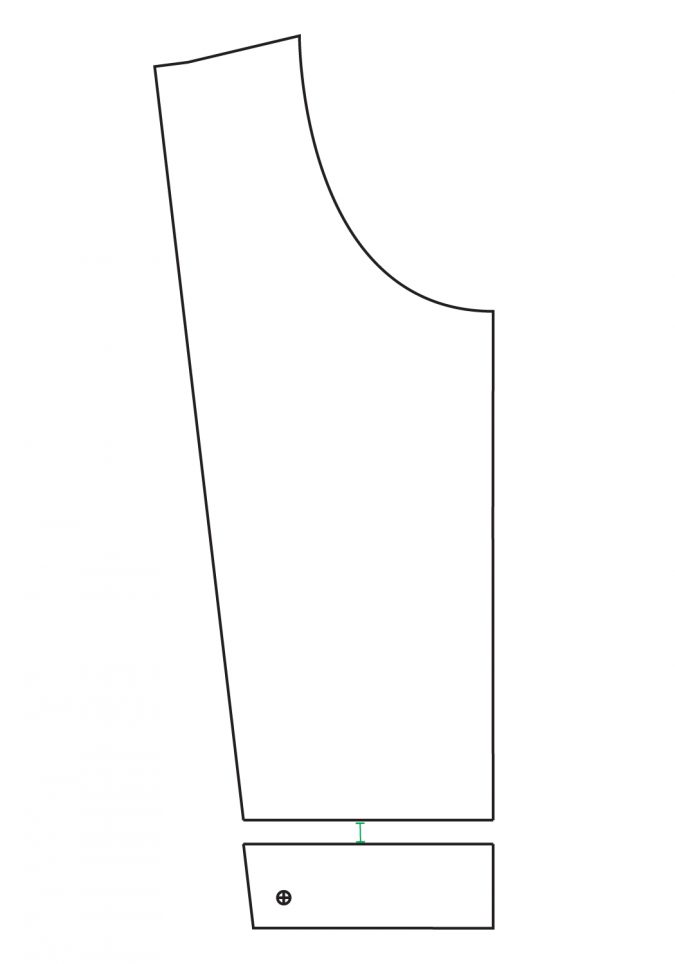
11. Separate the two yoke pieces by the same amount as the small dart (green measurement) from the princess seam.
12. Redraw the side and center lines on the yoke.
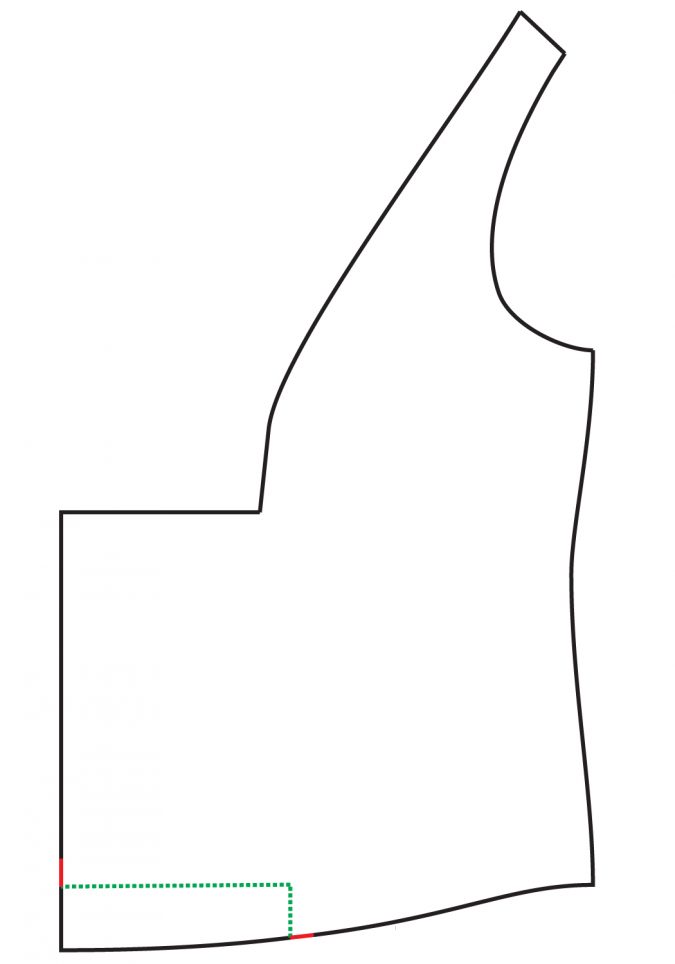
13. Smooth out the curves on the princess seam and armscye of the front piece. Cut off the lower center hem portion.
14. Move the center hem portion down to align with the new side hem level and reconnect the center and hem lines.
If your muslin showed that the yoke needed to be lower, you can also use a different technique. Remember that the yoke is already lower because of the FBA alterations. Ideally, it should be 3-4″ below your bust point. If you need it lowered more than the FBA provided, you can do the following:
15. Instead of dropping the center front hem, measure the distance between the two hem lengths.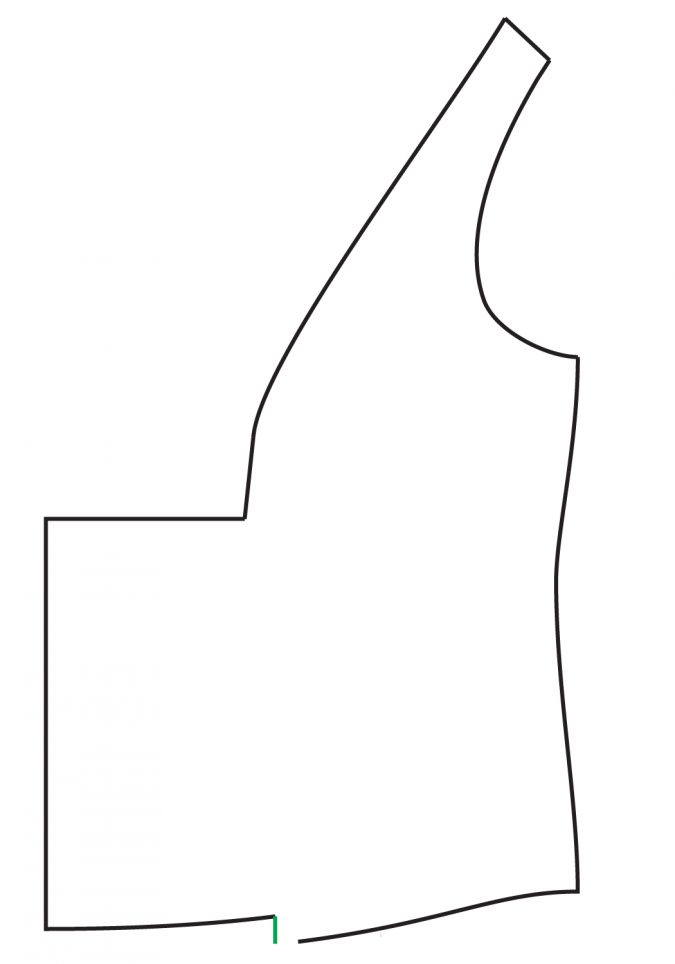
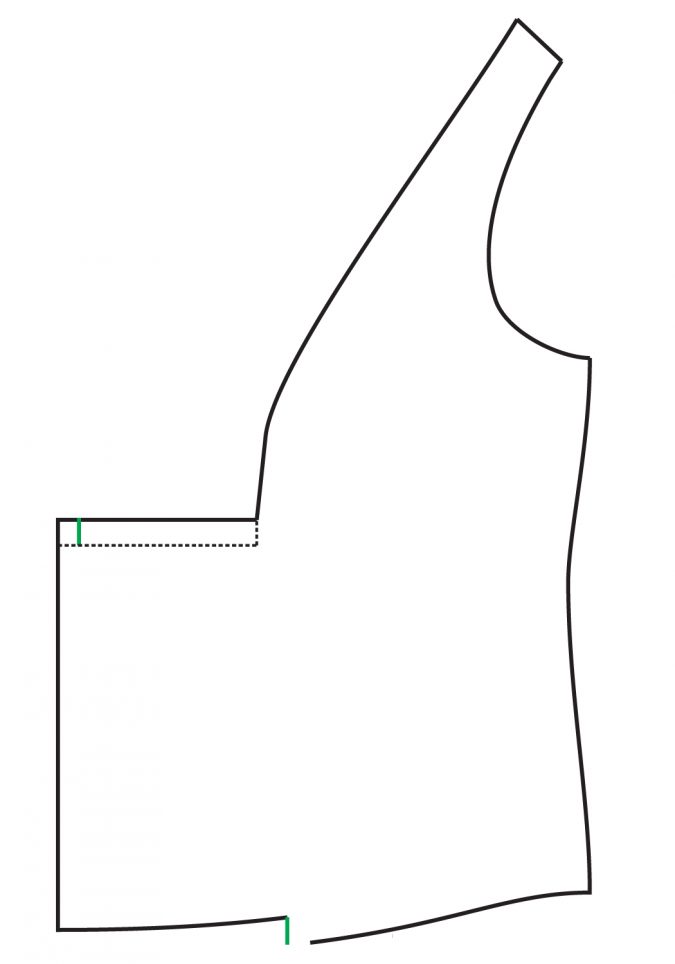
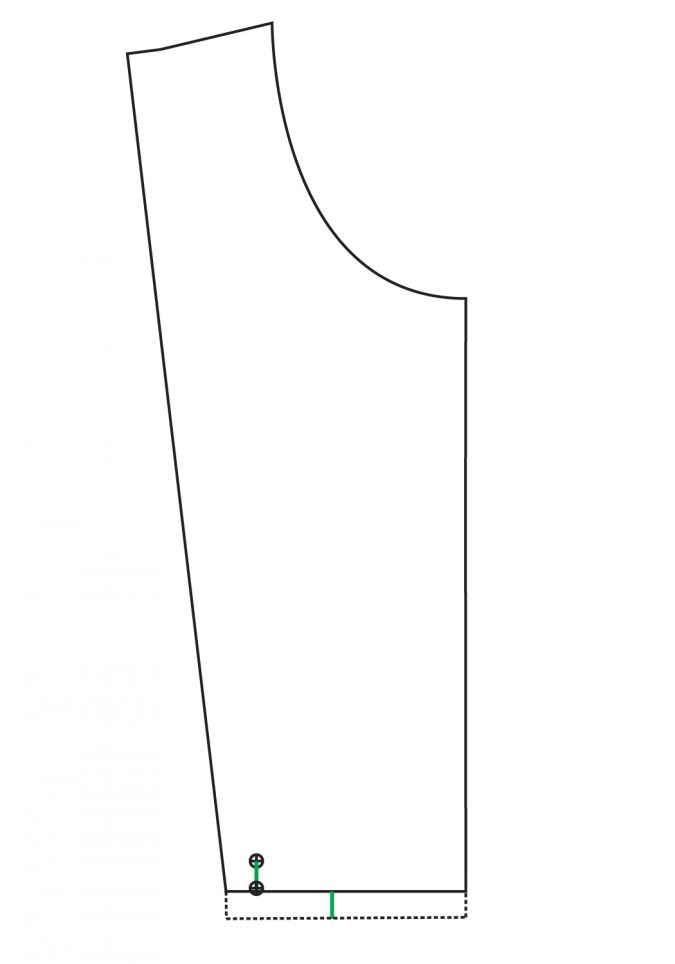
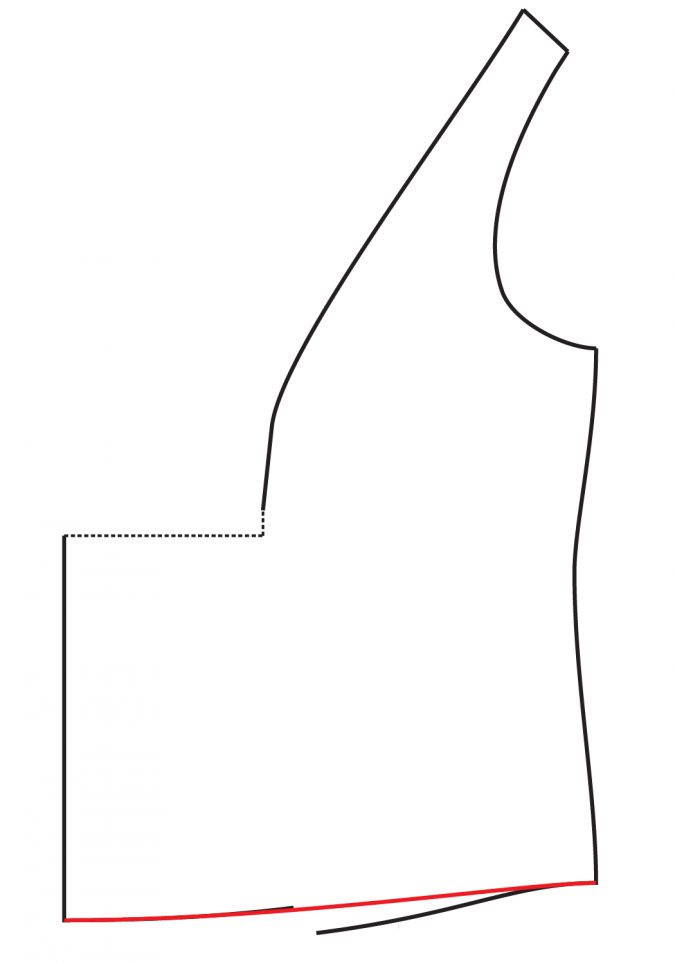
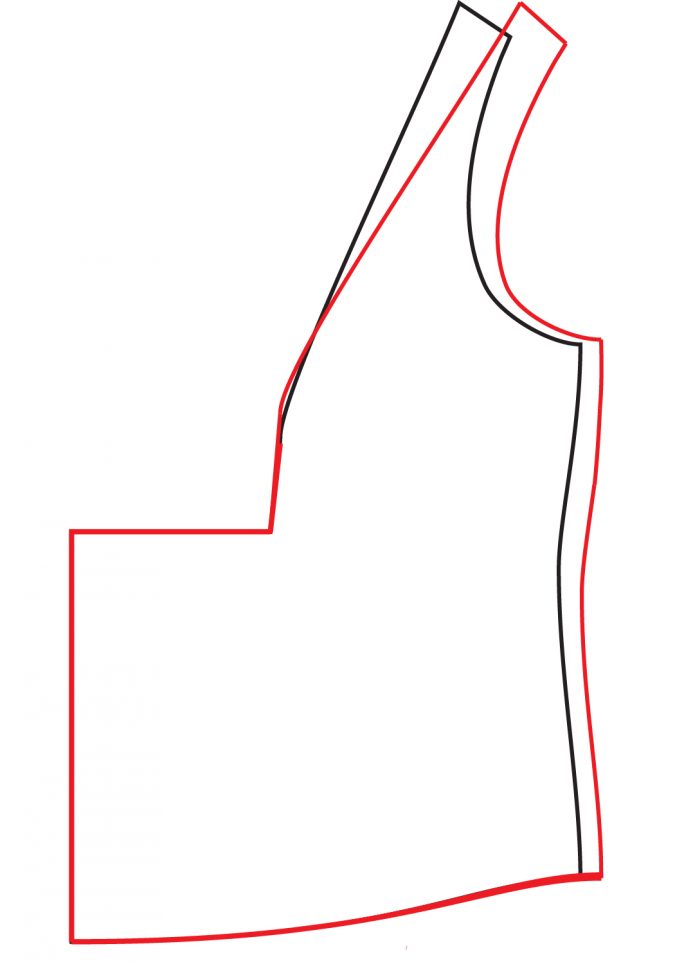
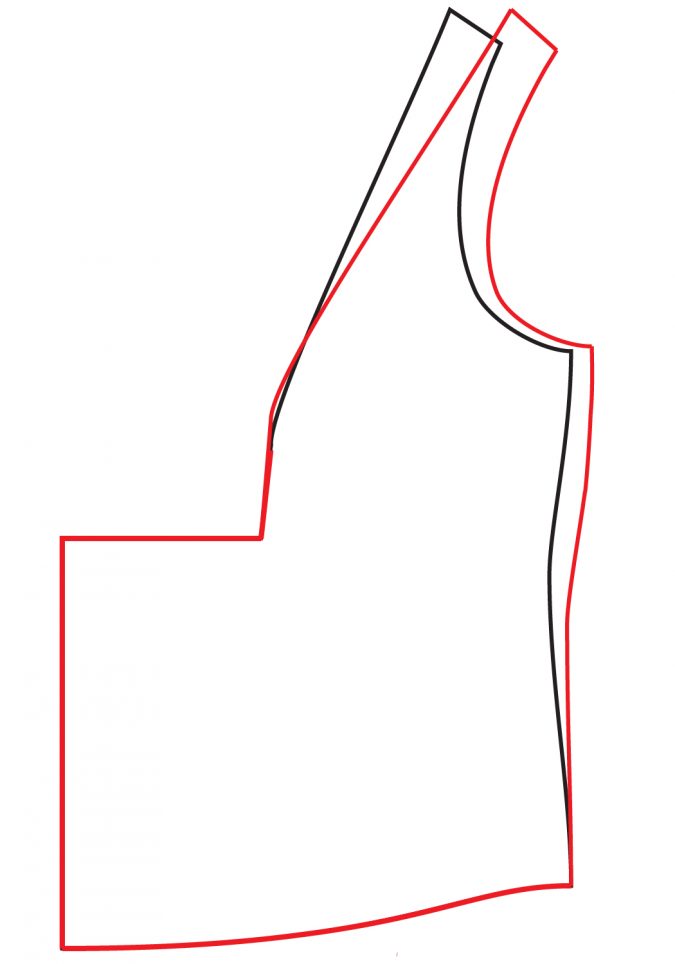
The main part of your FBA is now finished! You should have a pattern piece resembling the red version now, as compared to the original pattern shown in black. As you can see, there is added ease at the side seam and the dart between the center shirt and the yoke is at a much wider angle, which will create a deeper bust protrusion on the fabric.
If you have smaller hips or just prefer not to have extra ease in the hips, you can gradually ease the side seam back to the original hip width on your FBA pattern piece.
Please feel free to email me or leave a comment if you have any further questions!

Love the explanation and diagrams! This is the first time I’ve done an fba on a princess seam and your method is very clear. Thanks for the yoke lengthening explanation too.
This is super helpful! I need to do a FBA but also grade out at the hips (size 10 upper bust, size 14 hips). Which should I do first?
Definitely do the FBA first, as that adds width to the hem unless you take it out at the end. You may not have to grade out, or not as much!
I used this method and it firs well in the bust, but I end up with an enormous amount of fabric about 4-6” down from the shoulder seam, or essentially just above the upper bust areaim talking about 2” each side. Appears to need a narrow shoulder adjustment now. Any tips?
You rotated the dart into the center seam but did not remove that additional length. If you had left it as a side dart it would have been sewn shut into a dart. This was left open so when I did this on my test shirt the neckline gaped until I pinned the “center dart shut”. This alteration doesn’t work exactly as shown.
For the key largo too, you would just stop before the yoke adjustment described? I thought there was a FBA for the key largo but I couldn’t find it.
I am anxious to start this blouse. However had I known the bust was only a size b cup I probably would not have bought it. It looks complicated for me.