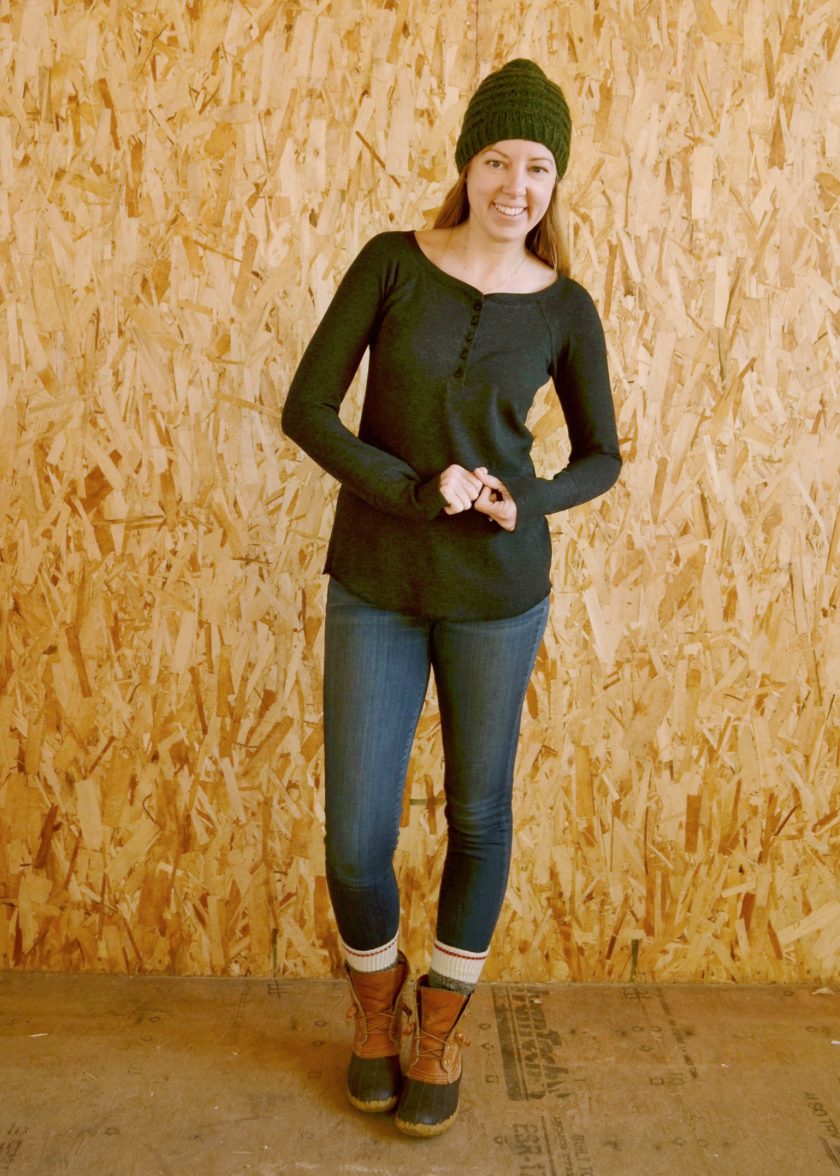
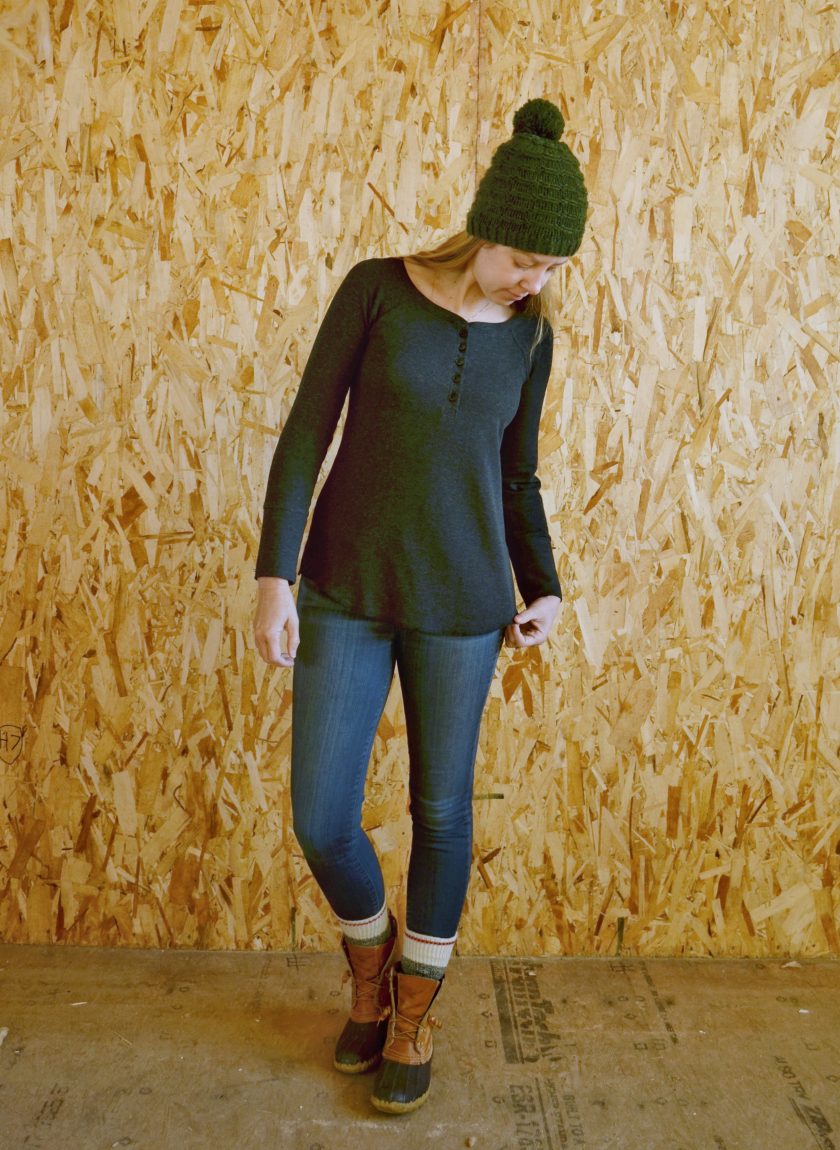
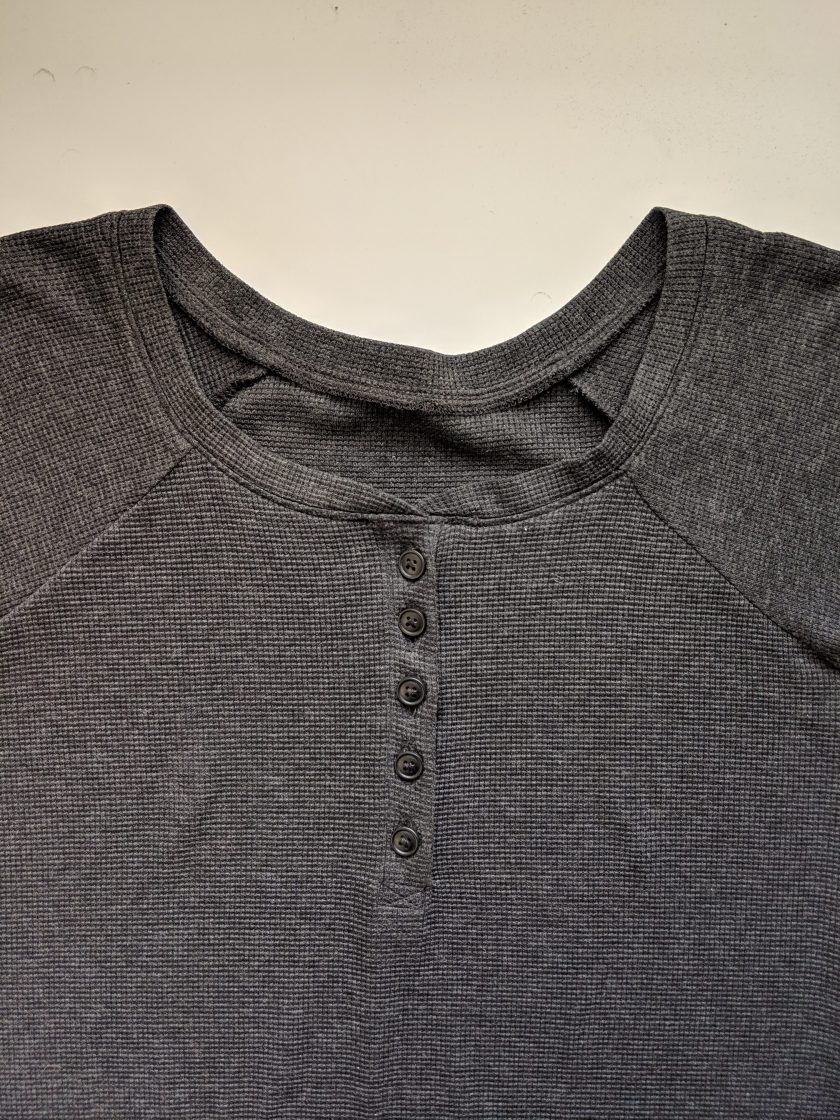
Haaaaappy Friday everyone! I shared some sneaks of this top on instagram last week and got a ton of requests for a tutorial, so here you go – a tutorial to sew a henley style placket and coordinating neckband onto any tee. I used the Lane Raglan for obvious reasons. I looooove how a henley placket looks on a feminine neckline like the Lane, but it’s also great on a higher crewneck style, like the Union! It looks equally great on fitted or looser tops, or even on the bodice of a dress. Or pajamas! Or a woven shirt! Use what you like.
This glorious waffle knit is from La Mercerie, and it worked out so perfectly for this top. It’s a rayon spandex, so it’s super smooth and flat and easy to work with (no curling edges!) The stretch, recovery, and drape are excellent for a henley placket Lane!
I also added extra long wristbands and just serged the hem on this top because those are common features I see on waffle knit henleys in RTW. Scroll toward the bottom of this post for a tutorial to make longer wristbands!
Henley Placket Tutorial
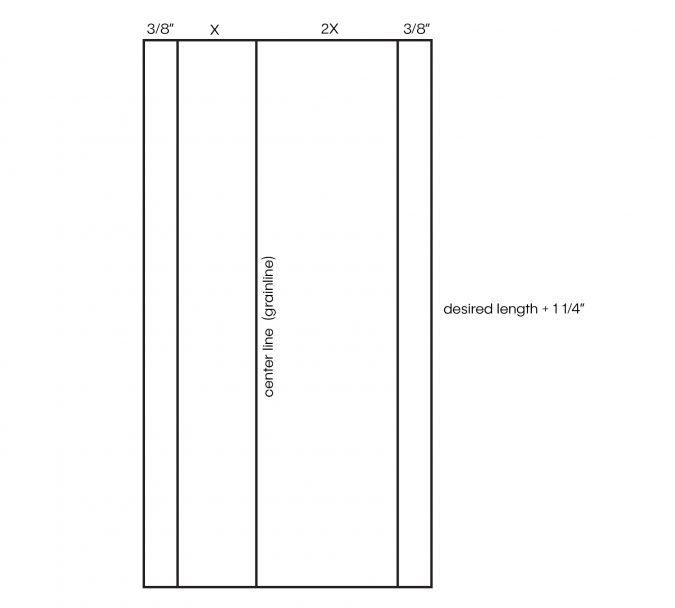
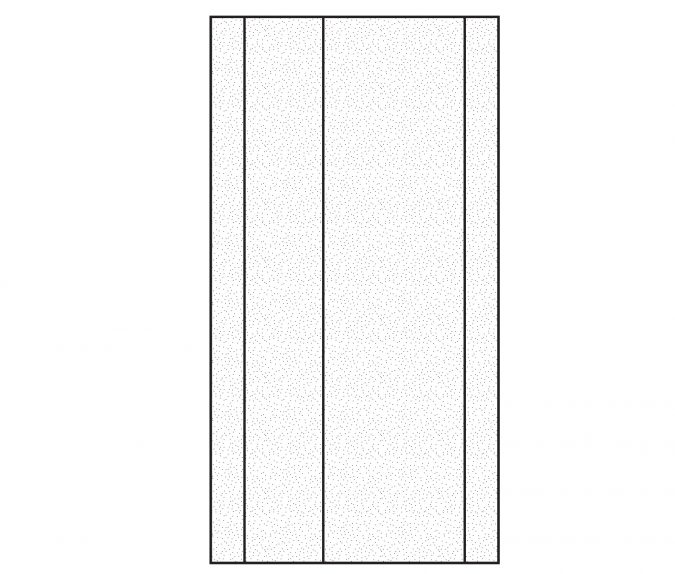
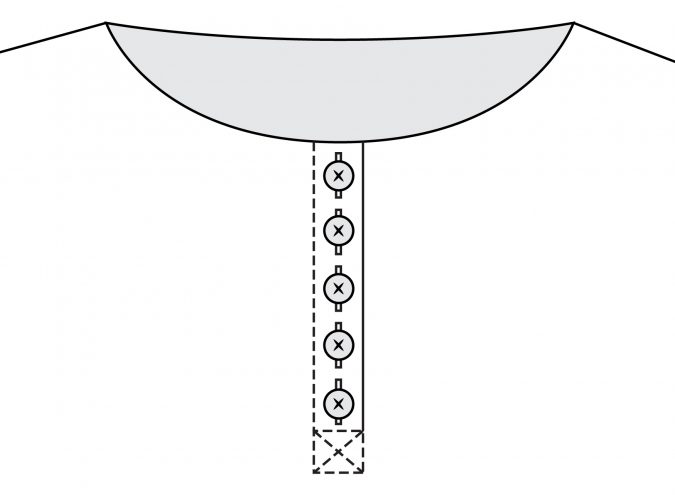
- Figure out how wide you want your finished placket to be. For my top, I chose 3/4″. I wouldn’t recommend less than 1/2″ just for ease of sewing. For men’s shirts, I would probably stick with 1″, but it’s totally up to you! Length is also personal preference. I measured to have my placket end at the bottom of my bra cup, which is a good reference point, but some henleys go nearly to the natural waist and some are only 2-3 buttons long. Again, that will depend partly on fabric, style, and the person who will be wearing it. Once you have your desired width (X) and length, draft a placket pattern piece according to this illustration:
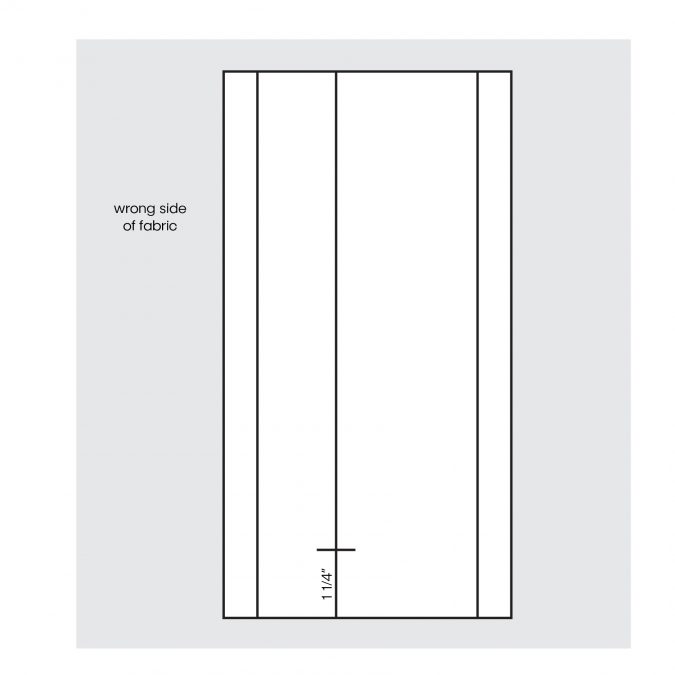
2. Lay your pattern piece on the wrong side of the fabric and cut it out. The only lines you need to mark on your cut pattern piece are the center line and a short horizontal line 1.25″ up from the bottom edge on the center line. The markings should also be on the wrong side of the fabric.
3. Press fusible interfacing to the wrong side of the fabric (redraw the center line and horizontal line if they are no longer visible).
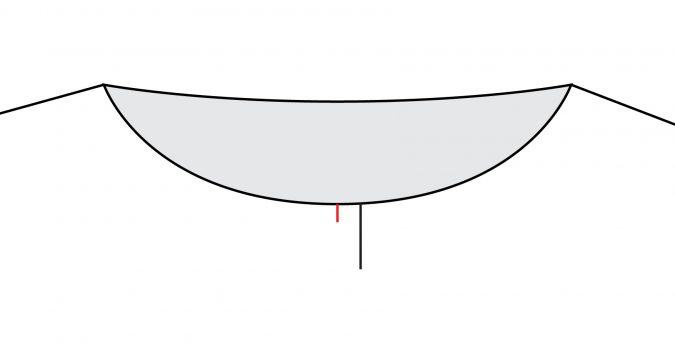
4. Find the center neck point on the front of your shirt (you can sew the placket on either before or after sewing the shoulder seams). The center line in this picture is shown in red. Measure to the right (wearer’s left) 1/2 the distance of X. Because my finished placket was 3/4″, this measurement for me was 3/8″. Mark a line at that point (shown in black).
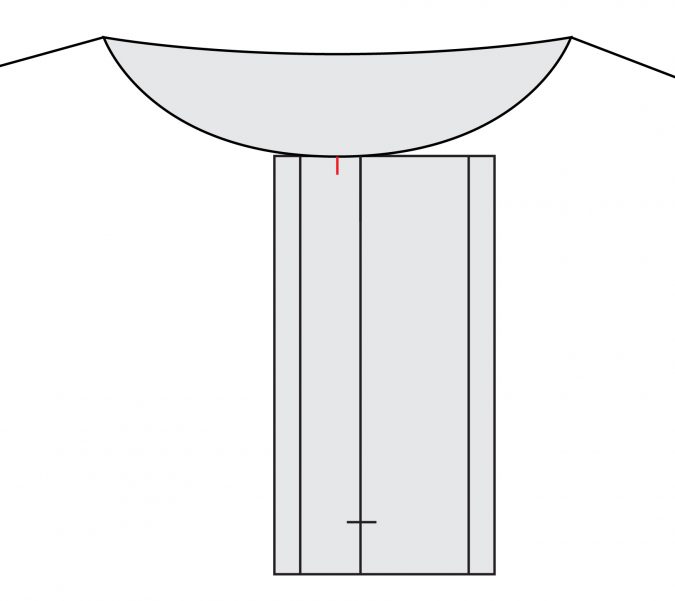
5. Align the center line of the placket with the black line from step 4, with fabric right sides together. Pin the placket to the shirt in several places, but not covering the center line. Make sure the placket is perfectly square on the shirt. If the shirt’s grainline is even, use that as a guide.
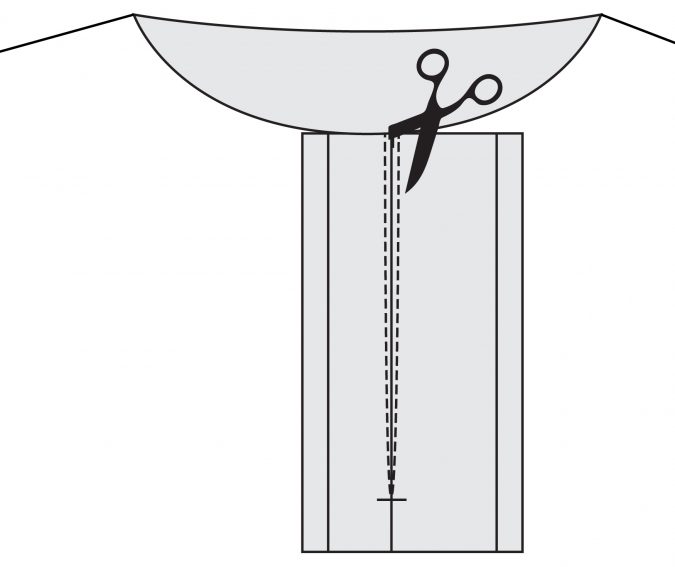
6. Use a very small seam allowance to sew the placket to the shirt around the center line. At the neckline, start with about 1/8″. As you approach the short horizontal marked line, decrease your stitch length to make sure the point is very secure. Angle in to a point at the horizontal line. Stop with your needle down right on the line. Turn the shirt around and repeat to sew back up to the neckline, again angling out until you’re using a 1/8″ seam allowance again.
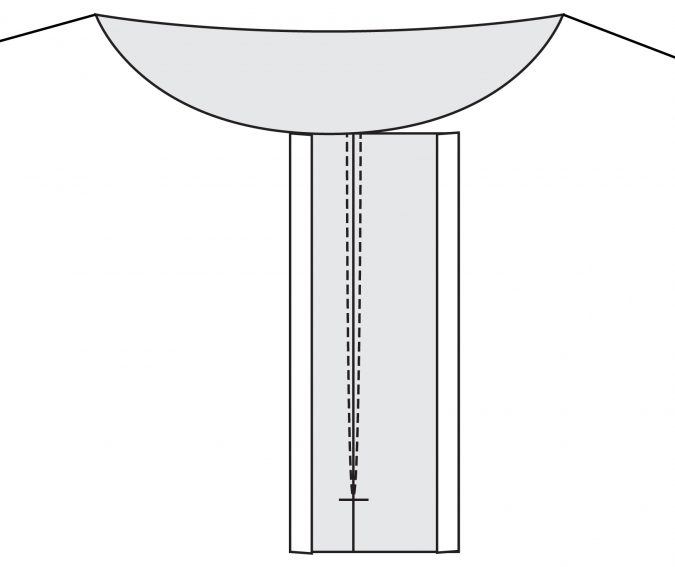
7. Use sharp scissors to very carefully cut down the center line, through the shirt and placket. Cut almost to the bottom point, but do not cut through the stitches.
8. Press the long edges of each side of the placket 1/4″ toward the wrong side. If you are wondering why 3/8″ was added on the pattern piece but the fold is only 1/4″, it is to account for turn of cloth. Knits can get especially bulky when you fold them, so we included a tiny bit extra at the beginning to mitigate that.
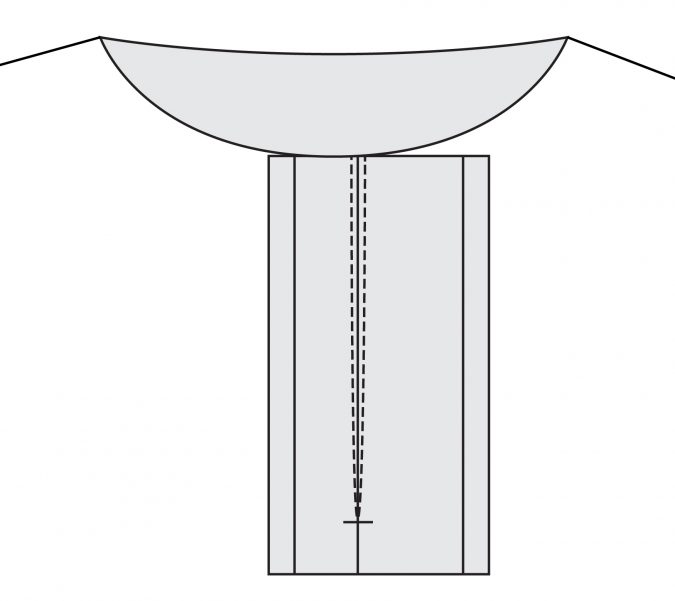
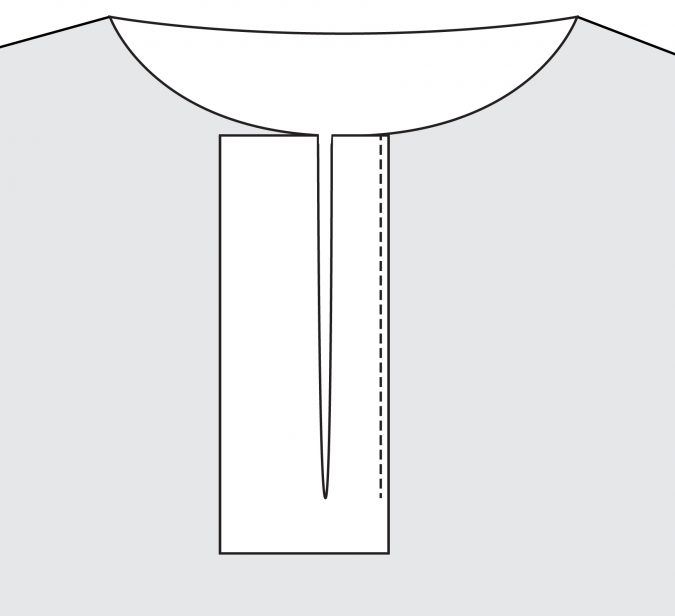
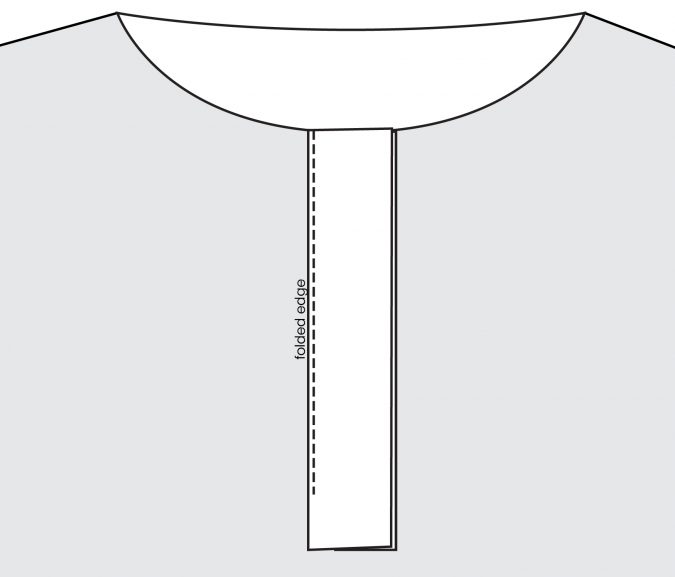
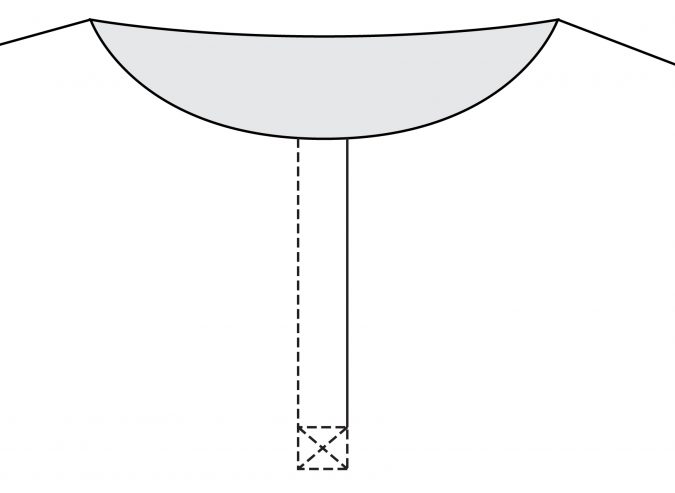
9. Flip the entire placket to the inside of the shirt. Maintain the pressed edges from step 8 and press the placket perfectly flat against the shirt. Use steam to make sure there are no puckers at the bottom of the slit. On the right (shorter) side of the placket, edgestitch along the fold from the neckline to the bottom of the slit. Pull thread tails to the wrong side of the shirt and tie them off at the bottom of this seam so you don’t have to backstitch. You can also top stitch this seam on the right side of fabric. Just use a ruler and chalk to mark the stitch line well so you catch the edge of the placket fold on the inside and your seam is perfectly straight.
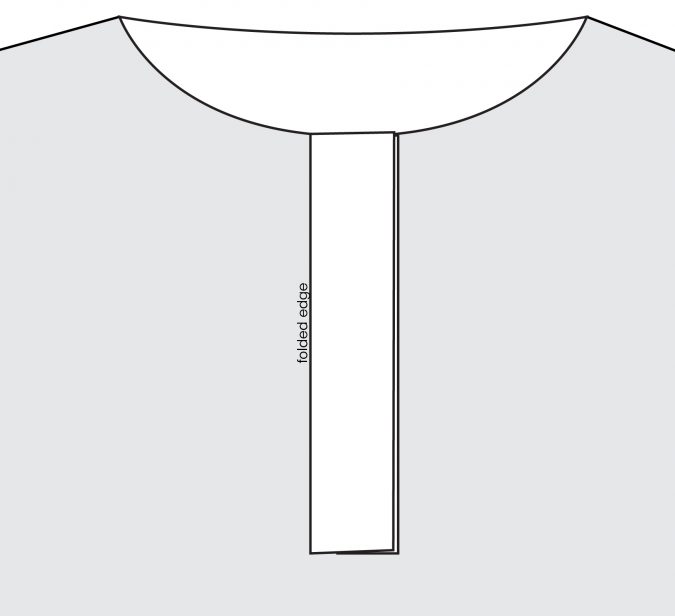
10. Fold the wider side of the placket wrong sides together until the pressed fold from step 8 is just covering the stitch line at the slit and the new folded edge is just covering the right side of the placket. In other words, the left placket should now be the same width as the right placket along the right edge and sitting right on top of it.
11. Once again, edgestitch along the folded edge from neckline to the end of the slit, or top stitch this seam after marking it on the front. Pull thread tails to the wrong side and tie off instead of backstitching.
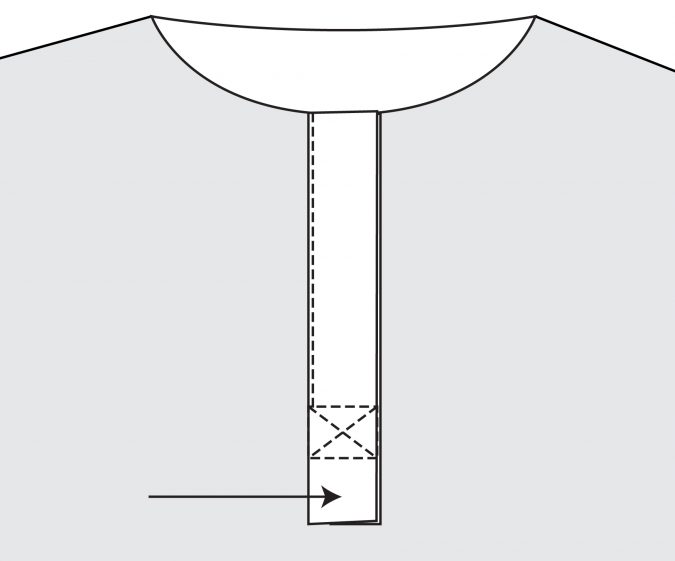
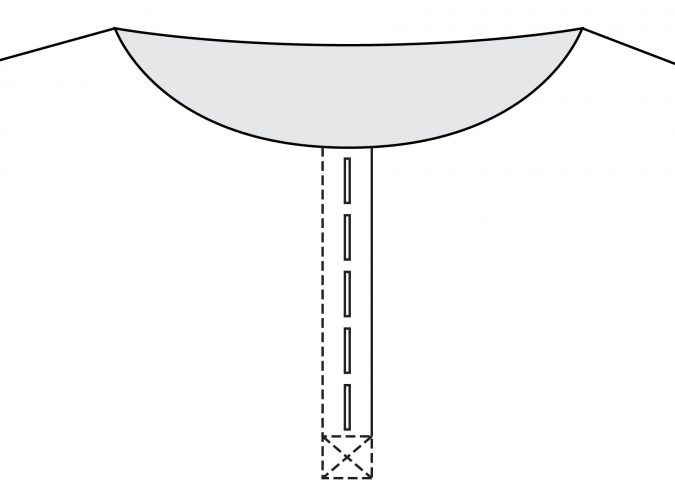
12. On the right side of the shirt, top stitch a horizontal seam at the end of the placket stitch lines to secure both plackets on top of one another and the shirt front together. You can also sew a square or rectangle, or sew an “x” shape inside the rectangle. You can get pretty creative with this step, all that matters is that the two plackets are secured directly on top of one another to the front of the shirt. When you start your seam, put your needle down directly at the end of the top placket’s stitch line and once again draw the thread tails to the wrong side to tie off.
Note: if you are more advanced, you can wait to sew the short (top) placket’s edge until this point and sew it in a continuous seam with the securing horizontal stitches or box. The key is to make sure the under (wider) placket is caught in the securing box seam but not in the vertical placket seam. As you sew up to the neckline, you’d have to move the under placket out of the way so it doesn’t get caught in the vertical stitches.
13. On the inside of the shirt, there will be placket tails hanging free below the horizontal or box securing stitch. You can handle those in a number of ways. I serged straight across mine to cut them and finish them in the same step. If you do so, leave long serger thread tails to weave back into the seam with a needle. You can also cut them and bind them with a scrap of woven fabric, or turn them under and stitch. Those methods can add bulk though, so if your fabric is relatively thin, I recommend just serging or cutting and zig zag stitching. In theory, the placket could also just be cut and left raw. It’s interfaced, so even a woven won’t fray. But finishing the edge is nicer.
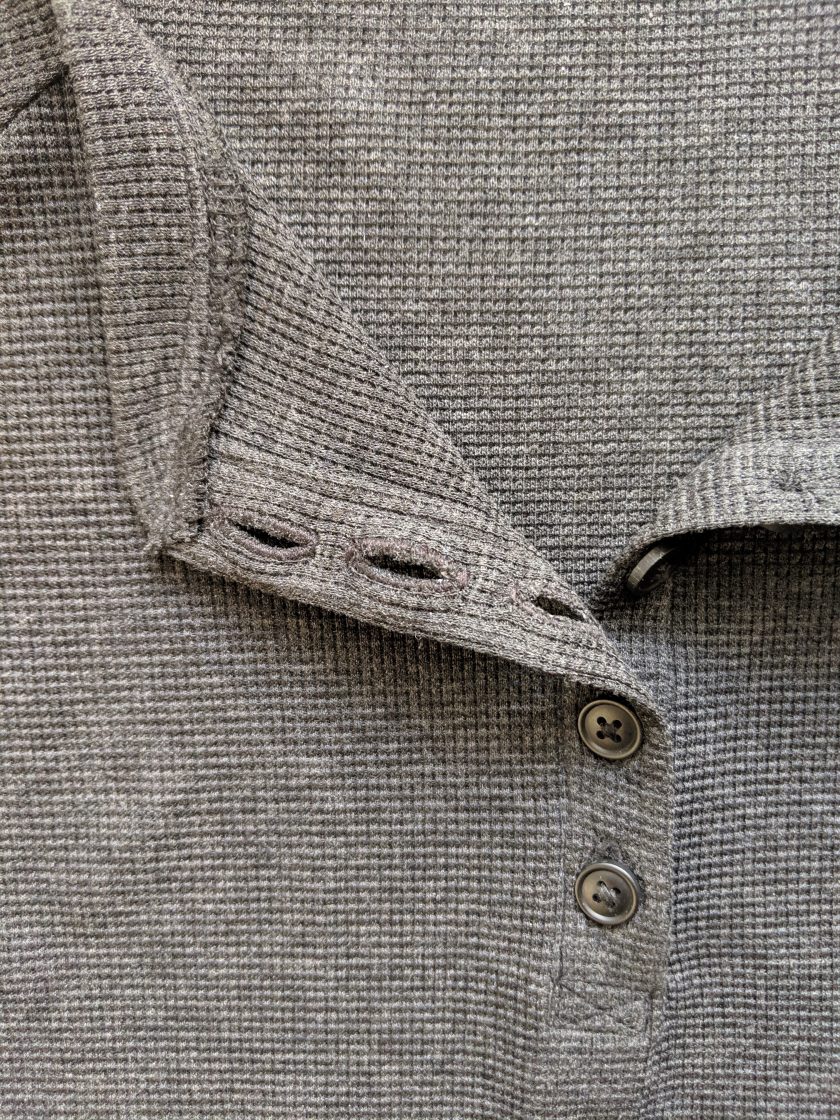
14. Determine your buttonhole or snap placement based on your placket length and button/snap size. Space them evenly, remembering to leave 1/4″ at the top for the neckband seam allowance plus at least another 1/4″ before starting your first buttonhole.
15. Sew on the corresponding buttons or apply the snaps.
Congrats! Your henley placket is finished!
Open Neckband Tutorial
Now that you have a split in your neckline, the traditional neckband pattern piece won’t work according to pattern directions. You have a few options here. You can choose to just sew the short ends of the neckband right sides together and turn them right side out, creating a squared finished edge on each side of the neckband. For a women’s henley especially though, I prefer a curved neckband edge. Here’s how you do that:
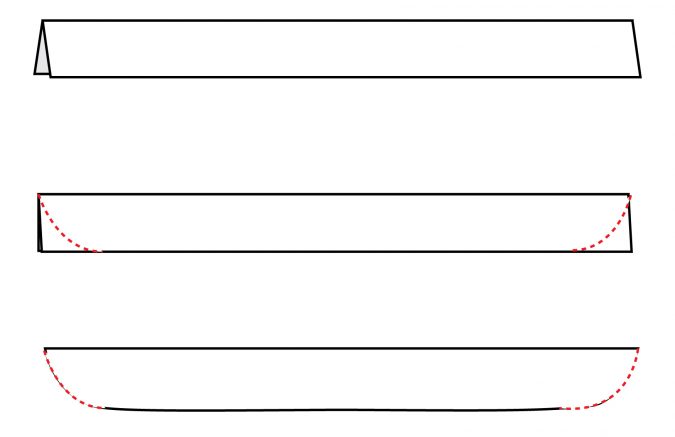
1. Measure the neckline of the shirt along the seam line, not the raw edge. Multiply that number by .85. Cut a rectangle that is the length you calculated and 2″ wide. The length will be along the direction of greatest stretch in your fabric, or crossgrain. Press the rectangle wrong sides together lengthwise.
Use chalk to draw in a curved line on each end starting at the corner with the fold and curving up to the raw edges. Make sure they are perfectly symmetrical.
Cut along the chalked lines that you drew on both sides.
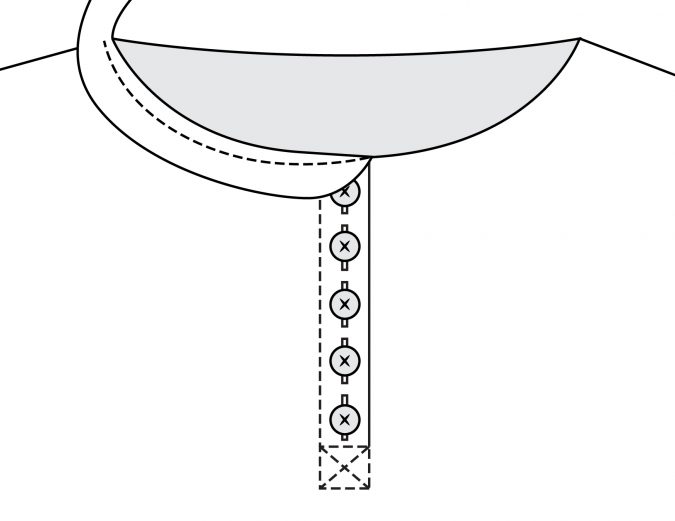
2. Because this step needs to be precise, I recommend using a sewing machine and even basting first to attach the neckband. After you sew it you can come back through and finish the seam allowances with a serger. Align the pointed edge of the curved neckband with the edge of one placket at center front. The two raw edges of the neckband should align with the neckline. Start sewing the two together precisely at the point of the neckband with no seam allowance. The point of the neckband can overlap the neckline by about 1/16″ to insure that no raw edges will be seen on the right side of the shirt when the neckband is pressed up. As you sew the neckband to the placket and then onto the shirt, angle the seam until you reach the 1/4″ seam allowance, and then continue using that seam allowance around the rest of the neckline until you reach the center front on the other side.
Like any neckband installation, it is best to pin the neckband and neckline together at the quarter marks before sewing and then stretch between pins while sewing. Remember that the shoulder seam is not the quarter marking on the neckline.
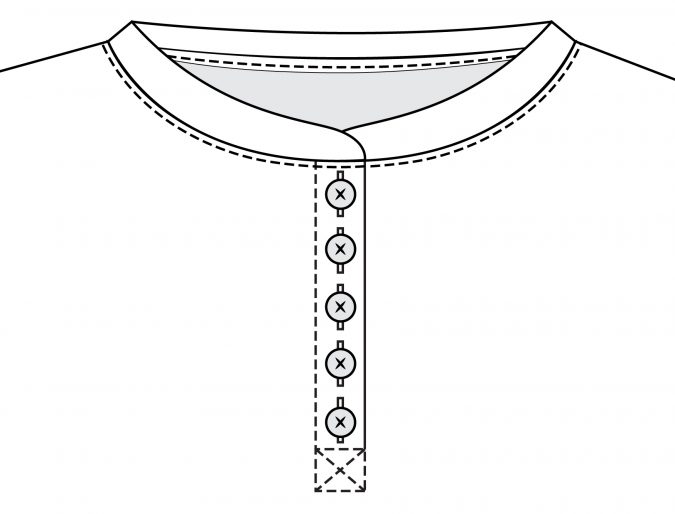
3. Repeat the steps from step 2 to finish the curved center front on the other side. Because the neckband extends to the edge of each placket, one will overlap the other when the plackets are closed. Press the seam allowances down toward the shirt. Steam them in place really well. Starting at center front, top stitch around the edge of the placket on the shirt, catching the seam allowances underneath. A longer stitch length is helpful, but this seam does not need to stretch since the neckline can be opened for dressing if necessary. At center front, pull the thread tails to the inside and tie them off. Press and steam the finished neckband well – no neckband is finished without that step!!
Extra Long Wristband Tutorial
When making an extra long wristband, you’ll achieve a better result using these instructions instead of just lengthening the band. If you simply lengthen a wristband, it doesn’t lay as nicely against the forearm, and the sleeve will most likely puff out around the top of the band. Unless you’re from Victorian Times you probably want to avoid that.
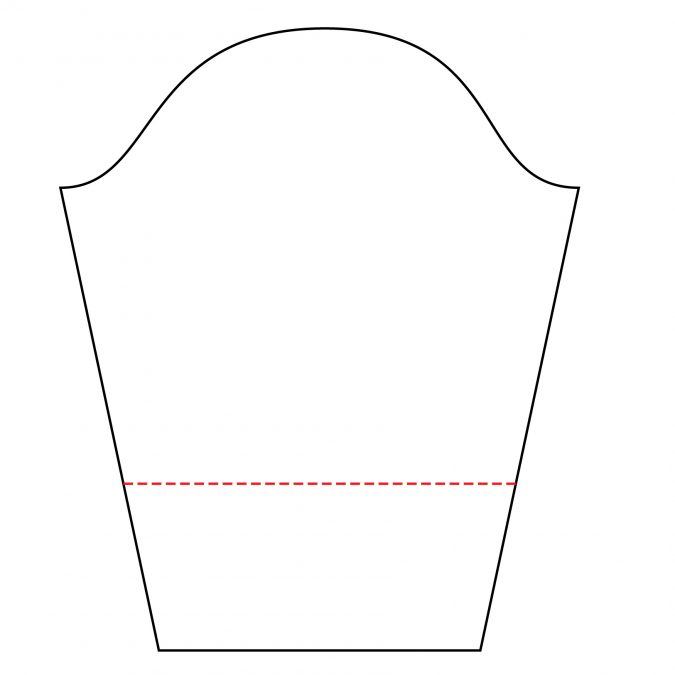
1. Cut the sleeve where desired. For an extra long wristband I like to measure up 6″ from the hem but this is fully personal preference. I’ve seen some RTW where the cuff starts at the elbow crease. Measure the cut line (shown in red).
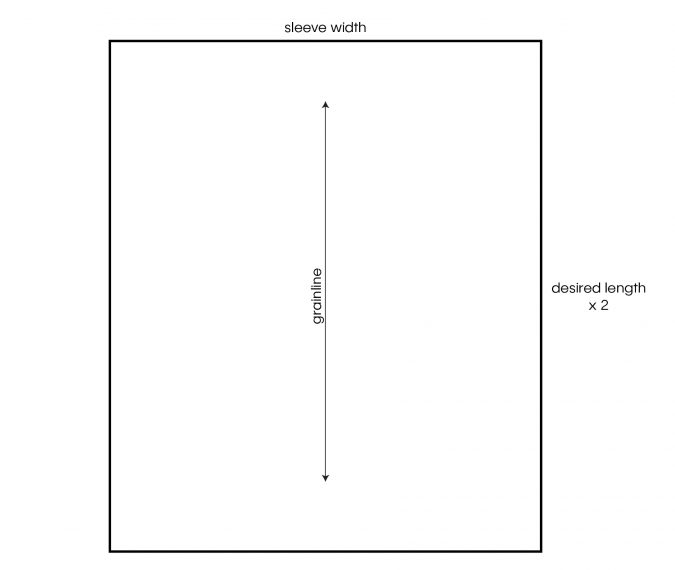
2. Use a ruler to draw a rectangle that is the same in width as the red line from step 1 and twice the desired finished length of the cuff. Remember that you will lose 2 seam allowance widths when you sew it to the sleeve, so make sure to account for that in your length.
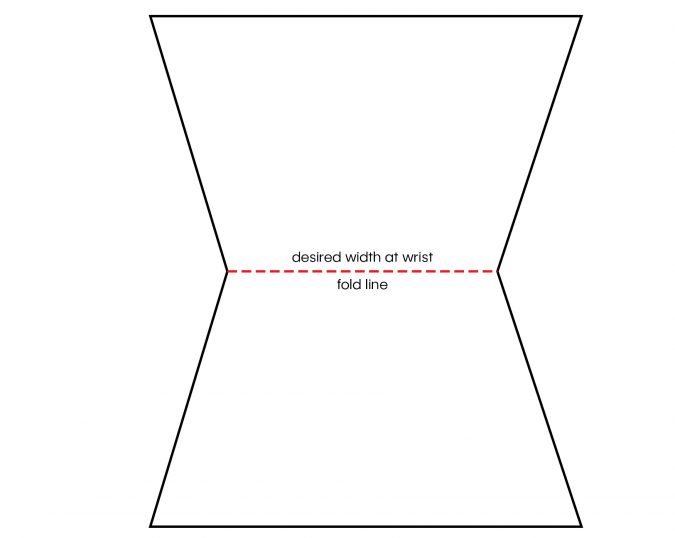
3. Measure to decide how wide you want the band to be at your wrist (wrist circumference). Fold the pattern piece from step 2 in half lengthwise and square out from the fold halfway down the rectangle the desired wrist circumference divided by two. Cut from the top and bottom edges to that center point, creating an angle. When you open the pattern piece back up, you’ll have this perfectly symmetrical hourglass shaped piece with the center fold line the width of your desired wrist circumference. Use this to cut two wristbands, remembering to keep them on grain.
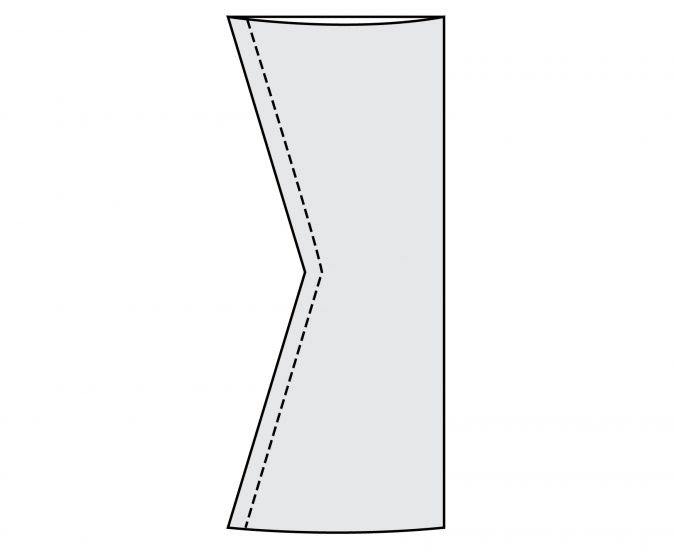
4. Sew each wristband into a tube right sides together along the long edges (grainline). Press the seam allowances open or to one side if serging.
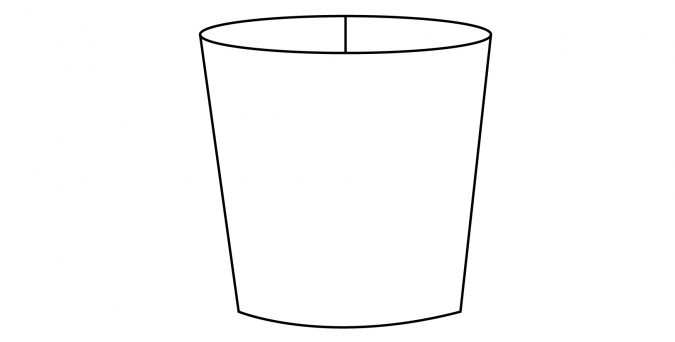
5. Fold the wristbands wrong sides together along the center fold line until only right sides are facing out and the two raw edges align. Press them well. Now they are ready to sew to the sleeve just like you’d sew any wristband.
WOW! Did you make it this far? I think I took a nap halfway through. There you have it – 3 full tutorials to sew a henley placket, split neckband, and extra long wristband. What can I say except you’re welcome.
Because this post isn’t long enough, please gather around for storytime now.
Once upon a time I grew up in Miami and went to an inner city school. My surroundings and the fashion of the time and place did not influence my wardrobe, however. Nay, I had no greater desire than to grow up and one day achieve my dreams of becoming a lumberjack. They say you should dress for the job you want, so I dutifully wore my plaid flannels and lace up timberland boots through sun and humidity and more sun and humidity every day, proudly oblivious to the stares and side eyes I generated. It will come as no surprise that I have never felt more at home than I do now living in Colorado. And although I did not fulfill my lifetime dream of becoming a lumberjack (the calluses! who knew!?), I do still endeavor to dress like one whenever possible and never feel more comfortable in my own skin than when I’m in full plaid regalia.
TL;DR: my new waffle knit henley is pretty damn perfect for my wardrobe!


Nicely written and Very handy to know. Thanks. I’ve been sewing for 50 years + and still love learning something new!
This has to be the clearest explanation I have ever had on how to do this. I am extremely greatful. Thank you so much for the tutorial.
I am grateful for the Henley tutorial. I have been wanting to make one and have used your instructions, Most of the instructions are clear, detailed and very helpful but I am confused about the collar. Do you want to sew the curve while the collar is right sides together? Otherwise the ends of the collar are raw edges and according to the illustration it looks like the curved top portion is not sewn directly to the shirt but the flat bottom side is.
Hi Lisa,
I’m not totally sure I understand the question, but basically after you cut the curve into the neckband you apply it the same way all around. So when you reach the center front points, the neckband automatically becomes narrower and curved because of the way it was cut. But you still apply it with the neckband wrong sides together, raw edges aligned with the raw edge of the neckline. The center front point needs to be sewn perfectly so the raw edges of the tip of the neckband do not extend past the center front of the shirt. The picture just above the sleeve alterations probably best shows how it’ll look if it’s sewn correctly.
hi lisa – i can see the issue you are having – i am having the same issue. the graphic showing the neckband being sewn right sides together, while still folded down seems confusing because the curve shown in the graphic is a raw edge and when flipped up would show an exposed edge. i’m currently sewing a henley pattern and have had a hard time matching the neckband to the shirt so that it looks like the completed picture above. all other instructions above have been super helpful. in case others are having this issue it may be helpful for more clarification. thanks! xo chelsea
These are some of the best and most professionally presented instructions (while being down to earth and applicable to home sewers) I’ve seen online. Thank you so much. I’m so tired of reading blogs by people that “just tried it out yesterday”. It’s also very nice to see your attention to detail, in tying off threads!
These are extremely helpful directions. I have been looking for something like this! Thanks so much.