
I know I say this a lot, but I am completely blown away by the tutorial coming your way today! Audrey from Skirt Fixation used the Halifax Hoodie to sew her own puffer jacket!! From SCRATCH! And by that I mean that she literally sewed this fabric herself by quilting the shell and adding batting. I’m so crazy impressed and only like 5% jealous (ok, 95%.) Audrey is sharing her tutorial below and I think you’ll find it’s easier than you may expect!
~~~~~~~~~~~

Hi there! I’m so excited to be back today showing you what I did with the Halifax Hoodie pattern! I hacked it into a puffer jacket, but I think you can still see View C of the Halifax Hoodie pattern.
Here’s the back story; I’m 6’ tall, and I’ve never had a jacket fit me properly in my entire teenage or adult life. And people, I grew up in MONTANA! I either had to make due with a man’s jacket that had long enough sleeves, but was too big everywhere else, or a women’s jacket with woefully short sleeves. Recently my sister (who is also very tall) sent me a photo of her new puffer jacket from a specialty tall clothing shop. And suddenly I’d had enough and decided this was the time to make my own puffer jacket, once and for all. Using her jacket as my inspiration, I saw the bones of View C of the Halifax Hoodie, and got to work. I don’t have a step by step tutorial for you with photo instructions this time, so hopefully you can follow these instructions if you want a similar puffer jacket.
First of all, I went up 1 size from my regular size. In retrospect, I could have graded up 2 sizes in the arms from below the armscye down to the wrist, because they are a little tight. The 2 layers of quilt batting between the lining and the outer fabric are the cause, not the pattern for sure.
I added 8 inches to the body length because I was not using the band, and to make it come to my fingertips in length.
I also added 4 inches to the length of the sleeves to accommodate for my long arms, and also no cuff at the end of the sleeves.
The hood was modified to be a 3 piece hood later in the process. There may or may not have been a panic-y photo sent to Adrianna of me in a triceratops-esque hood already sewn onto the jacket, and later some ripping involved. But spare yourself the trouble (and Adrianna the photo!!) and modify the hood to have 3 parts instead of 2. Each side piece will be narrower, and the center will be a long rectangle.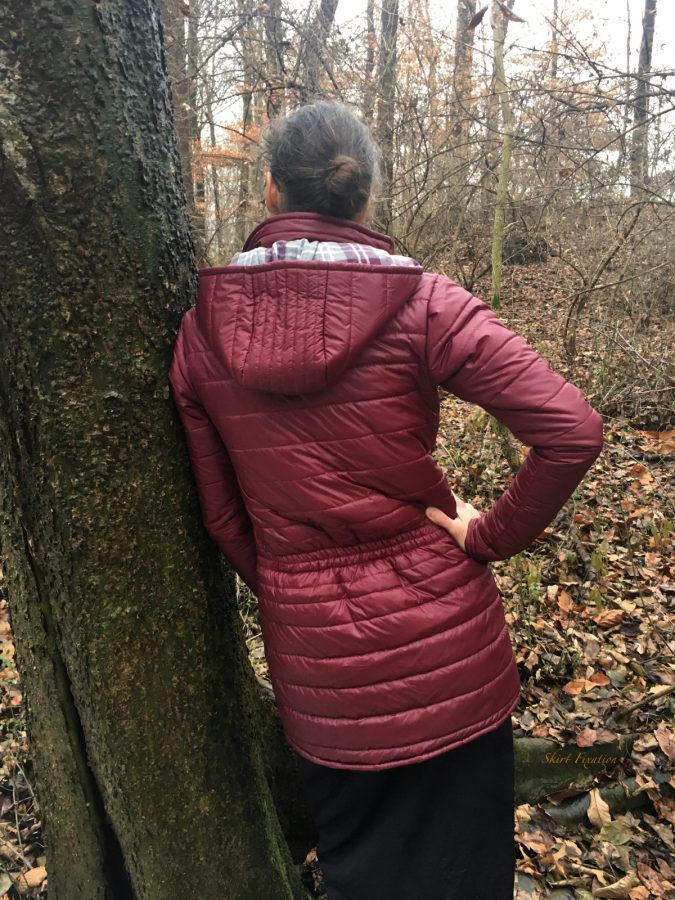
I added the turtleneck piece from the Tallinn Sweater for neck warmth above the hood. This piece was only cut on the vertical fold, not cut out on the horizontal fold, as I wanted the inside of it to be from lining.
There I mentioned the lining again, so let me go on to that! I cut out all my pattern pieces for View C of the Halifax, as modified above, from the outer fabric, quilt batting and my flannel lining fabric. I quilted the outer fabric and the batting together. (If you’re interested in more details about this, check out my DIY post about it over at Mood Fabrics!) Then I added welt pockets, because an epic jacket calls for epic pockets, don’t you think?
Across the back, I added some 2” wide elastic, because although I wanted a puffer jacket, I didn’t want to look like the Pillsbury Dough Boy! I just estimated how much I’d need and stretched it as I sewed across the previous quilting lines in the center of the back.
Next I constructed the outer jacket and the lining basically following the instructions for View C, but putting on the hood and neckpiece before installing the zipper. On a lined jacket, the zipper is one of the last steps.
To add the zipper, you sew it to the outer jacket first. Next you place the lining over the outer jacket, right sides together. Starting part way down the zipper (with it partly unzipped) you sew the jacket and the lining together all the way around, stopping about 4-6 inches from where you started. Sew down the zipper, across the bottom, up the other zipper, up the neckpiece, across the top of the neck piece and back down the original zipper. Pull the jacket out through the opening you left in the zipper. Topstitch around the same path again, closing that opening.
The final step is to fold both the outer fabric and the lining to the inside at the base of the sleeves and topstitch them together, closing the jacket at the sleeves.
There are some lessons I learned, and changes I would make for next time, but you can probably tell I’m very excited to have an ethically-produced, custom-fitting puffer jacket, made from the Halifax Hoodie pattern! For more of my sewing adventures, catch me over at my blog Skirtfixation, or on Instagram.
~~~~~~~~~~~
Thank you so much Audrey, this is just beautiful. I think my favorite part is the different quilting width in the center hood. It’s details like that that make handmades so special!
I am astounded! And I want one! I love three piece hoods too!
Thank you so much for the inspiration! We travelled recently and all of my warm clothes had to be left behind, so I had to SHOP. I don’t really relish shopping and I found those puffer jackets to be SO priced out of my budget. I just sucked it up and vowed that I would figure out how to make my own puffer jacket- And There YOU were! You did all of the research for me and shared your techniques. THANK YOU SO MUCH!