
Hi guys, happy new year! I’m so excited to have guest poster Michelle here today. She’s going to show you all how to do an amazing flatlock stitch on your regular old serger. Are you ready to elevate your sewing game in 2016? Detailing is one of the best ways to take it to the next level! So read on, and don’t forget to show her a little love in the comments for a fantastic tutorial! Take it away Michelle!
—————————————–
Hey there, It’s Michelle here, from SewJourners. I’m going to share with you my newest addiction – flat locking.
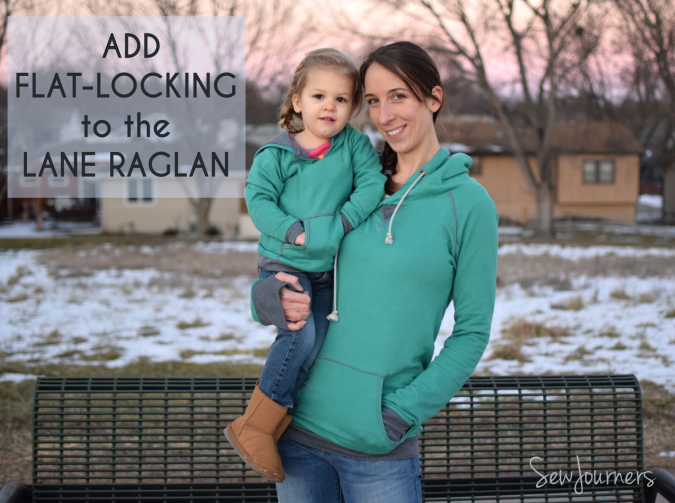
You know that decorative stitching you find on ready-to-wear sweatshirts and raglans, that you might think you need a cover-stitch machine or a super-fancy serger to achieve? Well it’s actually super easy to do on a serger!
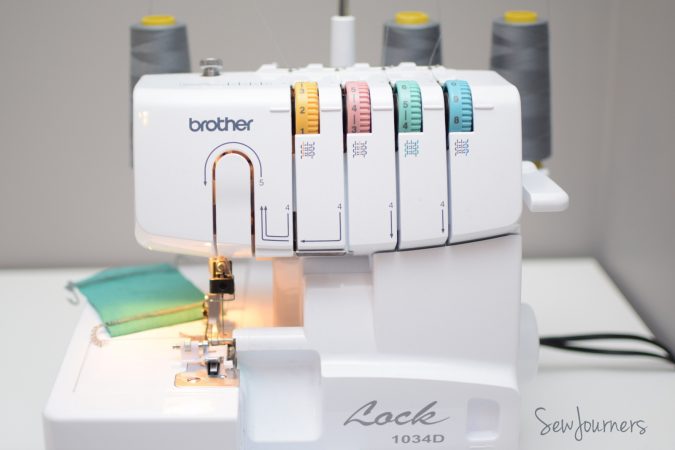
I was surprised to find there are actually instructions for this in my serger manual (Brother 1034d). However my manual and I aren’t the best of friends, so let me do you a favor and decode its instructions and pictures. I’ll start out by explaining how to set up the Brother 1034d to do flat locking (even if you have a different serger, the instructions should be similar, otherwise hopefully your manual has better pictures than mine) and then I’ll show you how to construct the Lane Raglan with a few tips so you spend more time sewing and less time threading and re-threading your machine.
If you don’t need the set-up tutorial, skip ahead here.
How to set up flat locking (Brother 1034d)
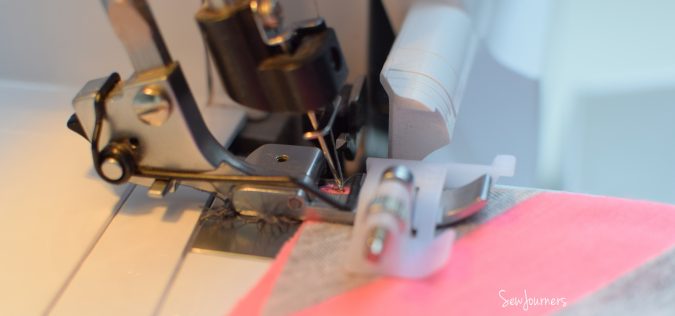
First off you are going to need the blind stitch presser foot. Mine came with my machine. Of course I had no idea what it was so its been living in a box full of random feet for the past 3 years. Bummer of a life if you ask me.
The blind stitch presser foot has a guide that keeps your fabric from the blade and creates loose stitches which will flatten out once you pull your fabric flat. There is also a wheel on it to adjust how close to the edge your needle will pierce the fabric. Adjust this closer to the edge if your flat locking doesn’t lay flat.
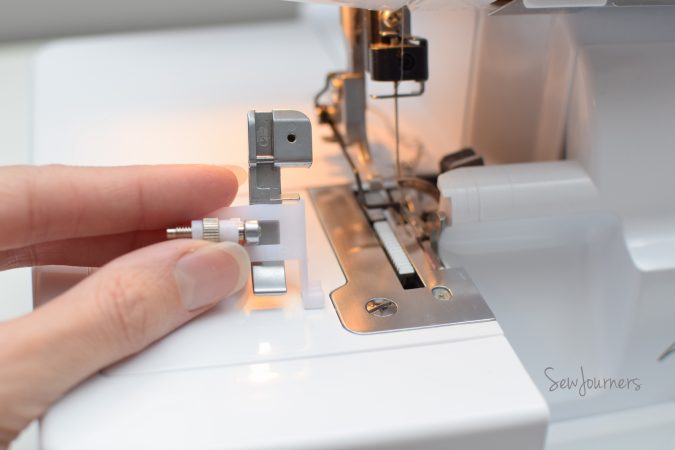
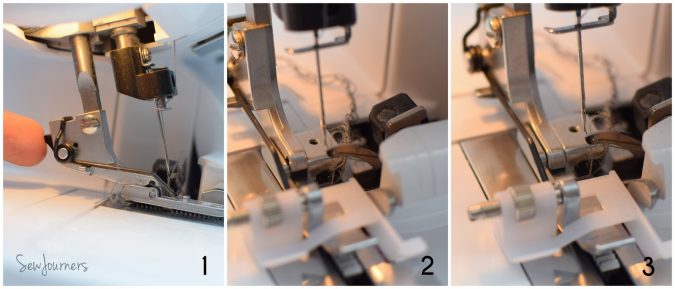
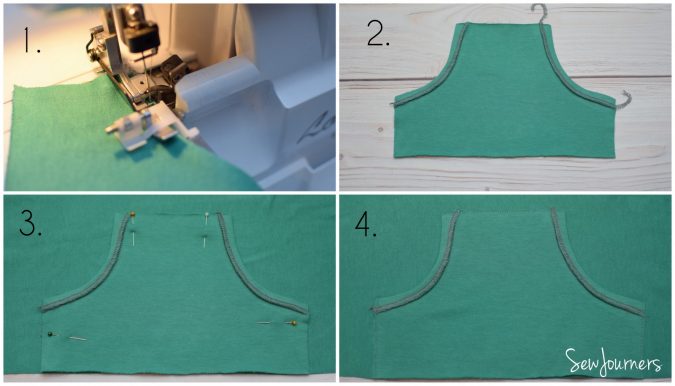
Remove the right needle and thread. Release the standard foot. (fig. 1) Now raise the presser foot lever up higher by simply lifting it a second time and holding to get additional clearance. Slide the blind stitch presser foot in place (fig. 2) and lower the presser foot. Adjust until it clicks into place. (fig. 3)
 Set your tension as listed below. You will want to play within the ranges depending on your fabric and the amount of layers you are doing, so make sure to practice on scraps first.
Left needle: 0-3
Upper Looper: 2-5
Lower Looper: 6-9
Stitch width: 5 mm
These are the settings that worked best with my fabric.
I made sure to practice with 2 layers and 3 layers since my project would have both.
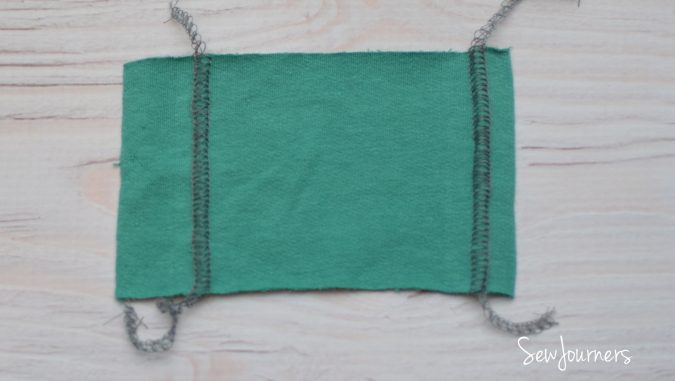
To achieve the look we are going for we want to stitch on the right side of the fabric. Fold your fabric right where you want the decorative stitching to be. Raise your needle all the way up and set the fabric right in front of the needle. Run it through your serger leaving a fair amount of chain off before and after since these stitches unravel quite easily.
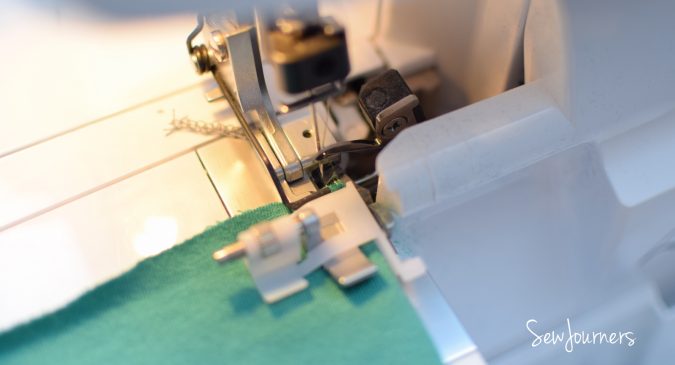
Then unpick the chain off and tie it off right away so that it doesn’t unravel. You will want to do this even if you will be serging over it. – Trust me!
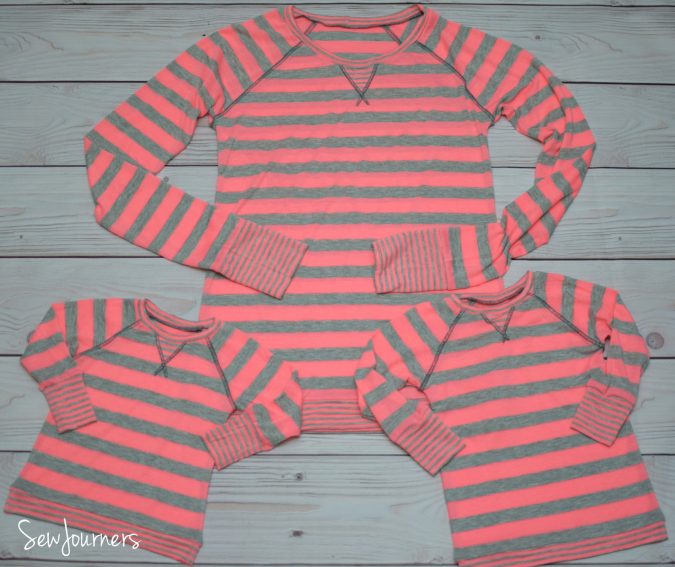
Now let’s start constructing the Lane, or Halifax, or Hatteras, or whatever you’re making and I’ll go into more specifics at each step.
Constructing the Lane Raglan with flat-lock stitching:
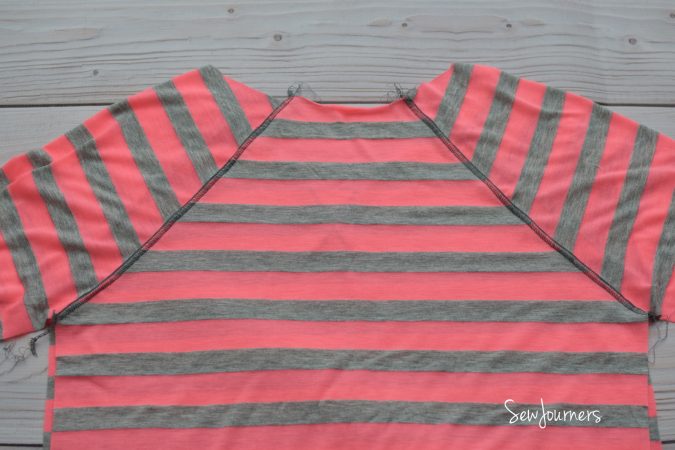
Go ahead and assemble all the sleeves (shoulder seams only) without sewing up the side seams yet. Basically go through step 5 in the Lane Raglan pattern. I did this in 3 needle serging to save time switching settings. It is sufficiently strong, plus we will be going over all these seams with flat locking for extra stability.
Once your sleeves are all attached switch to your flat locking settings.
If you are going to add a kangaroo pocket, we will do that first. If not then skip ahead to the neckline triangle.
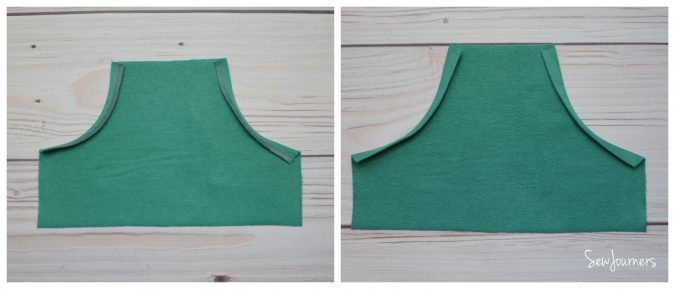
For my Lane I used the kangaroo pocket pattern from the Halifax Hoodie. I also made a Hatteras Hoodie for my daughter and that is what I am going to show you here.
If you are using the Halifax Hoodie pocket you will want to add a 1/2″ to the curved part of the pattern since we will be folding that in, and you will want to cut a 1/2″ off the sides and top since we will not be folding those in. For the Hatteras you only need to cut the 1/2″ off the sides and top.
Fold the curved edges over a 1/2″wrong sides facing. Fold in again.
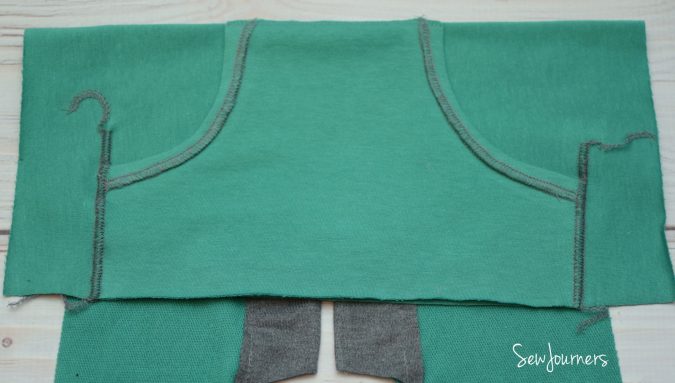
Flat lock along the right side of the curved edge. (fig. 1) I adjusted the wheel on the blind stitch foot so the needle would be farther from the edge since I needed it to catch the raw edge that was folded under first.
Chain off and tie off. (fig. 2) Center pocket on the bodice, right sides facing up, aligning lower raw edges. Pin in place. (fig. 3) I sewed the pocket to the shirt first for added stability. (fig 4) The raw edges are showing and that is fine. They will be encased in the flat locking.
Then add the flat lock sticking to the sides and the top of the pocket. Fold along the raw edges and start and finish the stitching about an inch from each corner. Chain off and tie off.
Done.
*You will notice that in these pictures I did the pocket and the triangle without first doing the shoulder seems. That is fine. You just want to avoid switching presser feet as much as you can!
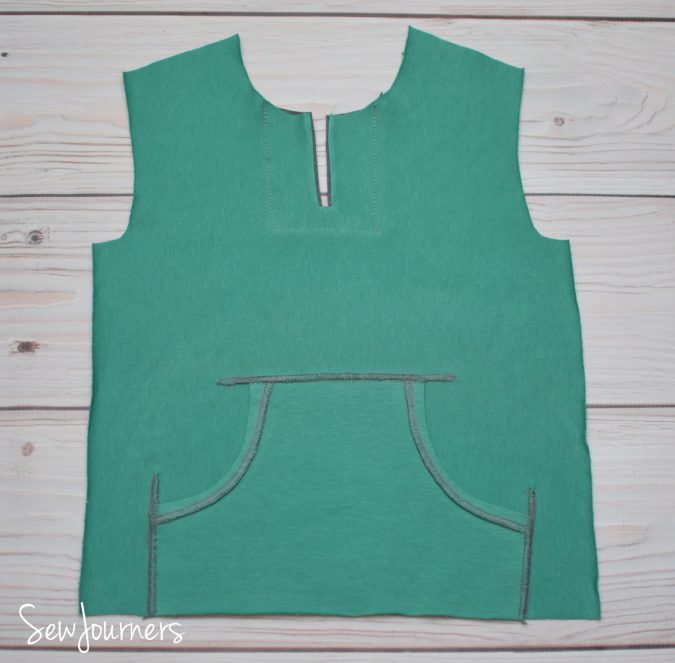
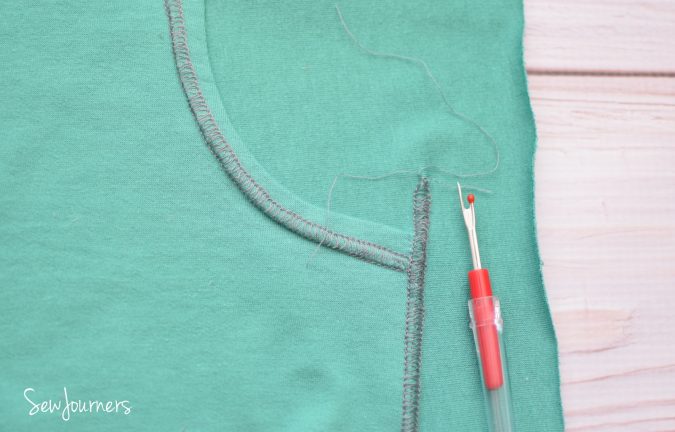
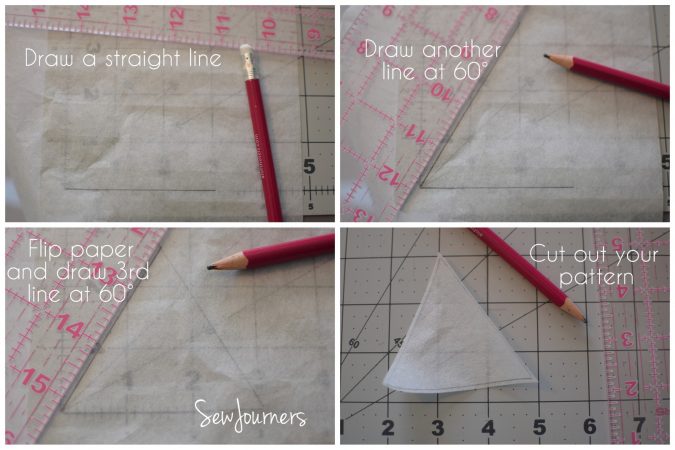
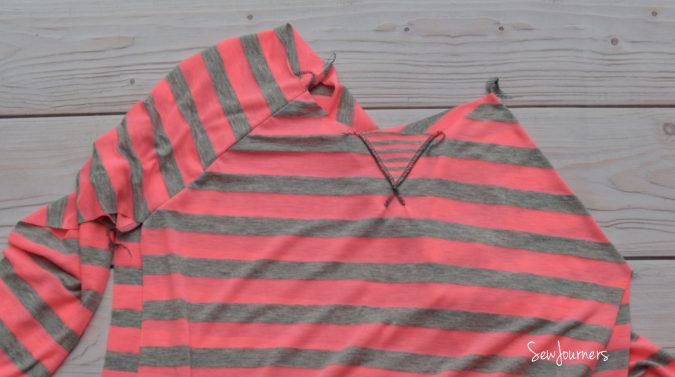
To make a triangle pattern for the neckline draw a straight line 2.5″-3″ long on tracing paper. Using the 60° angle from your cutting mat draw a second line for your triangle. Flip the paper over and connect a third line. It won’t matter that you are drawing on both sides because it’s transparent. Now cut out a piece of your fabric using this triangle pattern.
Center the triangle along your neckline right sides facing up and clip or pin in place.
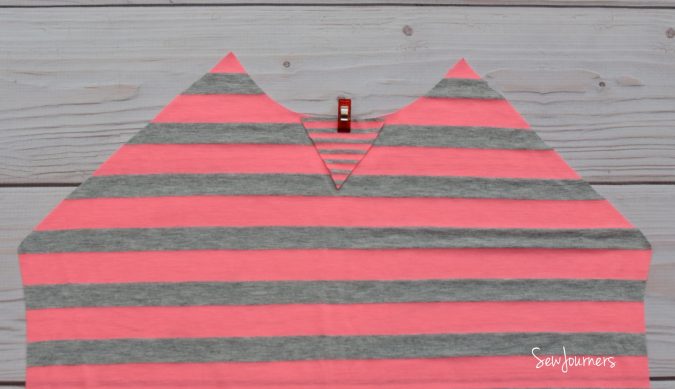
Fold the shirt under, wrong sides facing along one raw edge of the triangle.
Serge along that line going about 1″ past the bottom point of the triangle. Chain off and tie off.
Unfold the fabric and pull gently until the stitch flattens itself out. Press and repeat for the other side.

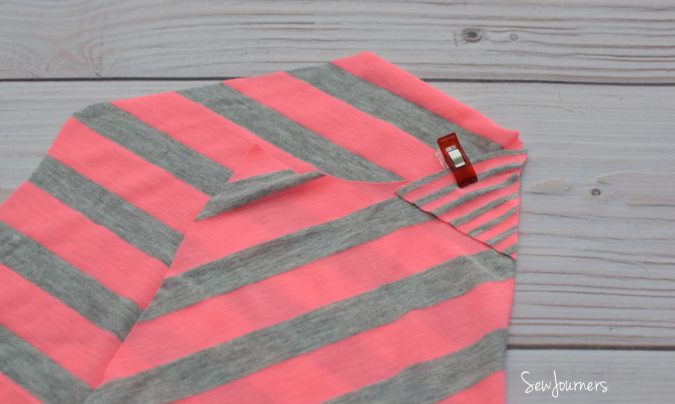
Now we’ll add the stitching to the four shoulder seams. Fold along each seam and pass through the serger.
Tie off the ends and pull at the seams to flatten the stitch.
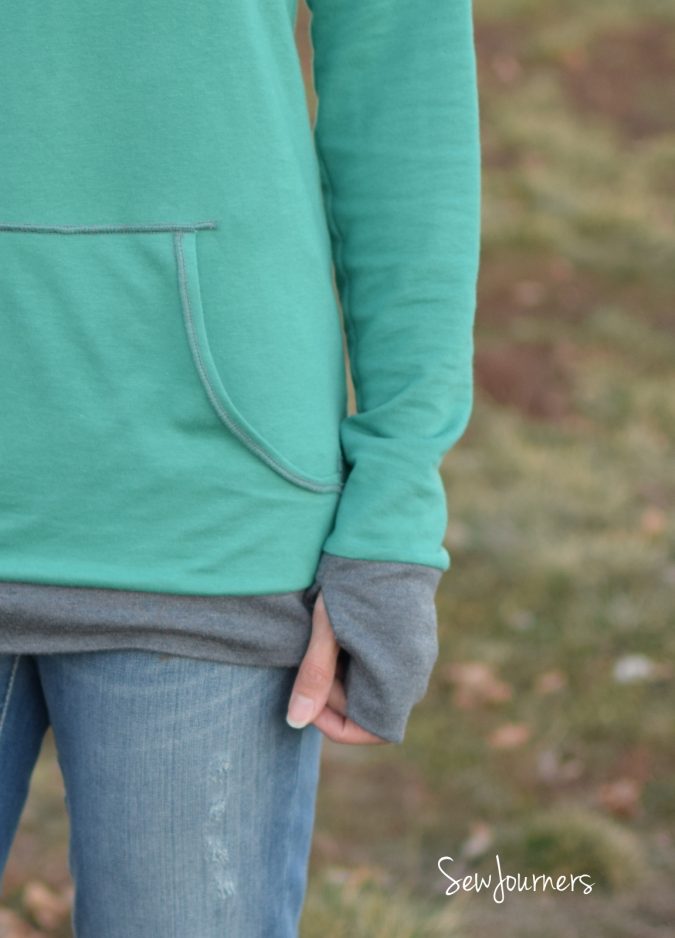
Now you can switch your foot out for regular serging and finish the shirt according to the pattern. Or you can add flat locking to the cuffs as well. Go wild!
Thanks for letting me share with you today. I hope you love this technique as much as I do. Be careful though, it’s addicting!

————————–
Thanks so much Michelle! Flatlocking was my one 2016 sewing resolution, so your timing is perfect! Who else is ready to give this a shot?
Oh my gosh! I just got my machine and was messing with it this weekend to do a rolled hem (which curse it, I never figured out?) and was looking at this foot and that this was an option! Wahoo! I have a sweatshirt on the agenda this week and I so want to attempt this! (Crossing my fingers it will work better then my rolled hem attempt) Thanks for the perfect timing tutorial!! ?
And I am so impressed you just got this machine! All you lovely handiwork has been without a serger?!? Amazing.
Fabulous tutorial! I have been wanting a coverstitch for so long. I’m going to have to figure this method out for my Janome and see if I can make it work. Thank you!
I spent a lot of money on a babylock last year, and then decided I needed a coverstitch, too (hubby has not agreed yet). Now I can learn how to use the flatlock stitching instead!
Well, I’m still a huge proponent of coverstitch machines, but this one will work in a pinch! You won’t have that double line of stitching, but you will get a hem that stretches!
I have a husquavarna serger and when I took my class we did the stitch to attach two pieces of fabric with no overlap. You pull the seam flat after. Is this the same stitch? If so, I don’t have the foot that keeps the fabric away from the blades… Should I be able to buy one?
That is another flat lock method. In that case, the blade is ok, so you should be able to use your standard foot. I’ll be honest I’m not sure how strong the seam will be with a serger though. You may need to play around to see.
Yes, same stitch, using a blind hem foot. If you don’t have one they should be pretty easy to find!
Amazing tutorial! Thank you!!
Seriously this is brilliant! Makes you want to do a faux coverstitch on everything!!
I loved this tutorial, I had no idea this was possible with the Brother 1034D. Thanks for the great photos and detailed instructions!
I’ve been wanting to do this for a while with my workout leggings for a more athletic look! I just never had the chance to find a tutorial. Thanks so much!!!
Thank you for taking the time to explain step by step with written instructions and pictures to show us and help us understand. It is so helpful to be able to visualize from beginning to end. It gives me motivation to want to try and see what my server can actually do. Thank you.
In ALL the years I have been sewing/serging – I could never figure out how you could get serging in the middle of a garment. I never took the time to figure it out, but someone shared this tutorial and I was like “DUH!!”?? Really, why didn’t *I* think of that!!!
Thanks for sharing your wisdom with us knuckleheads!
Lisa J.
Great tutorial with helpful info and pictures :)… One question, the Brother manual suggests using “decorative heavy thread” for this decorative overlock stitch. Did you use the decorative thread? If so, did you using 3 cones or just 2, one for each needle? Thanks 🙂
Hi Jayne,
A decorative thread would be really nice but I believe she just used regular thread for this tutorial. You only use one needle while flatlock stitching, so you’ll need 3 cones total for the needle and two loopers.
Hope that helps!
Adrianna
Thanks for this great tutorial! I love the coverstitched look but don’t have a coverstitch machine. Do flatlocked seams need to be reinforced with a zigzag stitch on your regular machine? Seems like just straight flatlocking could result in skin showing through the seam line.
Flatlocking is a decorative topstitch, so it isn’t used on any construction seams.