Hello lovely sewists! I’m here to show you how to do a full bust adjustment on a woven dolman shirt. There’s nothing to be worried about, it’s really no different from a regular FBA, but we do have to deal with the sleeve since it’s built into the bodice. This tutorial is based on the Willamette Shirt, but will work on any woven dolman.
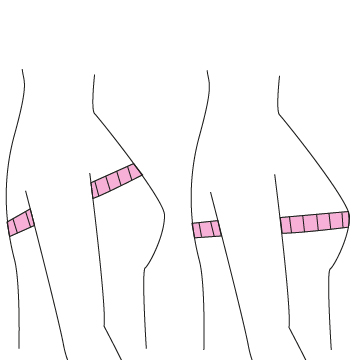
Before we begin, find the difference between your high bust and full bust (the illustration below shows where to properly measure yourself). Hey June patterns are drafted for a B sewing cup, or a 2″ difference between high bust and full bust. PLEASE NOTE: sewing cup size is not the same as bra cup size. You may wear a D cup bra and not need a FBA. Bra cups are based on the difference between your under bust and full bust. Just as an example, my underbust and full bust have 4 inches of difference, so I wear a D cup bra, but I have no difference between my high bust and full bust, so I never need a FBA. Also note that most Hey June patterns have enough ease that you may be tempted to skip a FBA based on the finished garment measurements. While this will usually work, it can also lead to drag lines and pooling above the bust because your bust no longer has the ease designed and drafted into the garment. In essence, you’ve changed the fit and proportions of the pattern in one place and left the rest the same, so proceed with caution.
If your full bust is closer to 3 or more inches larger than your high bust you should do a full bust adjustment.
Step 1.
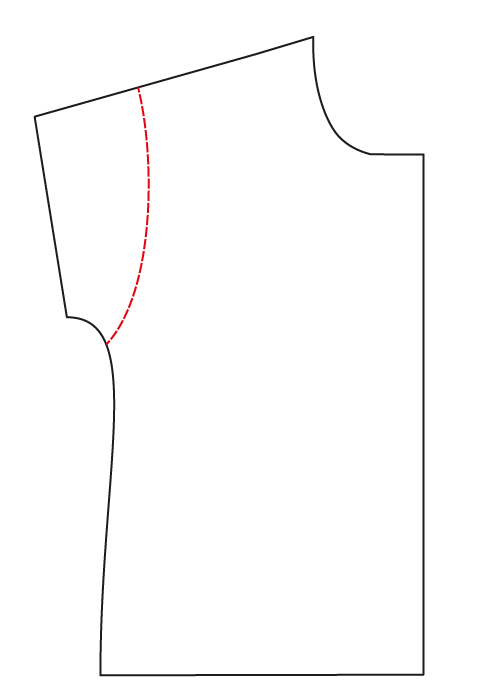
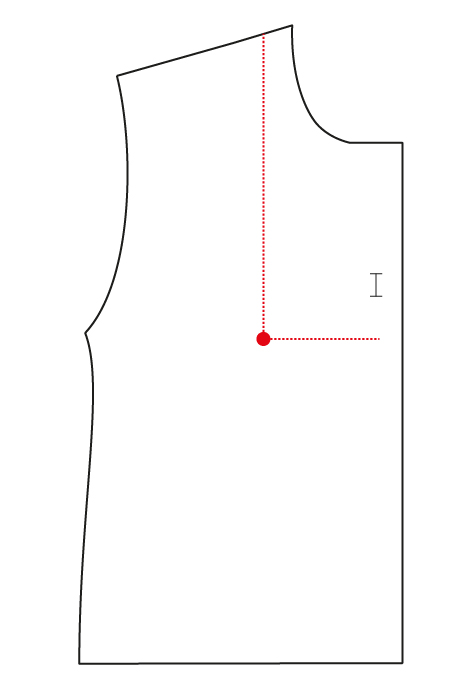
First you’ll need to cut the sleeve off to access what would normally be the armscye. Don’t stress too much about this. The bottom of the curve that you cut should be just above where the bodice starts to curve into the sleeve, as pictured.
Find and mark your bust point using one of two methods: First, you can hold the pattern up to your body and mark your bust apex (ahem, nipple). The second option is to measure down from your high bust for the height and mark that point. Then measure the distance from one bust apex to the other and divide that by two. Mark that distance from the center of the pattern front horizontally at the bust height. Keep in mind that unless a shirt is cut on the fold, the edge of the pattern piece will not be the center. On the Willamette, the center is where the buttonhole is marked.
Step 3.
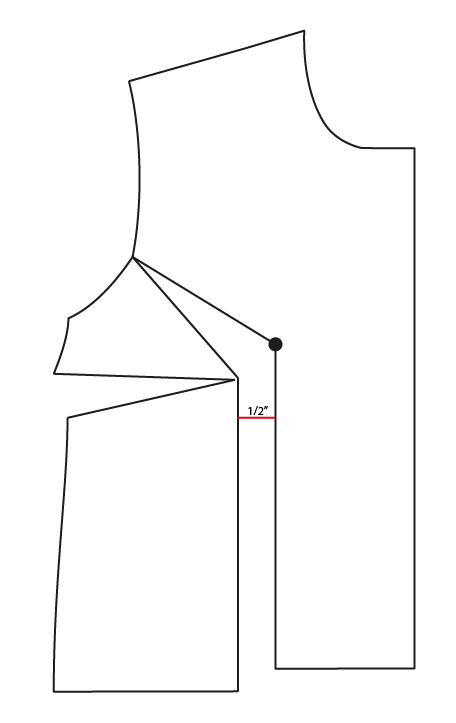
Now you will use the bust point as a guide to cut the pattern in three places. First, draw a line straight down from the bust point to the hem. Cut all the way down this line. The second line will go from the bust point up to the armscye. Cut from the bust point to the armscye, but leave a small amount uncut at the armscye to act as a hinge. Lastly, cut from the side seam up to the bust point, again leaving a small amount uncut as a hinge. The second two lines should be positioned approximately where you see them in the illustration (about halfway up the armscye and about 1.5″ down from the underarm.)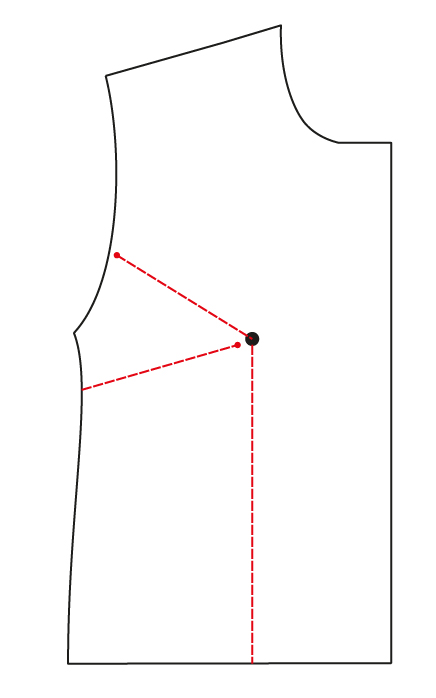
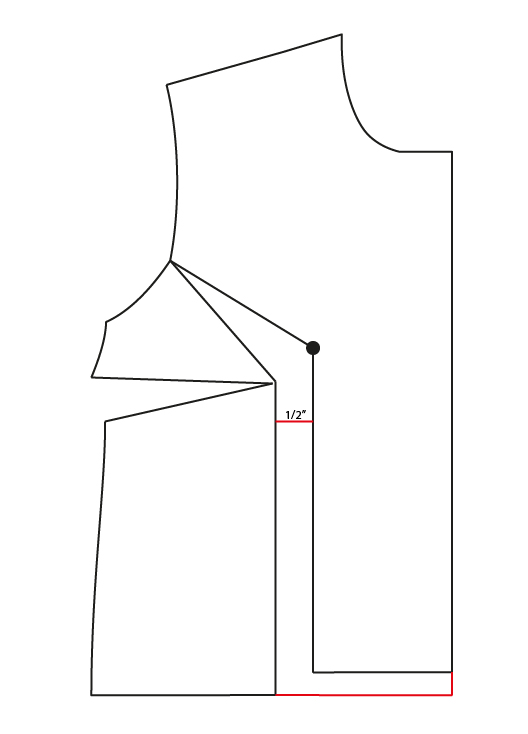
Lay a sheet of paper under the bodice. Open up the cut portions of your bodice. For every cup size you add, you’ll put a 1/2 inch of space between the parallel cut lines that go down to the hem. Add 1/2″ to make the pattern a C cup, 1″ for a D, 1.5″ for a DD. Make sure those cut edges remain parallel to one another. When they are perfectly positioned, tape them to the paper below. The cut in the side seam will have automatically created a dart shape. Tape that in place as well.
Step 5.
Even out the hem at the center front by redrawing it at the new length. For the Willamette, you’ll also need to adjust the facing by the same length.
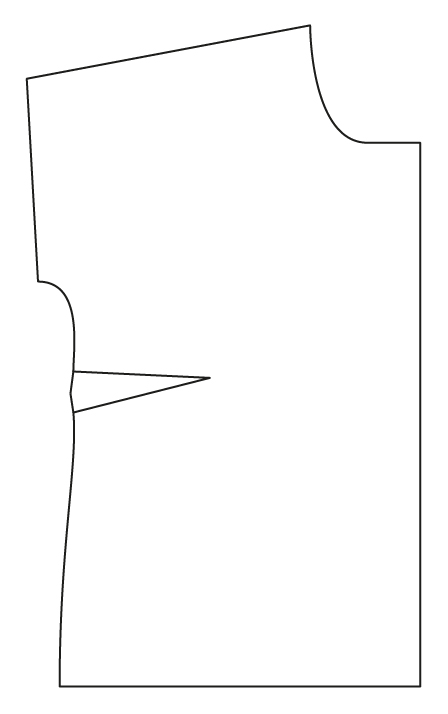
Because bust darts do not extend all the way to the bust apex, draw a new dart point 1/2″ – 1″ away from the dart point depending on cup size. The more space you added in step 4, the farther away the dart point should be. Redraw the dart legs up to the new dart point.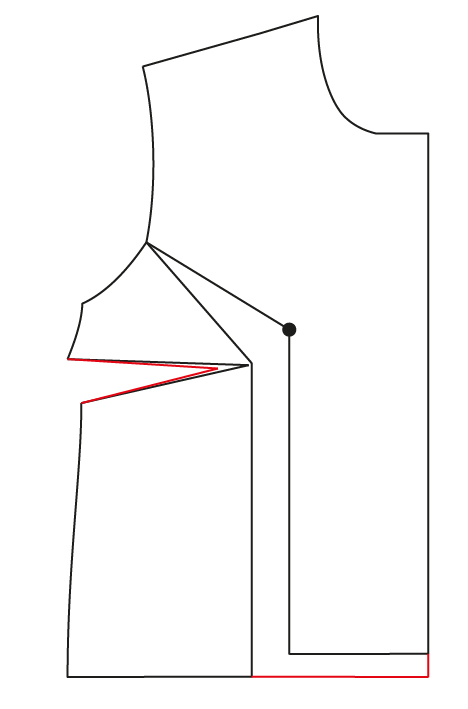
Fold the dart as if it were sewn in place. The top dart leg will likely need to be shortened to be equal to the bottom dart leg. Cut off the excess from the dart leg to the underarm point.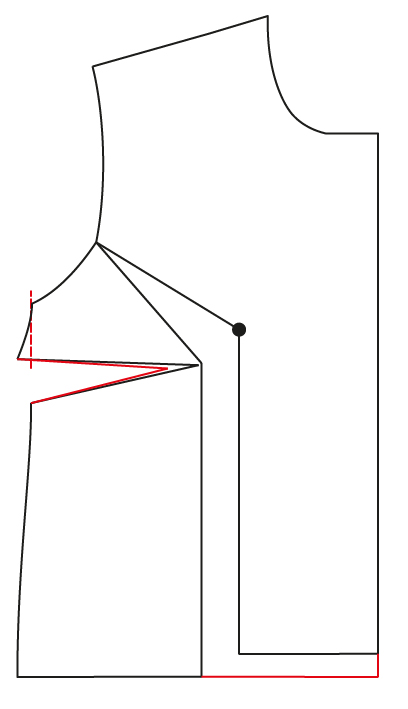
Redraw the side seam from the underarm to the top dart leg. For a regular FBA, this would be the new pattern piece. However, now we need to add the dolman sleeve back to the front.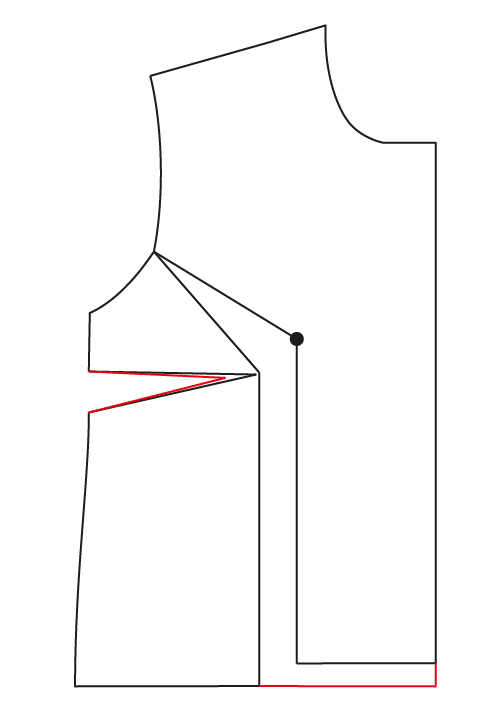
Position the cut off sleeve so that the bottom point touches the underarm point on the bodice and the top of the sleeve rests against the outer shoulder point. They will no longer align.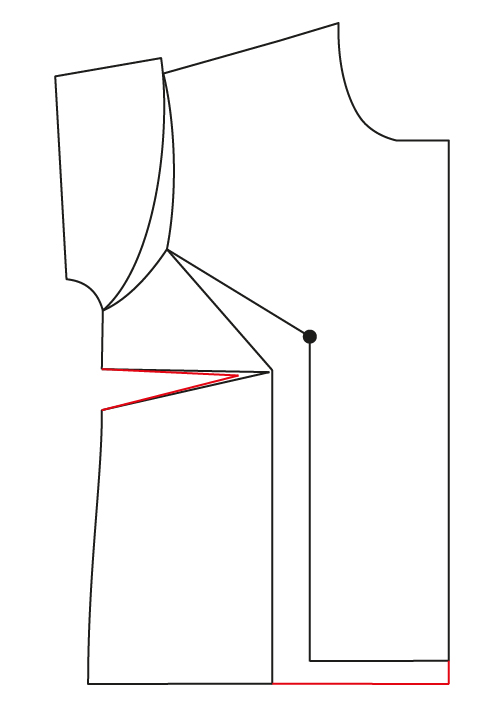
Redraw the shoulder seam from the inside neck point to the sleeve hem. Part of the sleeve may be cut off in this step depending on the amount added to the FBA.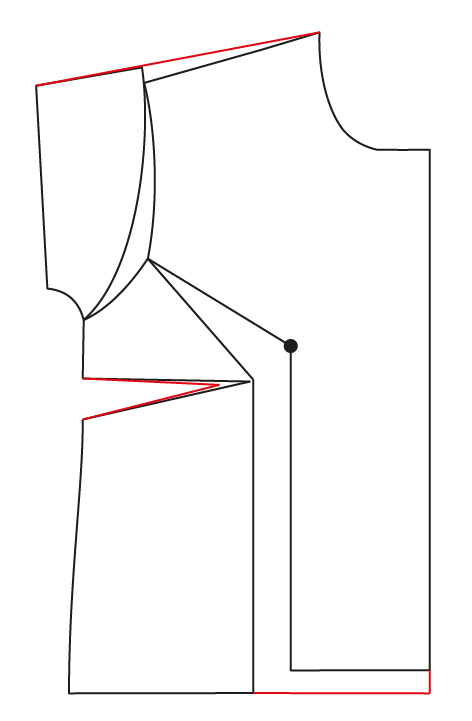
Trace around the new pattern piece and cut it out. If desired, fold the dart to mark the side seam between the dart legs. However, it is usually easier to leave this portion of the pattern open to easily trace the dart legs onto the wrong side of the fabric. Lay the back yoke shoulder seam against the new front piece to verify that the front and back shoulder seam lengths are still equal. If they are slightly off, make the adjustments on the front piece by trimming or adding a small amount of length.
Congrats, your new dolman with a full bust adjustment is complete and ready to use! Your first step in the pattern will now be to sew the darts. Remember to sew from the side seam to the bust point, with the last few stitches running parallel to the fold on the very edge of the fabric. Tie off the bust dart seam threads and leave about a 1/2″ thread tail hanging so it doesn’t come untied.
Happy sewing!

Dear hey JUNE,
What useful advice you’ve given me for this sort of FBA: totally clear and concise. I’m very grateful. At the age of 71 with 60 years of sewing behind me, I’ve only recently made myself au fait with the mysteries involved in Better Fitting, with the FBA being the most challenging for me. It has made such a difference to my sewing and finding your dolman-sleeved tutorial has enriched my knowledge further. Thank you again! Lorraine, Dunedin, New Zealand.
Thank you, that is VERY helpful. Question though- what do I do to the back pattern piece to make them work together??? Can’t quite wrap my brain around this for some reason.
Hi Kate, I need to add that info! For FBAs you have a few choices. You can remove the added length from the front hem, which isn’t necessarily recommended because the extra length at the bust is what adds extra bust room, but if you’re petite this is an option. Or you can angle the front hem line to bring it back up to the original position at the side seam. Or you can lengthen the back piece to match.
Is there a reason why the dart is not moved up to the horizontal line of the actual bust point (the black dot) in step 6, rather than below it (inside the slash-and-spread opening) as shown? Just to make the process simpler?
I had 2 question, please reply to me.
1. In step 10, you change shoulder. This is front shoulder, … But have you change like this in back shoulder?
2) bust point apex don’t change ?
Your shoulder seam should remain the same length, it’s just the angle that has changed. You’ll need to check it against your back shoulder and adjust as necessary. The bust apex can be adjusted after your muslin, but generally you do not want the point coming directly to your body apex and you want the dart below the apex because that is where the fullness of the bust exists.
Thank you! I have the Willamette Shirt pattern all prepped, and wanted to do an FBA so it will hang nicely. I really appreciate the info! Just what I needed. 🙂 So excited to make the shirt!