• Account
  • Gift Card
  • Affiliate Program
  • Wholesale Accounts
  • FAQ
  • Nav Social Menu

    • Email
    • Facebook
    • Instagram
    • Pinterest
    • Twitter
  • 0 items$0.00
Hey June Handmade

Hey June Handmade

  • Shop
    • Women’s Patterns
    • Tops
    • Bottoms
    • Dresses And Jumpsuits
    • Juniors Patterns
    • Free Patterns
    • All
    • Gift Card
    • Paper Patterns
  • Blog
    • Women’s Patterns
    • Juniors Patterns
    • Kid’s Patterns
    • Free Patterns
    • Other Sewing
  • Tutorials
  • Sew Alongs

December 11, 2020 · 2 Comments

DIY Faux Fur Throw

Other Sewing· Tutorials

Hi everyone and happy holidays! I have another simple and great handmade gift idea for you today! Last week I shared my multi-size crossover back free apron pattern, perfect for gifting to yourself or your favorite chef. But if your giftee doesn’t like to spend time in the kitchen, a cozy faux fur throw will be perfect for just about anyone! I’ve been eyeing this style of throw blanket at stores like West Elm and Anthropologie for $100+, but we can DIY it for much less!

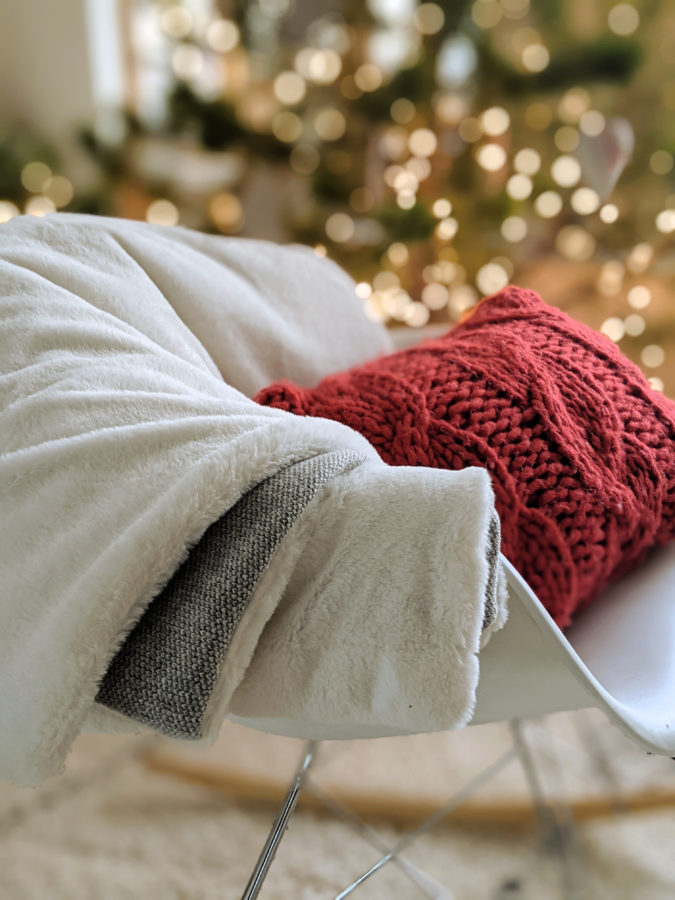
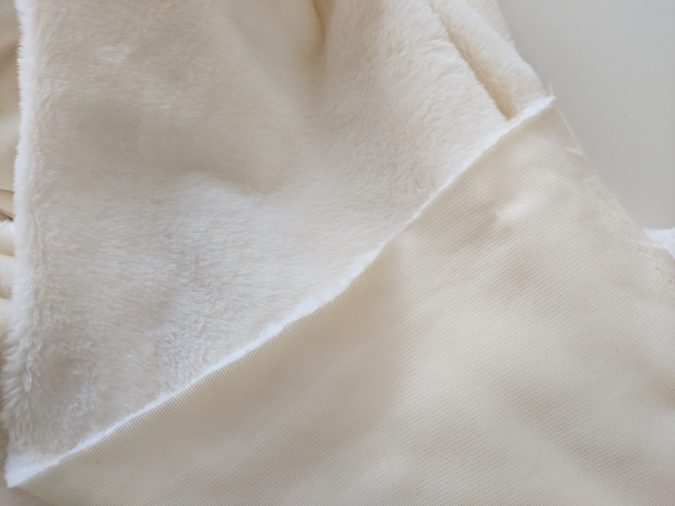
I used Fabric Wholesale Direct‘s linen for the aprons, and for this project I chose their super soft and luxe Ivory Rabbit Faux Fur. They generously sent me two yards for this project and it turned out to be the perfect fabric! I’ve used faux fur from two big box stores before and was not impressed. They shed like crazy all over my sewing area and the backing was overly rough and stiff. I can’t tell you how impressed I was just pulling this faux fur out of the box. It’s as soft as you’d expect for this substrate, but also very fluid because the backing isn’t too plasticky or stiff. I also found that although it would shed if I intentionally pulled at the cut edge, the cut fabric did not shed at ALL while I was cutting and sewing! This made the project so much easier to handle.

I definitely recommend any of their faux fur if you want to make a similar throw. I love the ivory shade for a neutral that would work in any home, but they also have different piles, patterns, and shades of faux fur.

This blanket is an upscale, grown-up version of the minky blankets I used to make as gifts when all of my friends were having babies. If you’re in that stage of life, Fabric Wholesale Direct also sells smooth and dotted minky that would work perfectly for these blankets!

For the backing, I used some deadstock sweater fleece that was gifted to me. This made my blanket super heavy and warm. If you want a similarly heavy throw, you could use a fleece, the same faux fur, or accent it with a different faux fur on the back. You can really use any woven or stable knit fabric, and Fabric Wholesale Direct has a ton of options. A few ideas to get you started:

  • polar fleece for a casual throw
  • silk dupioni for an ultra luxe gift
  • or a great plaid flannel for winter decor!

I only recommend that you pick a backing fabric that is about the same width as your faux fur to make life easier. If your two fabrics are drastically different widths, you’ll have to piece together the backing fabric before sewing.

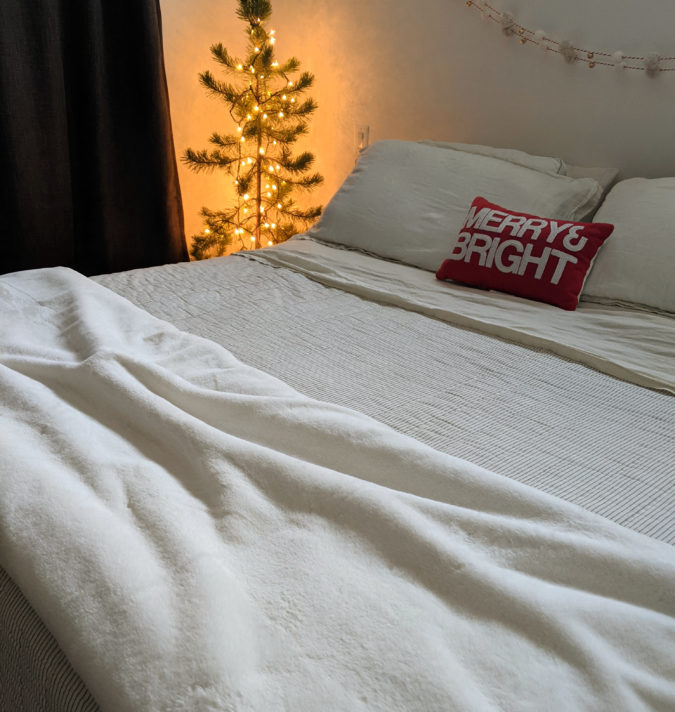
A final note: I used a full 2 yard cut for my blanket because I wanted it to double as a bed blanket. 2 yards works great on a twin bed, or folded lengthwise at the end of any larger size mattress. A standard throw is 50″x60″. Most of the faux furs are already 60″ wide, so you would only need 1.5 yards to make one about that size. These instructions will be for a full 2 yard length blanket like the one I made, but they apply to any size you choose.

Materials Needed:

  • 2 yards of faux fur or other cozy, soft fabric
  • 2 yards of backing fabric (cotton, flannel, silk, fleece, etc)
  • matching thread
  • pins
  • scissors
  • Optional but recommended: a walking foot

Step 1

Evaluate your main fabric and backing fabric. If one is longer or wider than the other, lay that one face up on the floor. Lay the other piece face down on top of it. Align them at least on 2 sides. My backing fabric was longer, but my faux fur was wider, so for me this step didn’t really matter and you may run into the same issue. If that happens, you can lay them down in any order as long as they are right sides together.

Step 2:

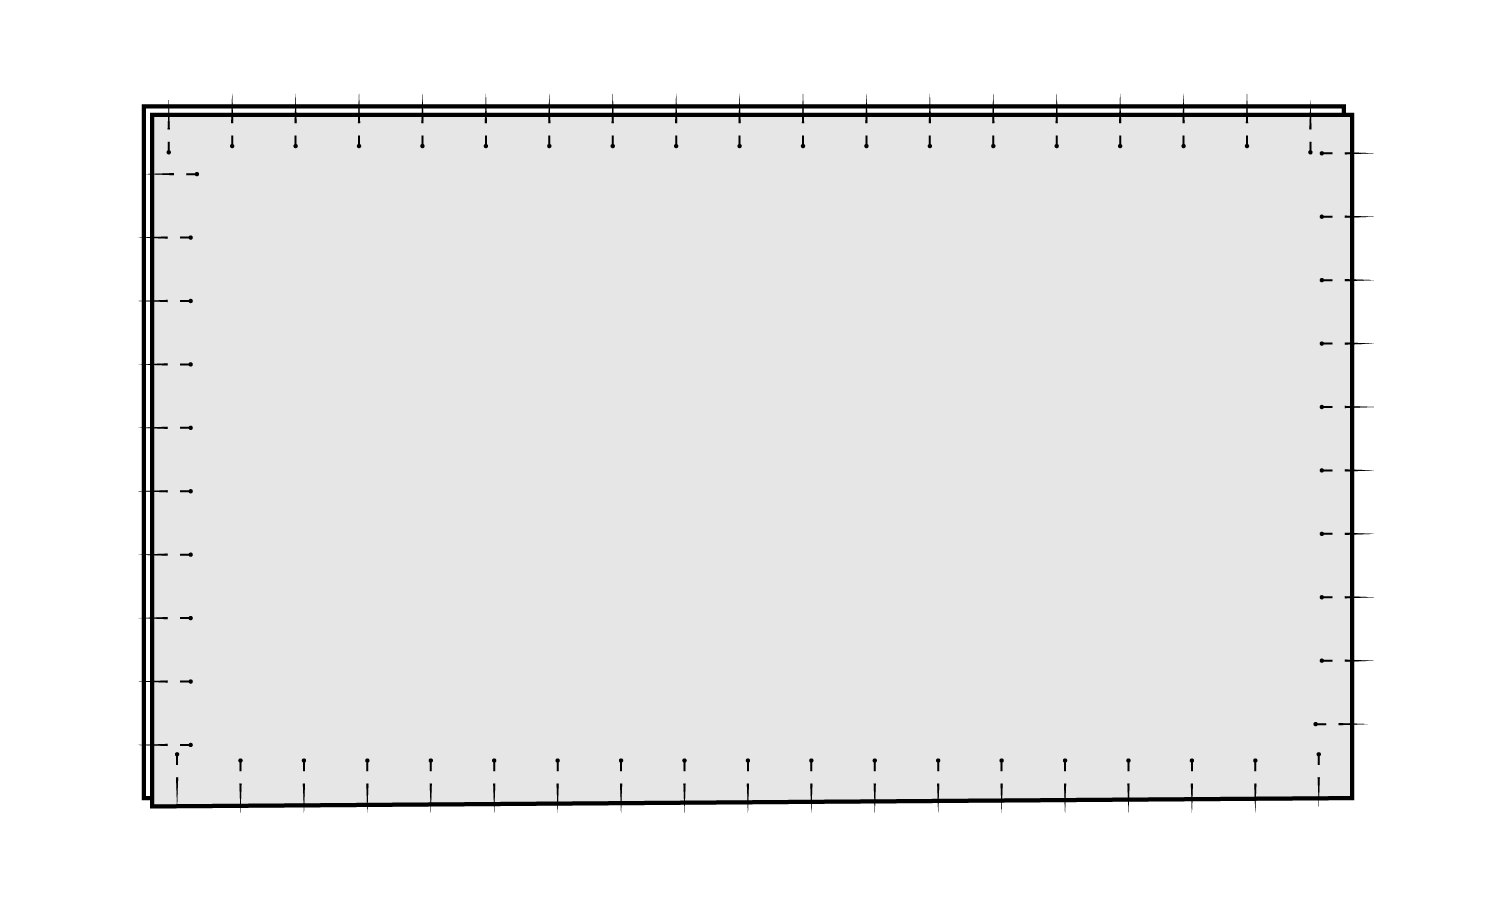
Smooth out the fabrics to the best of your ability. Begin by pinning the two together at the center of all 4 sides. Continue to smooth and pin toward each corner from the center of each side. Place pins farther apart, and then go in and fill in the gaps with more pins, continually smoothing the fabric, until you have both fabrics pinned together every 6″ around the entire perimeter.

Step 3:

Trim any excess fabric from the longer and/or wider piece until the two layers align on all 4 sides.

Step 4:

Begin by sewing in the middle of one of the edges (not a corner). Sew from the cut edge down to the seam allowance line. Depending on the thickness of your fabrics, I recommend a seam allowance of 1/2″ – 1″. A thicker fabric will require a larger seam allowance. It is more important that you stay accurate all around the blanket no matter what seam allowance you choose. Stop and pivot when you reach your desired seam allowance width and sew to the first corner. A walking foot will prove all but essential for this step to keep the two fabrics aligned. With or without a walking foot, it is important to make sure the two fabrics are pulled taut as you are sewing from one pin to the next so you don’t build up excess of one fabric over the other. The feed dogs on your sewing machine will try to move the fabric on the bottom faster, so you will need to continually hold the two taut to compensate for this, even with a walking foot. When you reach each pin, stop and move your hands down to the next pin and grip the fabric at that point so you can hold them taut until you sew up to that point. Continue this process all around the blanket. Stop when you get about 10″ from where you started. Pivot and sew back up to the raw edge.

Step 5:

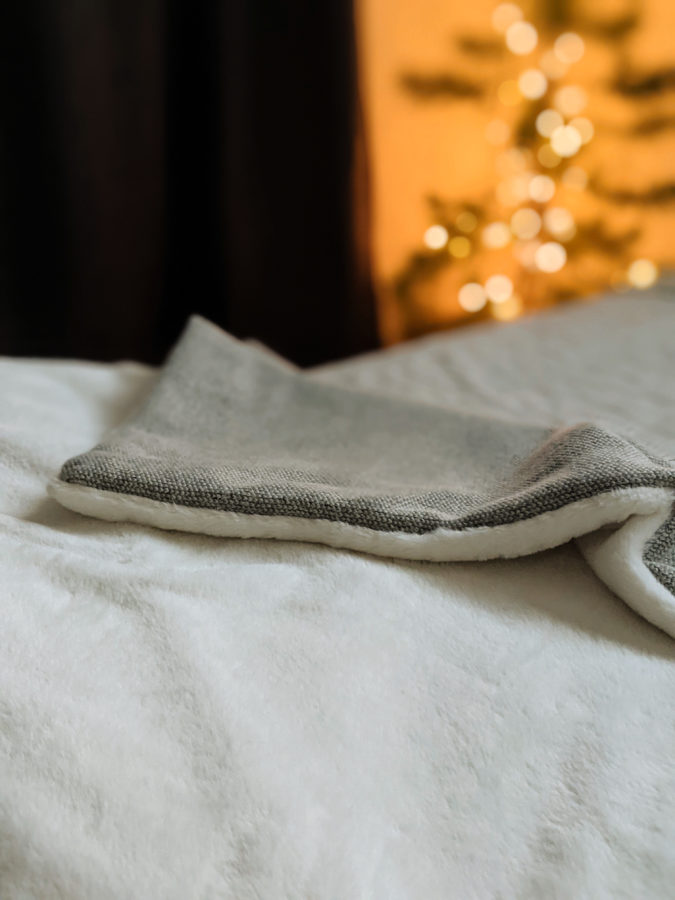
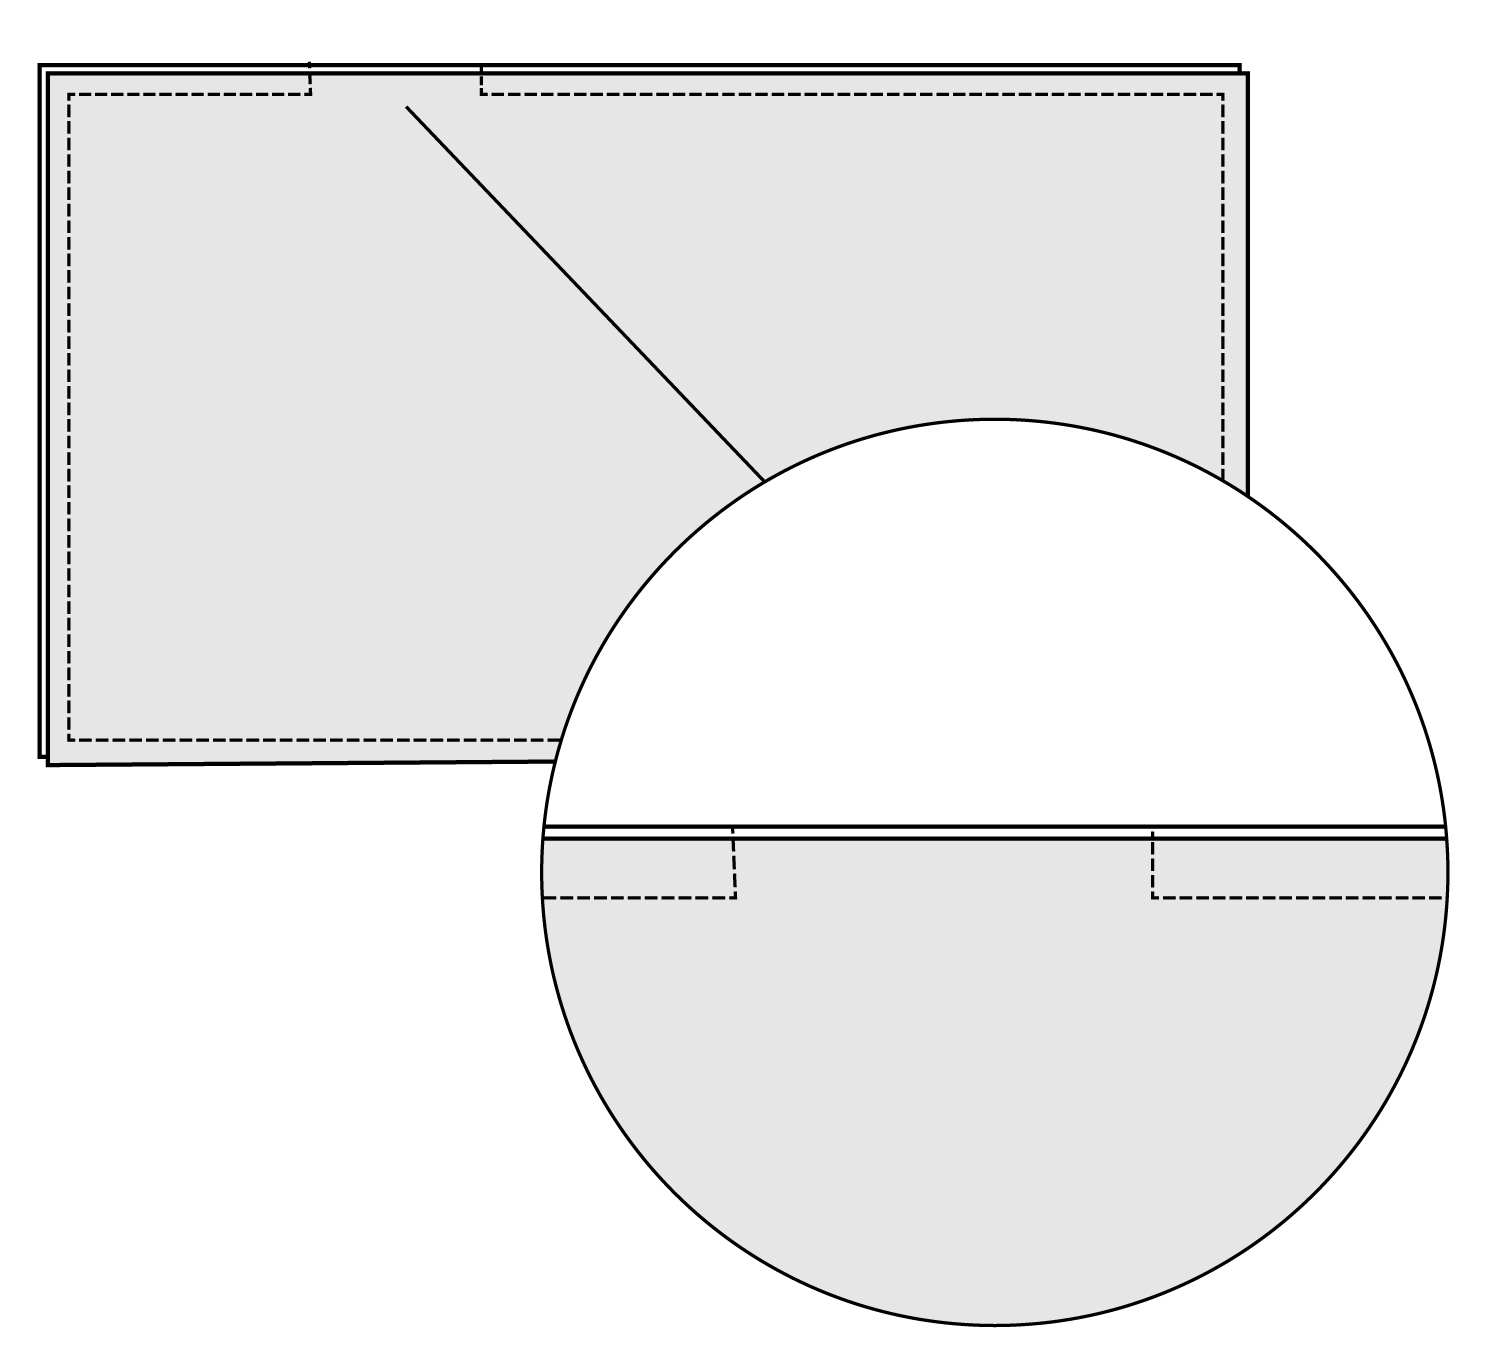
Turn your blanket right side out. With your arm inside the blanket, push out all the corners. The two short seams that you sewed in step 4 up to the cut edge of fabric will force the opening to turn to the inside of the blanket. Sandwich the raw edges from the opening inside and pin the hole closed. Topstitch near the edge of the blanket to close the hole. This seam will be hidden in the pile of the faux fur, so there is no reason to sew around the entire perimeter of the blanket to disguise it unless you wish to do so.

You’re finished! Wasn’t that easy? The great thing about sewing such a large, high-pile blanket is that even if your fabric shifted a bit while sewing and the edges didn’t remain completely square, it won’t be visible on the finished project.

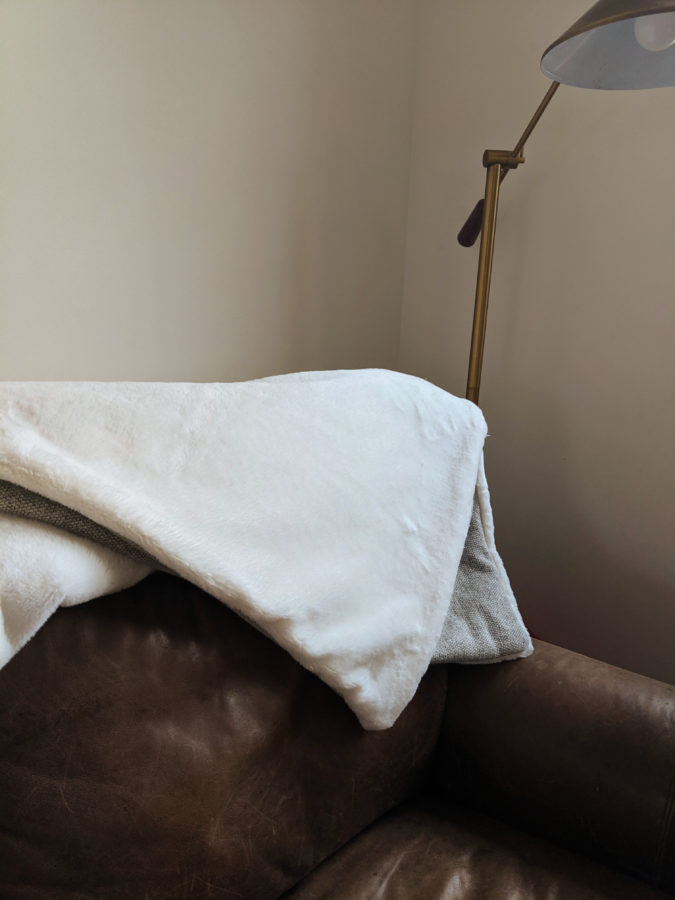
Now you have a gorgeous handmade faux fur throw blanket for a fraction of the retail price that the whole family will fight over on movie night. You may just have to make a few more 🙂

Happy sewing!

Previous Post: « Allspice Apron

Reader Interactions

Comments

  1. Deb says

    January 11, 2021 at 10:18 pm

    Amazing
    Need to try this blanket
    Thank you so very much

    Reply
    • Patricia says

      January 12, 2021 at 9:01 am

      Thanks for the various types of fabric to use.

      Reply

Leave a Reply Cancel reply

Your email address will not be published. Required fields are marked *

Primary Sidebar

Welcome to Hey June! I'm so glad you're here. Whether you're an experienced sewist or a beginner, I aim to provide simple, modern sewing patterns that are as fun to sew as they are to wear. Read More…

Never miss a post, sale, or new pattern!

Categories

  • Free Patterns
  • Juniors Patterns
  • Kid's Patterns
  • Other Sewing
  • Sew Alongs
  • Tutorials
  • Women's Patterns

looking for something?

Disclaimer: Amazon Affiliate links are sometimes used in blog posts.
Nothing scarier than hearing the serger running in Nothing scarier than hearing the serger running in your sewing room when you're not in your sewing room 😱. But this girl decided to get up and make herself a Nikko Top and I'm so proud 🙌. I haven't really taught my kids to sew, but I'm happy they're getting into it on their own anyway.  I'll be here to nurture their interest and attach arm bindings when they ask though!  How are you approaching this skill with the next generation?⁣
⁣
#NikkoTop #truebiaspatterns #sew #sewist #seweveryday #handmadewardrobe #handmade #sewistsofinstagram #sewistsgonnasew #sewcialists #diyfashion #memadeeveryday #memadewardrobe #imakemyclothes #isew #isewmyclothes #sewingpattern #sewingtutorial #sewingblogger #instasew #slowfashion #modernsewist
Sharing a giant sneak peek of our next pattern tod Sharing a giant sneak peek of our next pattern today because the fabric I used and loved is on sale!⁣
⁣
@raspberrycreekfabrics is starting their black Friday sale early so you can have your holiday fabrics in hand and start sewing now! ⁣
⁣
@littlebitco and I both used their linen rayon for this project and it works fabulously - highly recommend!  Plus, it comes in several gorgeous colors.  I used rust, naturally 💁🏼‍♀️🧡⁣
⁣
Swipe to see the fabric recs and reqs for this pattern and keep an eye out for it in a few weeks!!⁣
⁣
#comingsoon #HeyJunePatterns #sew #sewist #seweveryday #handmadewardrobe #handmade #sewistsofinstagram #sewistsgonnasew #sewcialists #diyfashion #memadeeveryday #memadewardrobe #imakemyclothes #isew #isewmyclothes #sewingpattern #sewingtutorial #sewingblogger #instasew #slowfashion #modernsewist
Grabbed all* my supplies to sit in bed, watch a mo Grabbed all* my supplies to sit in bed, watch a movie, and sew buttons on my two new button-ups.  Can you tell what I'm missing? This is what happens to a chronically anti-hand-sewing person 🤦🏼‍♀️⁣
⁣
*All =/= all ⁣
⁣
#CheyenneTunic #AmherstShirt #HeyJunePatterns #sew #sewist #seweveryday #handmadewardrobe #handmade #sewistsofinstagram #sewistsgonnasew #sewcialists #diyfashion #memadeeveryday #memadewardrobe #imakemyclothes #isew #isewmyclothes #sewingpattern #sewingtutorial #sewingblogger #instasew #slowfashion #modernsewist
Thank you, former me, for having the foresight to Thank you, former me, for having the foresight to use French seams on this robe topper so I could roll it up on these warm autumn days 🍂☀️⁣
⁣
I voted, and then promptly lost my sticker.  I hope all my fellow Americans did the same! (Minus the lost sticker bit, I don't wish that upon anyone.)⁣
⁣
#selfdrafted #HeyJunePatterns #slublinen #sew #sewist #seweveryday #handmadewardrobe #handmade #sewistsofinstagram #sewistsgonnasew #sewcialists #diyfashion #memadeeveryday #memadewardrobe #imakemyclothes #isew #isewmyclothes #sewingpattern #sewingtutorial #sewingblogger #instasew #slowfashion #modernsewist
I'm back today with another modification to the pu I'm back today with another modification to the puffed sleeve tutorial released yesterday!  A few simple changes to the style lines yields a shorter banded puff sleeve with volume at the hem.  I am so in love with this top - using a sweater knit makes it so comfy but also dresses it up just enough for me 🖤. Hope you enjoy!  Don't forget to tag me if you use these tutorials, I'd love to see!⁣
⁣
#HeyJunePatterns #UnionStTee #sew #sewist #seweveryday #handmadewardrobe #handmade #sewistsofinstagram #sewistsgonnasew #sewcialists #diyfashion #memadeeveryday #memadewardrobe #imakemyclothes #isew #isewmyclothes #sewingpattern #sewingtutorial #sewingblogger #instasew #slowfashion #modernsewist  #YouCanHackIt
Add some drama to your Unions this fall with this Add some drama to your Unions this fall with this puff sleeve tutorial!  It's a super simple way to dress up a wardrobe staple.  After you have your pattern piece altered for this modification, come back tomorrow when we'll add to it for another cute sleeve style!⁣
⁣
#HeyJunePatterns #UnionStTee #sew #sewist #seweveryday #handmadewardrobe #handmade #sewistsofinstagram #sewistsgonnasew #sewcialists #diyfashion #memadeeveryday #memadewardrobe #imakemyclothes #isew #isewmyclothes #sewingpattern #sewingtutorial #sewingblogger #instasew #slowfashion #modernsewist #YouCanHackIt
I finally used this gorgeously thick and soft cott I finally used this gorgeously thick and soft cotton sweatshirting from @dashuepfendekomma to make the hoodie of my dreams 🙌. I've been sitting on this fabric and matching ribbing since last winter trying to decide on the perfect pattern.  In the end I (predictably) just ended up modifying a few style lines to get exactly what I wanted.  I'm sharing my tutorial for a dropped sleeve Brunswick with a bit of volume at the wrist on the blog today!⁣
⁣
#BrunswickPullover #HeyJunePatterns #sew #sewist #seweveryday #handmadewardrobe #handmade #sewistsofinstagram #sewistsgonnasew #sewcialists #diyfashion #memadeeveryday #memadewardrobe #imakemyclothes #isew #isewmyclothes #sewingpattern #sewingtutorial #sewingblogger #instasew #slowfashion #modernsewist
Ok I'm fully obsessed with a pocket and I don't ca Ok I'm fully obsessed with a pocket and I don't care who knows it.  I hope I can keep the momentum going on the rest of this garment because right now I just wanna make welts all of the times.⁣
⁣
#HeyJunePatterns #WheatonWindbreaker #sew #sewist #seweveryday #handmadewardrobe #handmade #sewistsofinstagram #sewistsgonnasew #sewcialists #diyfashion #memadeeveryday #memadewardrobe #imakemyclothes #isew #isewmyclothes #sewingpattern #sewingtutorial #sewingblogger #instasew #slowfashion #modernsewist
There may be snow on the ground but it's still sum There may be snow on the ground but it's still summer!  @thepetitesewist is on the blog today sharing a tutorial to turn the Bryce Cargo Pants (or any pants!) into bermuda shorts (or any length shorts!) So versatile and cute!  Link in profile 😊⁣
⁣
#heyjunepatterns #BryceCargoPants #sew #sewist #seweveryday #handmadewardrobe #handmade #sewistsofinstagram #sewistsgonnasew #sewcialists #diyfashion #memadeeveryday #memadewardrobe #imakemyclothes #isew #isewmyclothes #sewingpattern #sewingtutorial #sewingblogger #instasew #slowfashion #modernsewist
Took a little break from pattern drafting to do so Took a little break from pattern drafting to do some necessary sewing.  Now all guests at Chez Appl will be required to wear satin gloves and monacles cuz we fancy.⁣
⁣
This is a gorgeous 100% linen from @fabricwholesaledirect.  I bought 3 different colors for napkins and reusable "paper" towels so we should be good (after I sew more than just this one 😂)⁣
⁣
Do you have any necessary sewing to do?  Next on my list are some mesh shampoo bar bags (makes them last forever!) and reusable produce bags!⁣

#sew #sewist #seweveryday #handmadenapkins #linennapkins #handmade #sewistsofinstagram #sewistsgonnasew #sewcialists #diyfashion #memadeeveryday #isew  #sewingblogger #instasew #slowfashion #modernsewist
Load More Follow on Instagram
  • About
  • Contact
  • FAQ
  • Policies
  • Positions

Copyright Hey June Handmade © 2021 · Log in