
Most knit sewing patterns that feature a banded edge are designed to be sewn in the round. This means that you first sew shoulder and side seams, sew your band piece into a loop, and then sew the loop to the round opening in the garment, such as the neckline or armscye.
This is a perfectly good method that yields good results most of the time. But limiting the band length to a finite, predetermined length can also cause a few issues. For one, not every knit fabric behaves the same way. A swim knit has great recovery and will spring back to its original length and shape no matter how much abuse it takes. However, a tissue linen knit will stretch out and warp with only the slightest tension. Unless you’re sewing all your knit garments with similarly weighted 95/5 cotton lycra, odds are you will encounter issues using fixed length bands sewn in the round.
Another issue that arises when sewing bands in the round is that you are usually instructed to distribute the band evenly along the edge of the garment. For a round neckline this works perfectly well. However, for a tank top, the strap area will have a band at the neckline and on the armscye, sometimes only an inch or less apart from one another. This narrow strip of fabric cannot support the tension pulling at it on both sides and the dreaded tunneling effect will result. All edges, but especially tank tops, need different amounts of stretch and tension in different areas. If using a fixed length band, this becomes very complicated and involves using a lot of pins – nobody wants that!
A band inserted flat solves all of these problems. You don’t have to worry about running out of band or having too much leftover because it isn’t a fixed length. In general, a good rule is to cut your band an inch or so longer than your opening. The band will be less than the opening, so you’ll have a small amount to trim after sewing.
A flat insertion also gives you full control over the amount of stretch you apply through different parts of the garment opening. The general rule is:
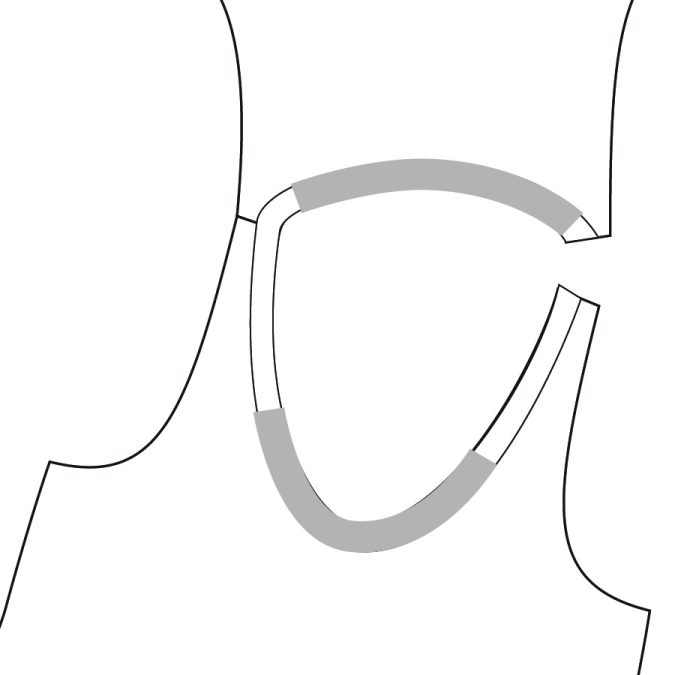
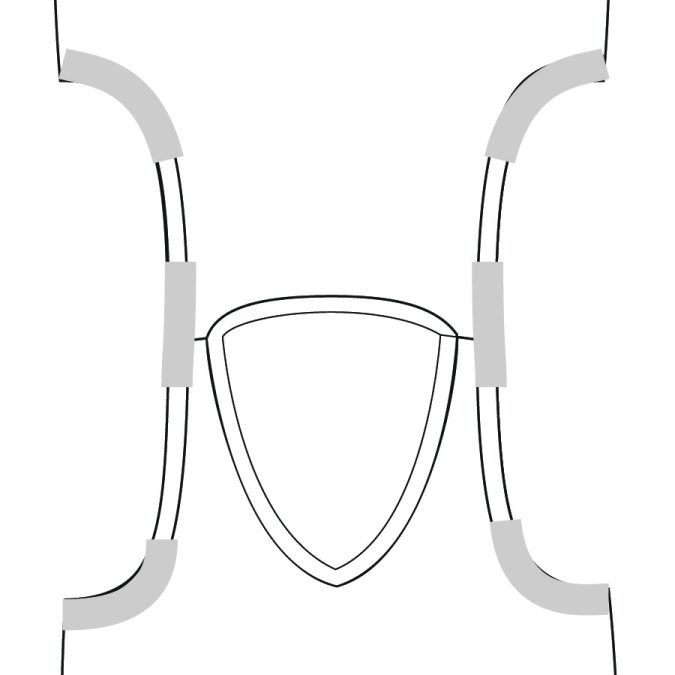
Curves: lots of stretch
Straighter areas: just a small amount of tension or tautness
The illustrations below show how different areas of the neckline and armscye need different amounts of stretch. The shaded curved areas require more, and the unshaded straight areas require little to none. Note that the area over the shoulder seams is technically a curve since it rounds over your shoulder. A little more stretch is necessary there to hold the tank top strap down on your body, particularly on the armscye.
So what does stretch vs. tension really look like? Well, that will depend a great deal on your fabric substrate and the amount of recovery it has. But once you start using this method, you will be able to easily feel how much stretch your fabric can handle. Sewing any knit substrate will become so easy and intuitive that you’ll be able to zip through your bands without a second thought.
This video will give you a visual of what stretch vs tension looks like, in this case on a ribbed fabric. There are also a few tips on how to hold the band as you sew it to the garment. I hope this helps you with your knit band sewing! (Note: This video starts with the band being sewn to the front underarm area of the armscye.)
If there’s any final advice I can give about using this method, it’s this – don’t overthink it! Knit bands are incredibly simple when you master this technique, and the learning curve isn’t as steep as you’re thinking, I promise!
Thank you for this — this is really helpful! Are you using a straight stitch, or a very narrow zig zag to sew the band on the tank?
Also curious as to what stitch you are using to sew the band on. Thank you for this tutorial. Also thank you for the free racer back girls dress pattern!
You’ll need to use a zig zag or stretch stitch, and ultimately a serger is what I use when not doing a tutorial as it is the best tool for the job.