
Welcome to the world of digital sewing patterns! This post series will walk you through every step of using a pdf pattern, from purchase to cutting out your garment. This comprehensive overview is great for beginners, but experienced pdf pattern users may pick up a tip or trick too! Please note that this tutorial only references indie digital patterns. Some of the big four (Simplicity, Vogue, etc) are now offering digital patterns but this will not cover those brands.
What is a digital pattern?
Digital patterns are simply sewing patterns that are delivered via a file on the internet that you can download, open, and print at home on a standard printer. Because the printed pages are tiled, you will then need to assemble them using the provided chart in each pattern. Patterns come in the form of a .PDF file, which is an Adobe product and can be opened on any computer using native .pdf viewing softwares. More on this later! Sometimes patterns will include large format sizes that can be printed on the standard paper size A0 or a large 36″ wide format.
Where to purchase digital patterns
There are two main ways to purchase digital patterns. You can buy them directly from the designer or purchase them from a third party reseller. There are pros and cons to each method.
If you buy directly from the designer, all of your money will support that person and their costs of business. You usually have lifetime access to your patterns on their website so you can re-download them if you lose them (read carefully to see if this is offered by each designer). You also have access to their customer service as they will have a record of your purchase. Their websites are usually a great place to find bundle coupons, tutorials, sew alongs, modifications, and tester posts for each pattern to gain the most knowledge before purchase.
If you buy from a third party reseller, the designer only receives a portion of the money you spend, but your shopping experience will be more similar to a big box website where you can purchase multiple designs from different designers all at once. It is also a great way to gain familiarity with different designers and find the ones that cater to your style and body shape. Note that if you choose to purchase from a third party reseller, you often will not be able to request access to the pattern from the designer as they will have no record of your purchase. I would give examples of third party resellers, but lately they tend to start up and shut down frequently. Another con to this is that if you relied on permanent access to your pattern through a reseller, they may shut down without much notice and you would lose access permanently.
One last thing to note is that if you are on the hunt for a specific pdf pattern, the designers and third party resellers often have sales and coupons at different times, so it may be worth investigating your best value.
Navigating an indie designer website
Most of the time, indie designers will have a website very similar to this one. There will be a main page with links that will take you to their shop, blog, and other pages. The main thing to be aware of when shopping for digital patterns is that you really need to read the titles and descriptions. Some indie designers sell both paper and pdf patterns, and it is very important that you know which one you are getting as the nature of pdf goods usually does not allow for returns. Some designers also have different patterns for different size groups, so make sure you’re purchasing the right one. To save headaches, this information is usually very clearly stated, and usually more than once. But be sure to double check before you purchase!
Accessing your purchased pattern
After purchase, you will generally be returned to the designer’s website from the checkout processor (paypal, square, etc). Your purchased patterns should show up immediately via links you can click on to begin download. In addition, you will usually receive an automated email with links to your patterns for download (check spam!) Immediately upon purchase, it is recommended that you download your patterns and then upload the files immediately to a cloud storage system. If you don’t have cloud storage, you can simply download the pattern and then attach it to an email to yourself and then save the emails in a special folder in your inbox so you’ll always have access. Also note that automated email links can easily expire or be broken, so downloading directly from the website is the best practice. However, most indie designers have websites that allow “permanent” access to your previously purchased patterns if you need to re-download them. It goes without saying that this is dependent on a host of variables, including the stability of the internet, the designer being healthy and alive, their desire to continue their business and not quit at a moment’s notice, etc. It is worth looking at this option as a hail mary, not one to be relied upon. As the only thing you can rely on is yourself, I definitely recommend you download your patterns and store them securely on your side of the internet.
Opening your pattern
.Pdf files can be opened on any .pdf viewing software, which comes native with computers. If you’re using a Mac it will be called “Preview”. Your computer will open the .pdf automatically with whatever software you have installed. However, in order to correctly print your pattern and access all of the functions, you should use the free Adobe software, “Reader”. You can download this for free from their website. Because Adobe created .pdfs, it is the best one to use for print accuracy and the only one to use if you want to access adobe-related features like layers (learn more about layers in the print options section). If you have a paid version of Adobe you will be opening patterns using “Acrobat”. Just double check when you open your pattern that you are in the correct software.
If your pattern comes in the format “.zip”, you simply need to unzip it to access the .pdfs contained therein. On Macs, it should unzip automatically or with a double click on the .zip file. On PCs, you need to right click and extract them to an area of your choosing on your computer. .Zip is just way for the designer to combine and compress bigger files for fast storage and downloading. Google how to unzip a .zip on your specific computer OS if you need further instruction.
Print Formats
There are 3 main ways to print .pdf patterns.
- Send the A0 file to a website that prints patterns onto A0 paper. Pdfplotting.com is the most popular online store at this time. They have flat rate shipping, so be sure to send them all of your patterns’ A0 files at once if you have purchased multiple patterns. Other online shops also print A0, and your local store may also print this size, though it is not a common paper size in the US. Outside of the US, this should be very easy to do. If you’re purchasing it locally, make sure it is printed to scale before paying for it.
- Send the “copy shop file” to a print shop. Designers will call this different things, and many designers are phasing it out because it is unwieldy, expensive, and rarely used. It prints on a continuous roll of paper that is 36″ wide. For some patterns, these can end up being more than 100″ long. They usually cost close to $20. Get a quote before you agree to have it printed, and make sure it is printed to scale before paying for it.
- Print at home, the library, or a print shop on regular paper. Most designers set up their files so they will print accurately on both letter and A4 size paper, but be sure to read this information in each listing.
Print Options
When printing at home, you have a few options. Most patterns are set up to print in black and white with differing line styles for each size, but the patterns that come in color should also be easy to differentiate if you wish to print in black and white with their line styles and labeling. This will save you a lot of ink.
Most patterns come with a layer feature. This means that when you open the .pdf in Reader or Acrobat there will be a menu on the side showing a list of all the sizes. You can check only the sizes you want to print. If you’re a size 12, you print that single size, or if you’re a 12 but you want to grade to a 14 at the hip, you can print just those two sizes. It’s a very handy feature that will save you ink and also make cutting the pattern much easier. Most patterns (including all Hey June patterns) come with a visual guide for implementing the layers feature within the pattern instructions.
One last option is to choose the pages you need to print for the pattern. It is highly recommended that you only print the pattern itself, and use your phone, tablet, or computer to follow along with the instructions. This will save you a lot of time, paper, ink, and storage space. Most patterns will also have a print guide that will tell you exactly what pages to print for just the pattern, and many will even have a chart showing you what pages you need for the specific view you’re making and the size you’re making.
On a personal note, if you intend to print many .pdf patterns, I highly recommend investing in a black and white laser printer. They are low cost and toner costs about $14 every year or two. I use this one and it is one of the most important tools in my digital pattern arsenal.
Print Settings
Always use these settings:
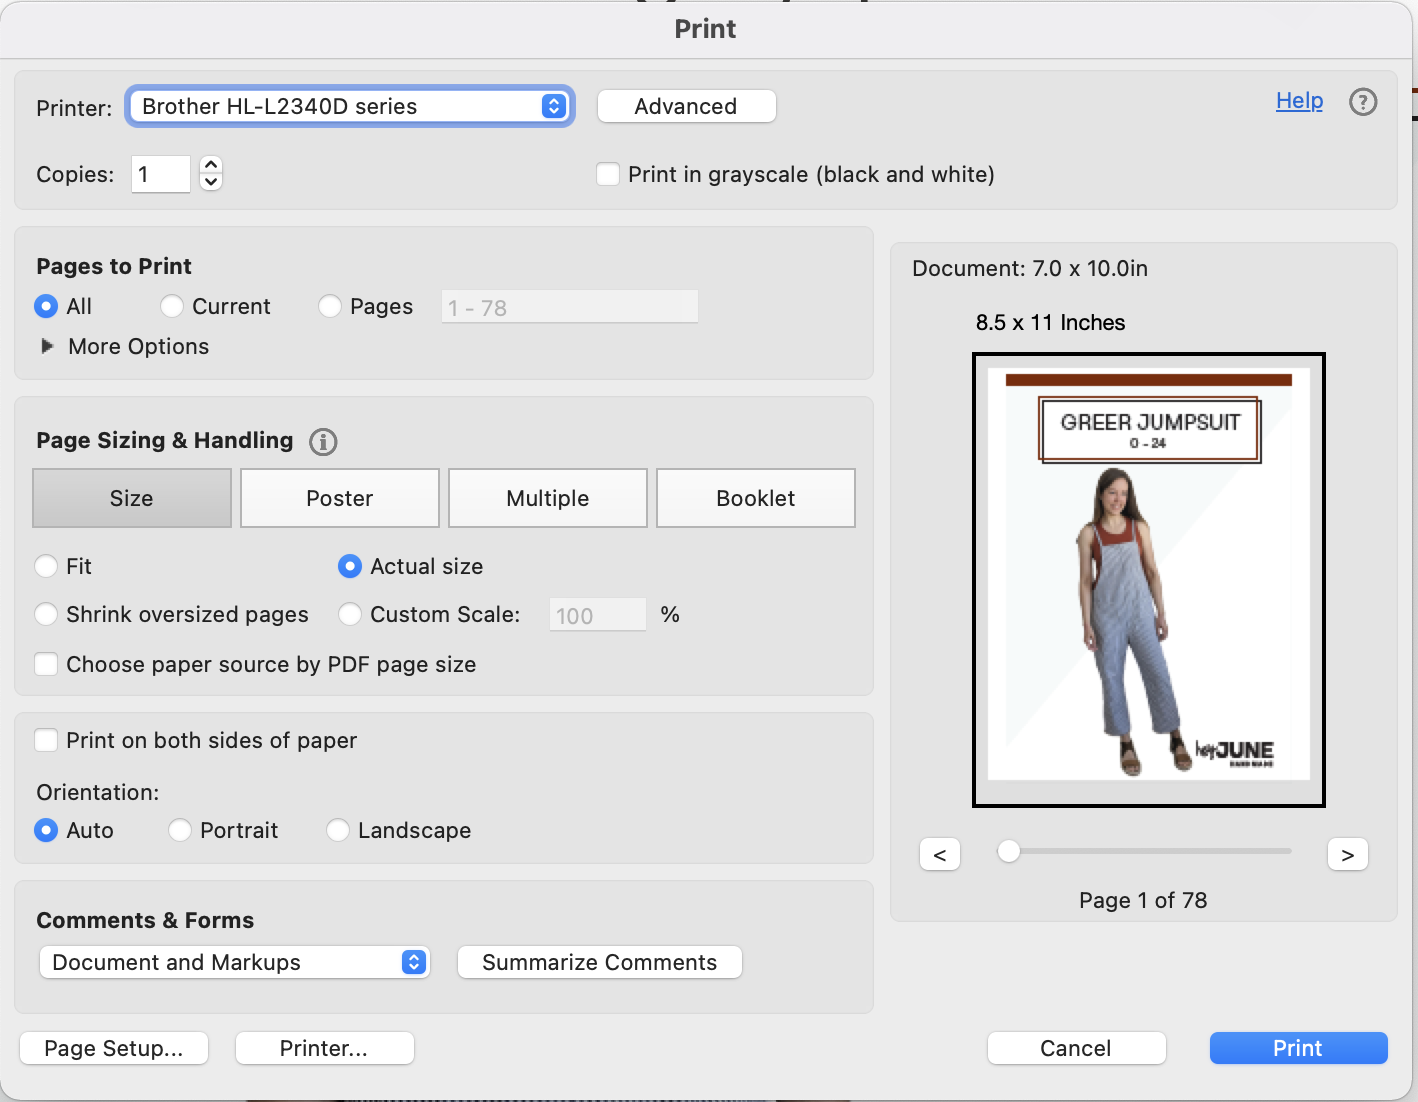
Note that under “page sizing and handling”, the option for “size” is checked. Do not check “poster”, “multiple,” or “booklet”. Under that portion, always choose “actual size”. Do not check any of the other options, and above all, do not check “choose paper source by pdf page size”.
Under orientation, you must choose “auto”. Do not check portrait or landscape.
On the right, you should see that the document is 7×10″ and the paper size is 8.5×11 (or A4).
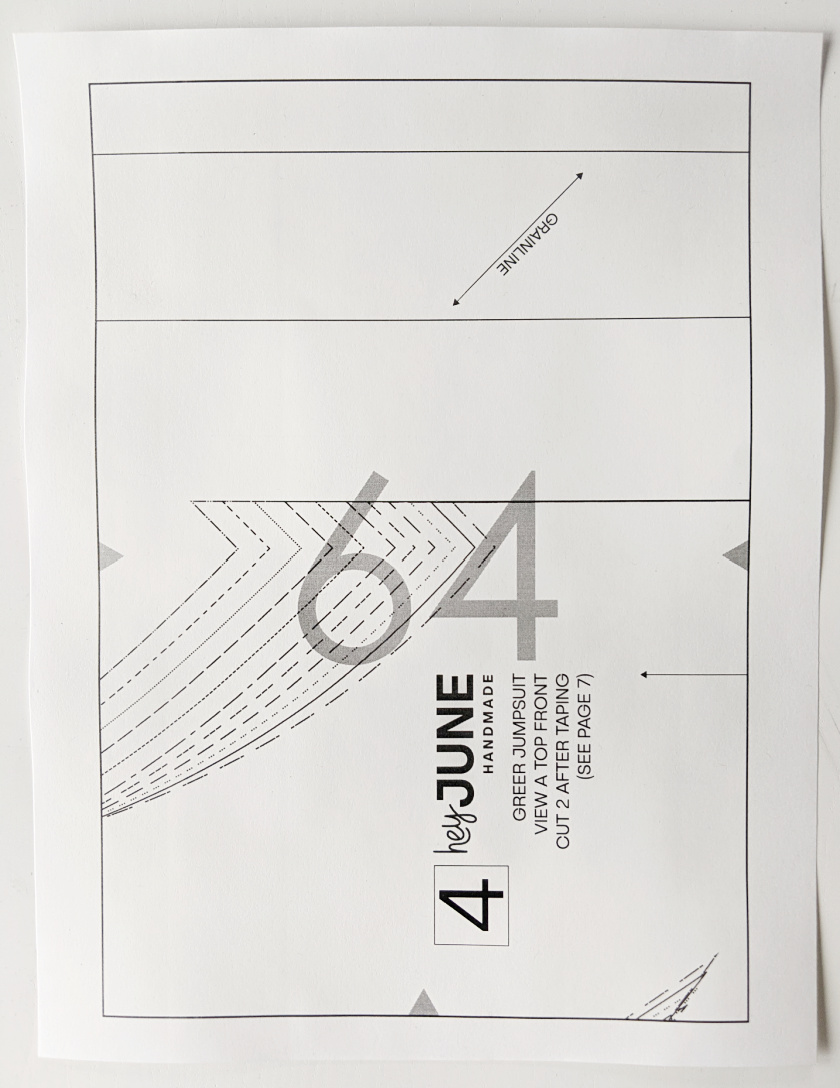
When printed correctly, your pattern pieces should look like the below sample. Note that the frame is 7×10″ and it is centered on the page. You should see all 4 edges of this frame. Within the frame will be the page number and triangles to align it to the pages surrounding it. As you can see, this sample page will be taped to another page on both sides and the bottom. The top edge does not have an alignment triangle and therefore will not be taped to anything. This feature is specific to HJ patterns, but all pdf patterns will have some kind of a frame, page number, and alignment device.
Assembly
Once your pattern is printed at home, you will need to assemble it. Use the chart included in the pattern to line up all the sheets into columns and rows and tape them together. Each page will have some form of a guide to help you align each page. Hey June patterns have a frame centered on each page, so you can align each side of the frame with that of the frame on the page next to it, and it also has triangles on each side of the frame that form a diamond when aligned correctly with the next page. There are a few options for removing the margins from each page. The cleanest way is to trim off one top or bottom and one side. IE: cut the top and left margins off of each page. That way they will all be able to line up with one another, with the cut margin overlaying the uncut margin on the next page. An easier way is to fold the margins back before taping, though this will make the pattern very bulky. Another shortcut is to simply overlap the pages and use good lighting to make sure you can see through the paper to align them together. For the most part, this is an excellent strategy for reducing time and effort, but the margins will cover some of the pattern. If it is not a straight line, you will need to go back in with a pen and trace over the margins to show the pattern hidden beneath. For what it’s worth, this is the strategy I personally prefer. It is fast and accurate and doesn’t add bulk.
Cutting the Pattern
After all the pages are affixed it is time to cut your pattern. If desired, you could trace the pattern at this point, just like you would do on a full size paper pattern. However, if you are sure of the size and grading, you can just cut the pattern out at this point. At the very worst, you can always reprint!
Using the Pattern
At this point, your digital pattern will be identical in use to a traditional paper pattern and you can proceed as usual. Be sure to read the cutting instructions carefully and refer to the notations on each pattern piece so you know how many to cut and if it’s a mirrored pair. Anytime a sewing pattern says “cut 2”, it indicates a mirrored pair, even if it doesn’t state that outright.
Storing the Pattern
This depends heavily on personal preference and the logistics of your space, but my preferred method is to fold each piece if necessary and put the whole pattern in a large clear envelope (I use the 12×15 size). I then store all of those envelopes in a drawer. You could also stack these envelopes on shelves. Because the envelopes are plastic, they hold each pattern nicely and don’t tear or degrade. But there are countless ways to store patterns, so be sure to ask in your favorite sewing-related facebook groups and do some Google searching for other ideas!
And that’s it! Have more questions? Feel free to leave a comment below, email us, or check out the FAQ for more info!